Configuring Watchdoc® SkyPrint
Preamble
To configure Watchdoc SkyPrint®, you have a configuration wizzard.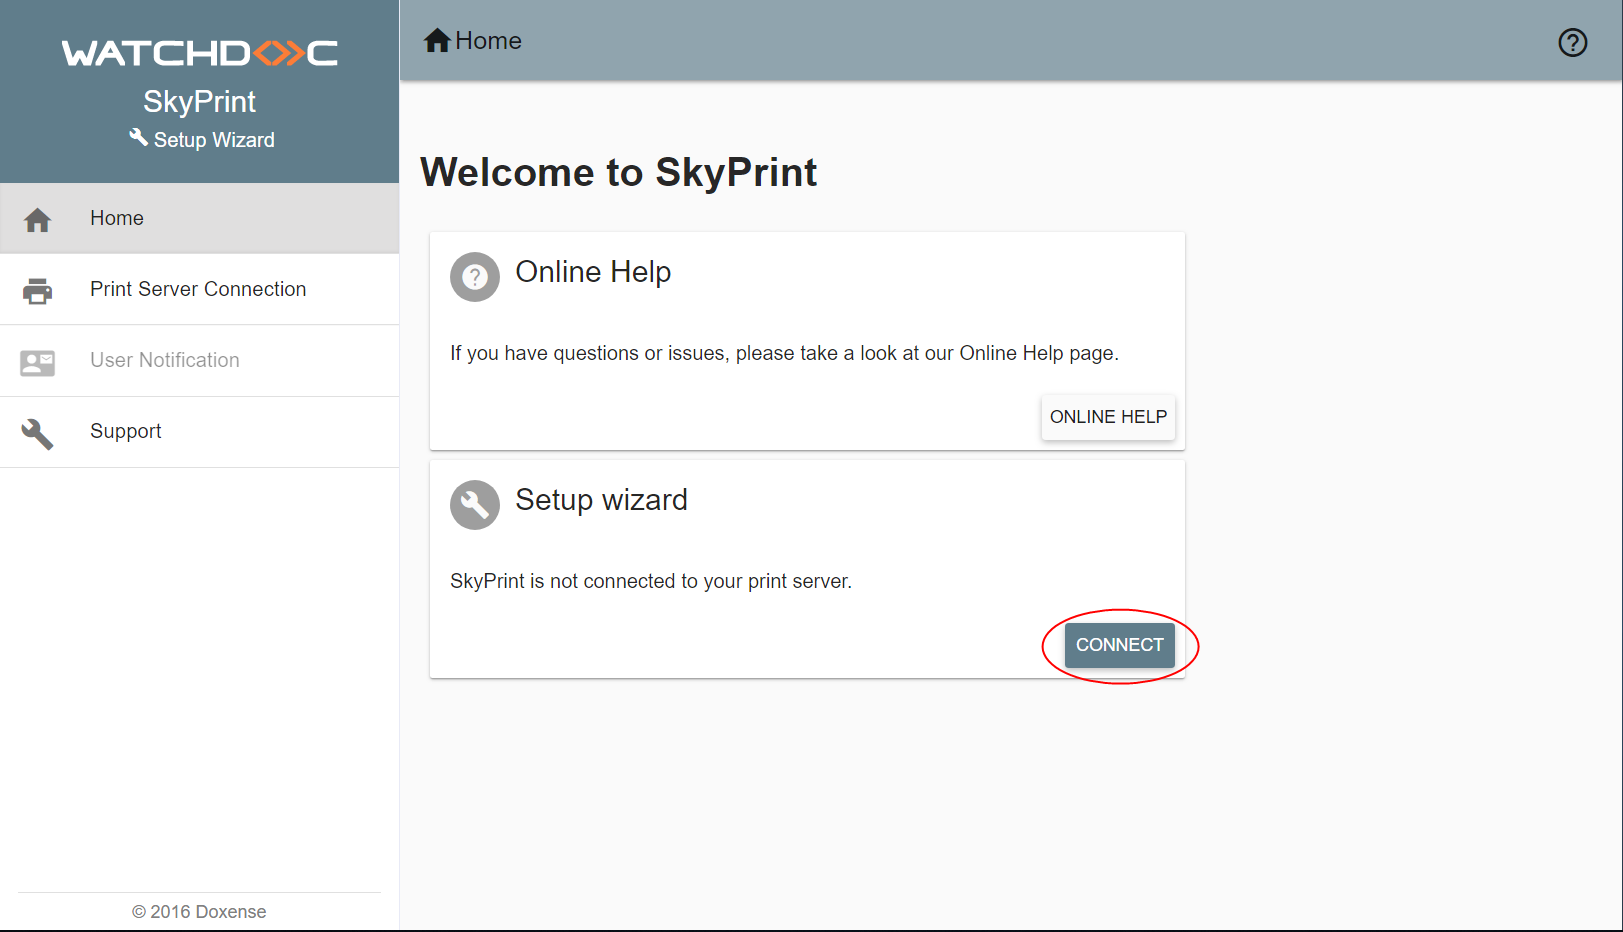
At the beginning of the configuration, the interface have 4 tabs:
-
Home: interface home page;
-
Print Server connection: gives access to configuration interfaces:
-
of the Watchdoc® Supervision Console (WSC),
-
of the print server,
-
of the targeted print devices.
-
-
Notifications: configuration of the server allowing the notification sending to the users;
-
Support: gives access to information relating to the tool and on-line help.
→ The number tabs increases as the settings are made. At the end of the configuration, the interface has 7 tabs.
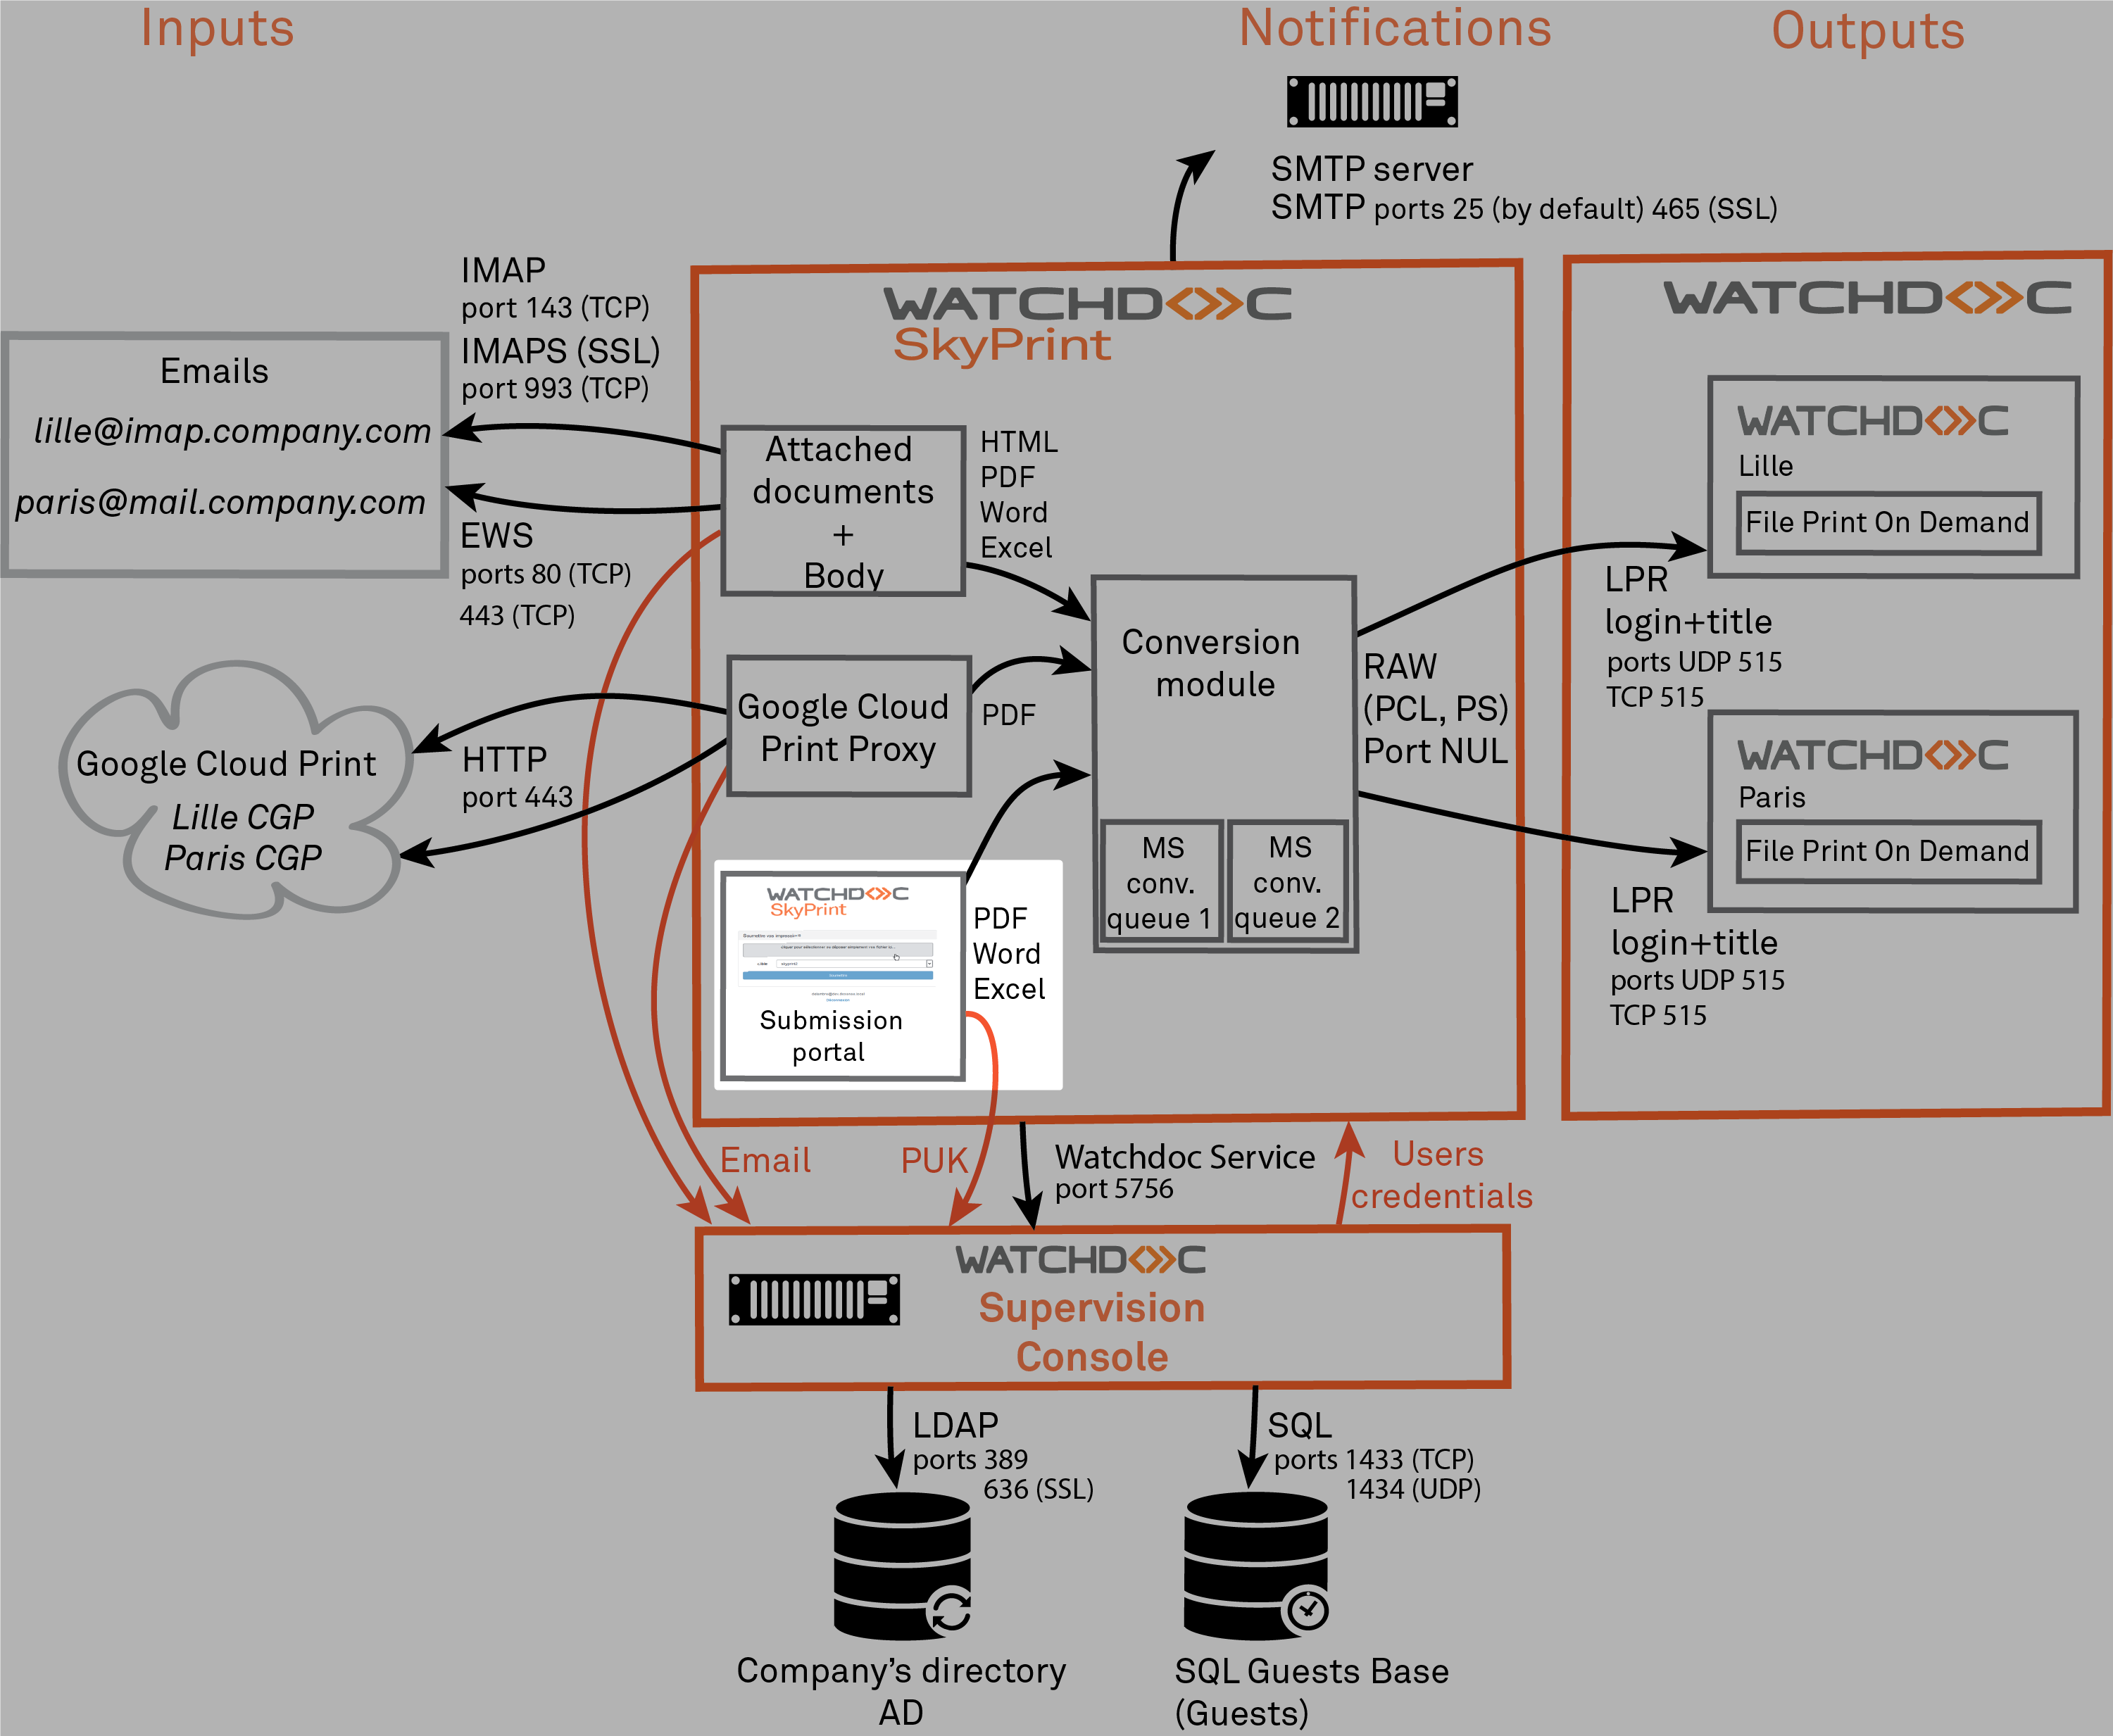
Configuring servers
Access the servers configuration interface
To access the servers configuration interface, click on the Connect button in the Setup wizard section of the home page:
You access the SkyPrint Supervision Console configuration interface (WSC server).
Configuring the supervision interface.
-
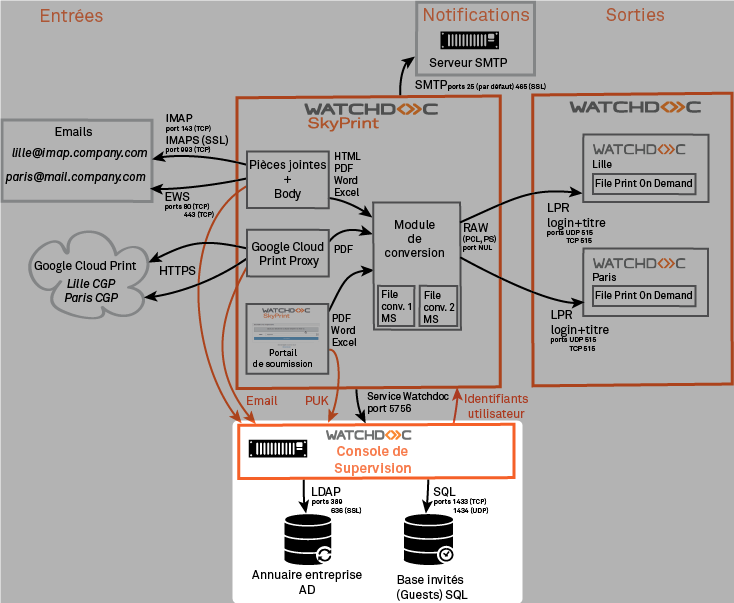
In this interface, you configure the access to the Watchdoc Supervision Console (WSC)® from which is managed users authentication and from which it's possible to givethem a login and a PUK code, after checking they are present in the company's directory or to register them in the guests database.
-
In this interface, fill the following fields:
-
(WSC) Supervision Console address: enter the IP address or the server name on which is installed WSC;
-
Username: username indicated in the Supervision Console REST API option;
-
Password: password of the REST API username.
-
-
Once data entered in the fields, click on the TEST button to check the connexion of Watchdoc® SkyPrint with Watchdoc®Supervision Console (WSC).
-
If the test is conclusive, click the SAVE button to validate the settings.
-
After validating the Watchdoc® Supervision Console settings, configure the Print Server.
Configuring the Print server
-
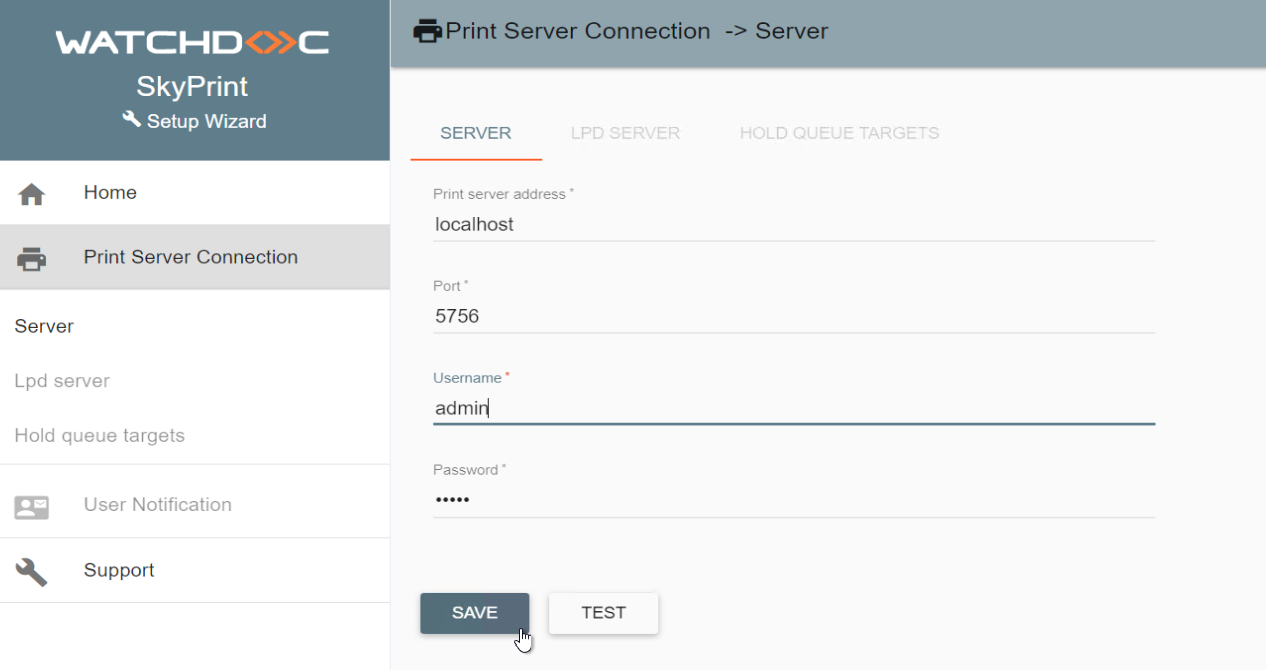
In this interface, you configure the access to the printing server and the conversion files toward which the print-jobs must be send via the LPD protocole:
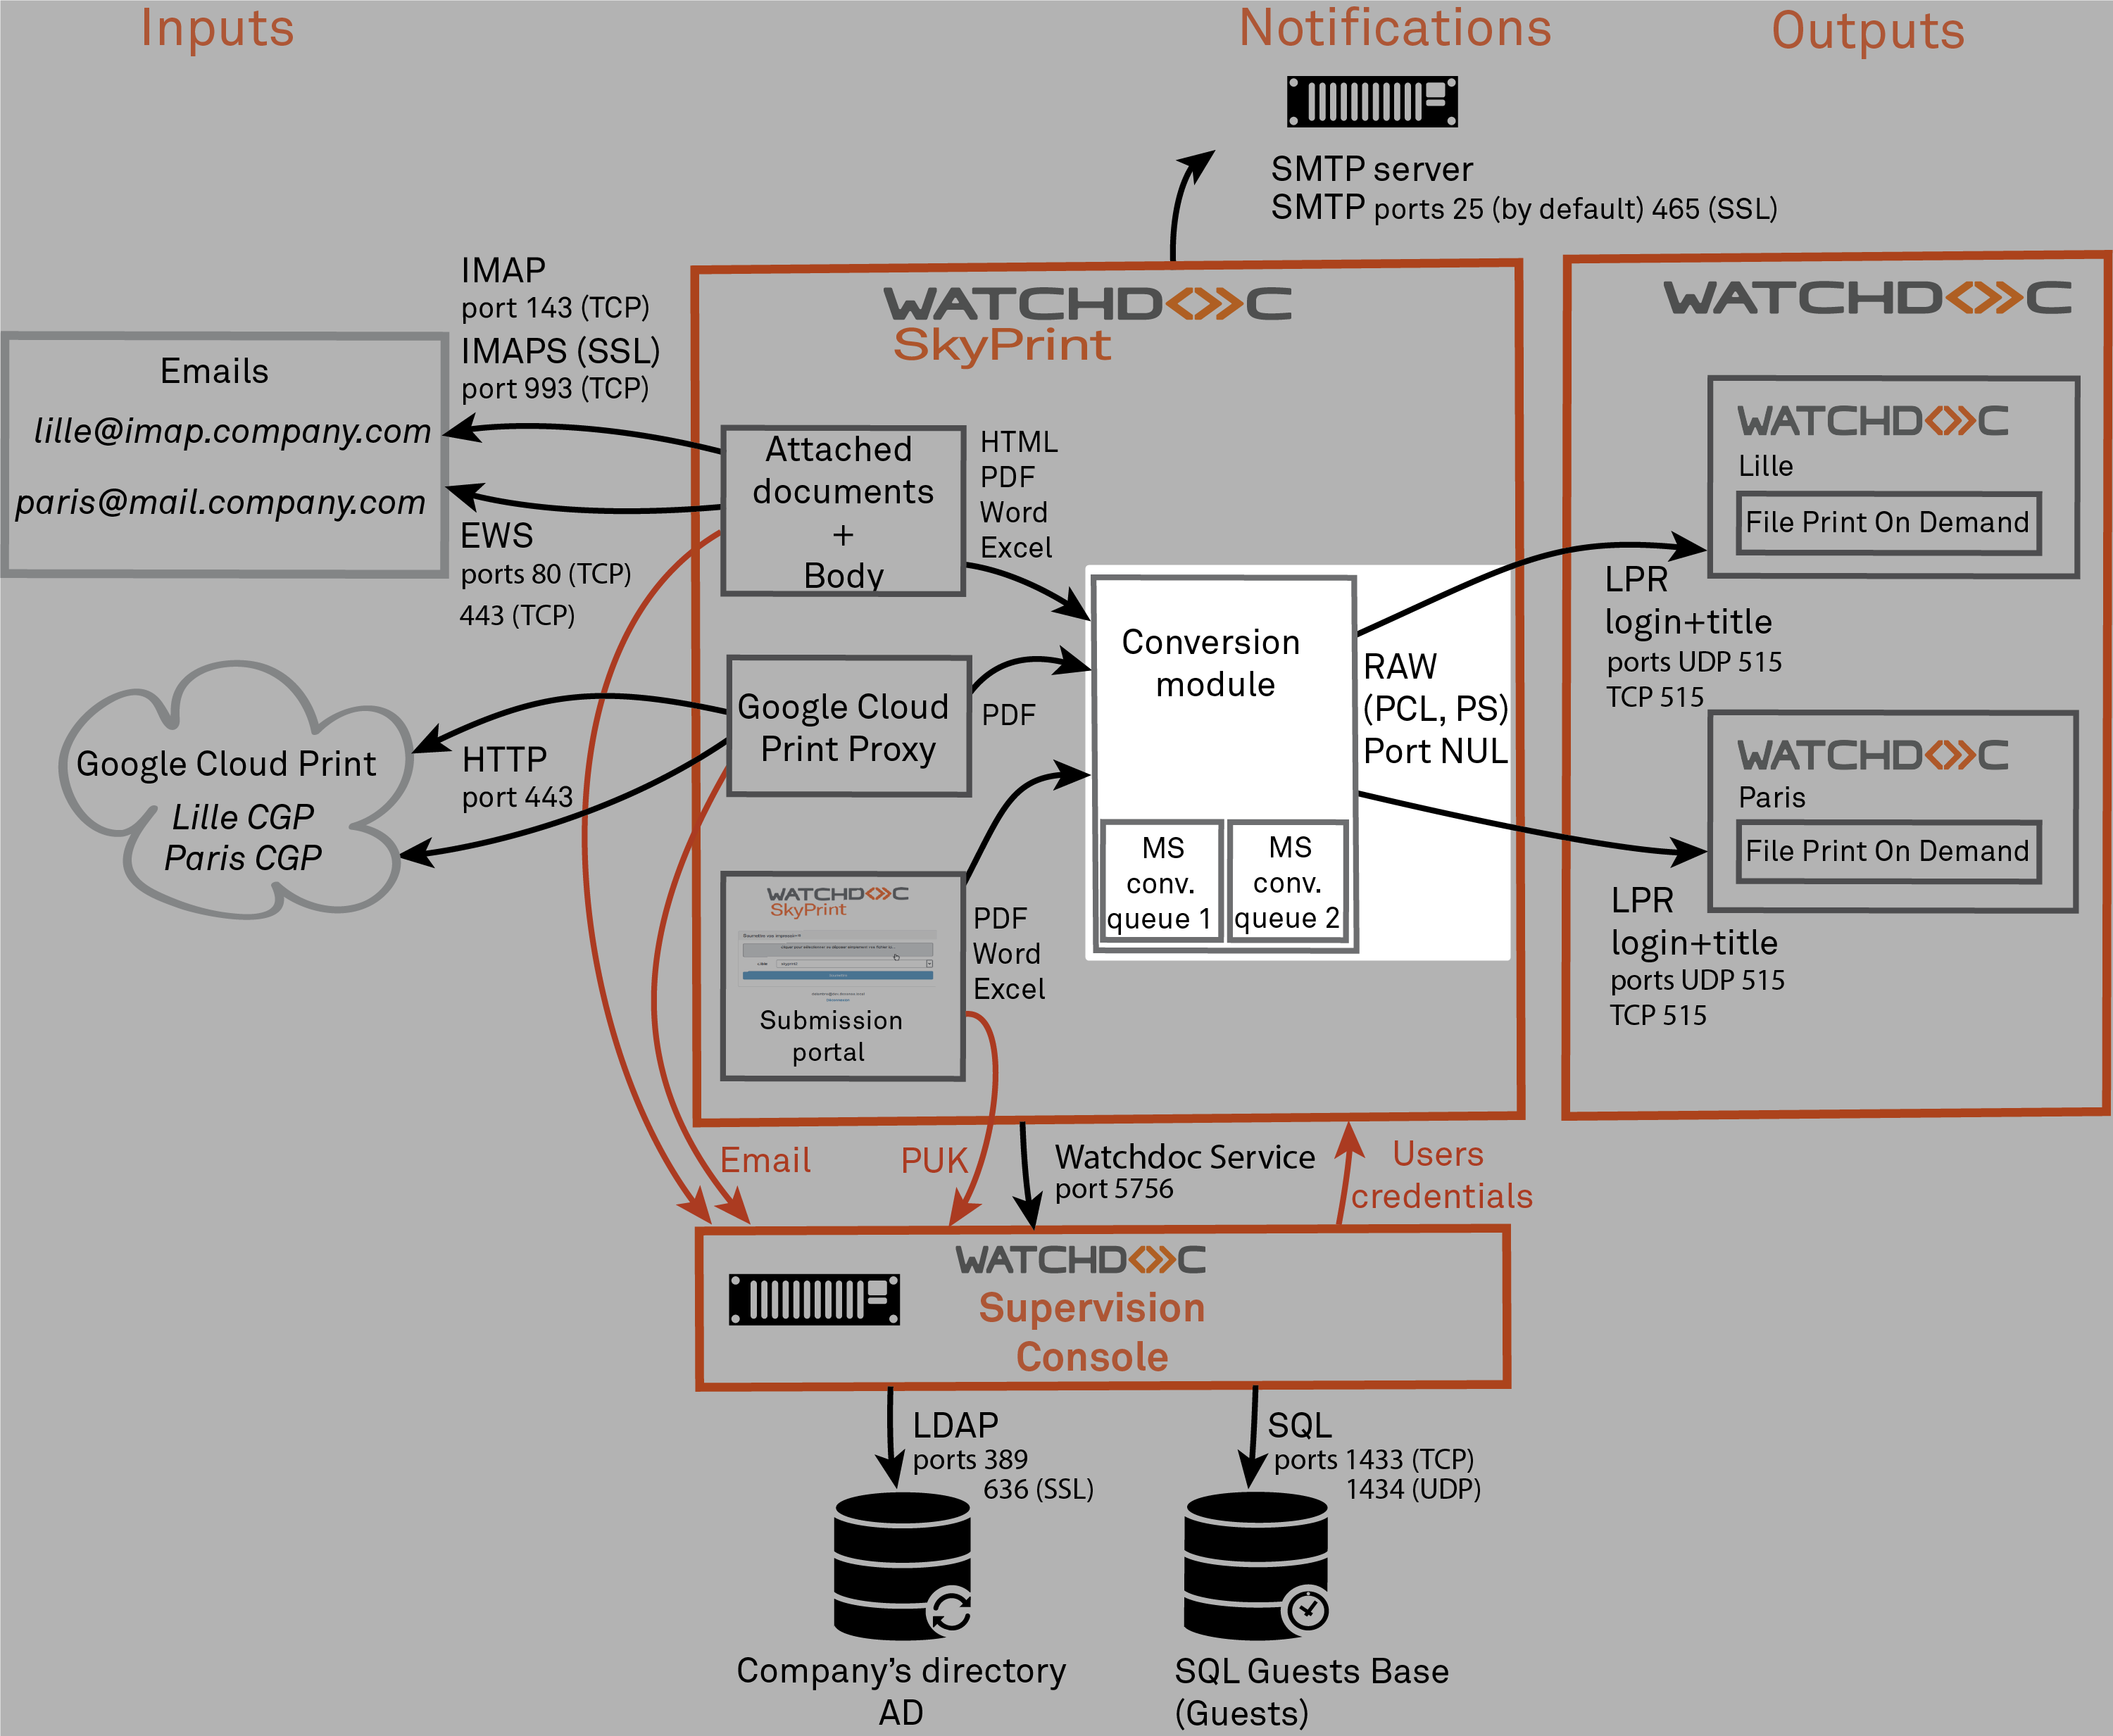
-
In the Print Server connection interface, LDP Server tab, fill the following fields:
-
LDP host: address (name, IP address) of the server on which Watchdoc® is installed;
-
Port: port number of the access to the Watchdoc® service (515 by default);
-
Default hold queue: name of the queue controlled by Watchdoc® that allows On demand printing. Select the queue in the displayed list.
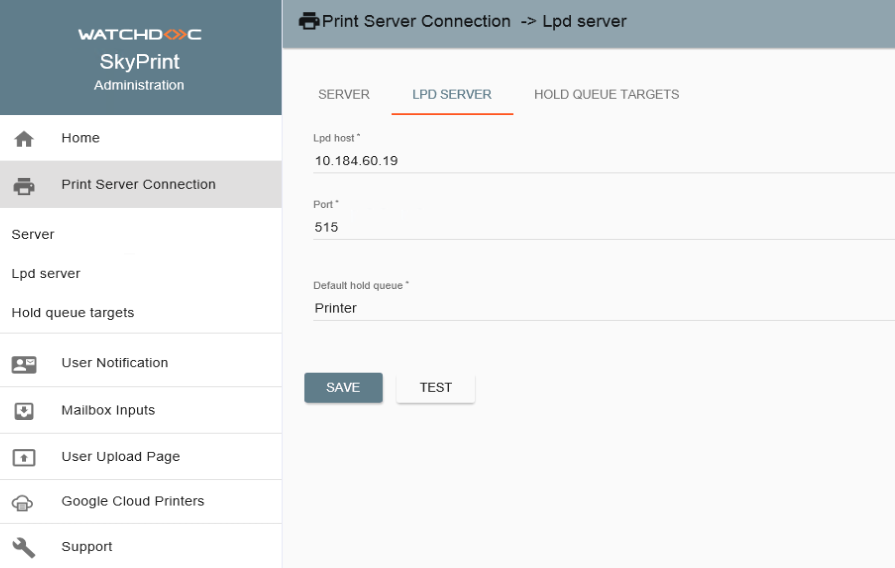
-
-
Once the data entered in fields, click on Test to check the connection between Watchdoc SkyPrint® LPD printing server;
-
If the test is conclusive, click on the Save button to save the settings:
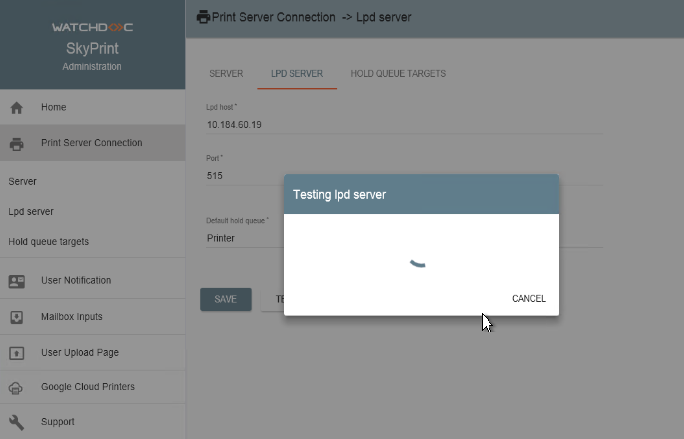
-
After saving the Supervision Console settings, configure Hold Queue Targets.
Configuring Hold Queue Targets
In this interface, configure the device (or devices) on which the print-jobs are send and the conversion settings which are applied. It's mandatory to configure at least one targer hold queue: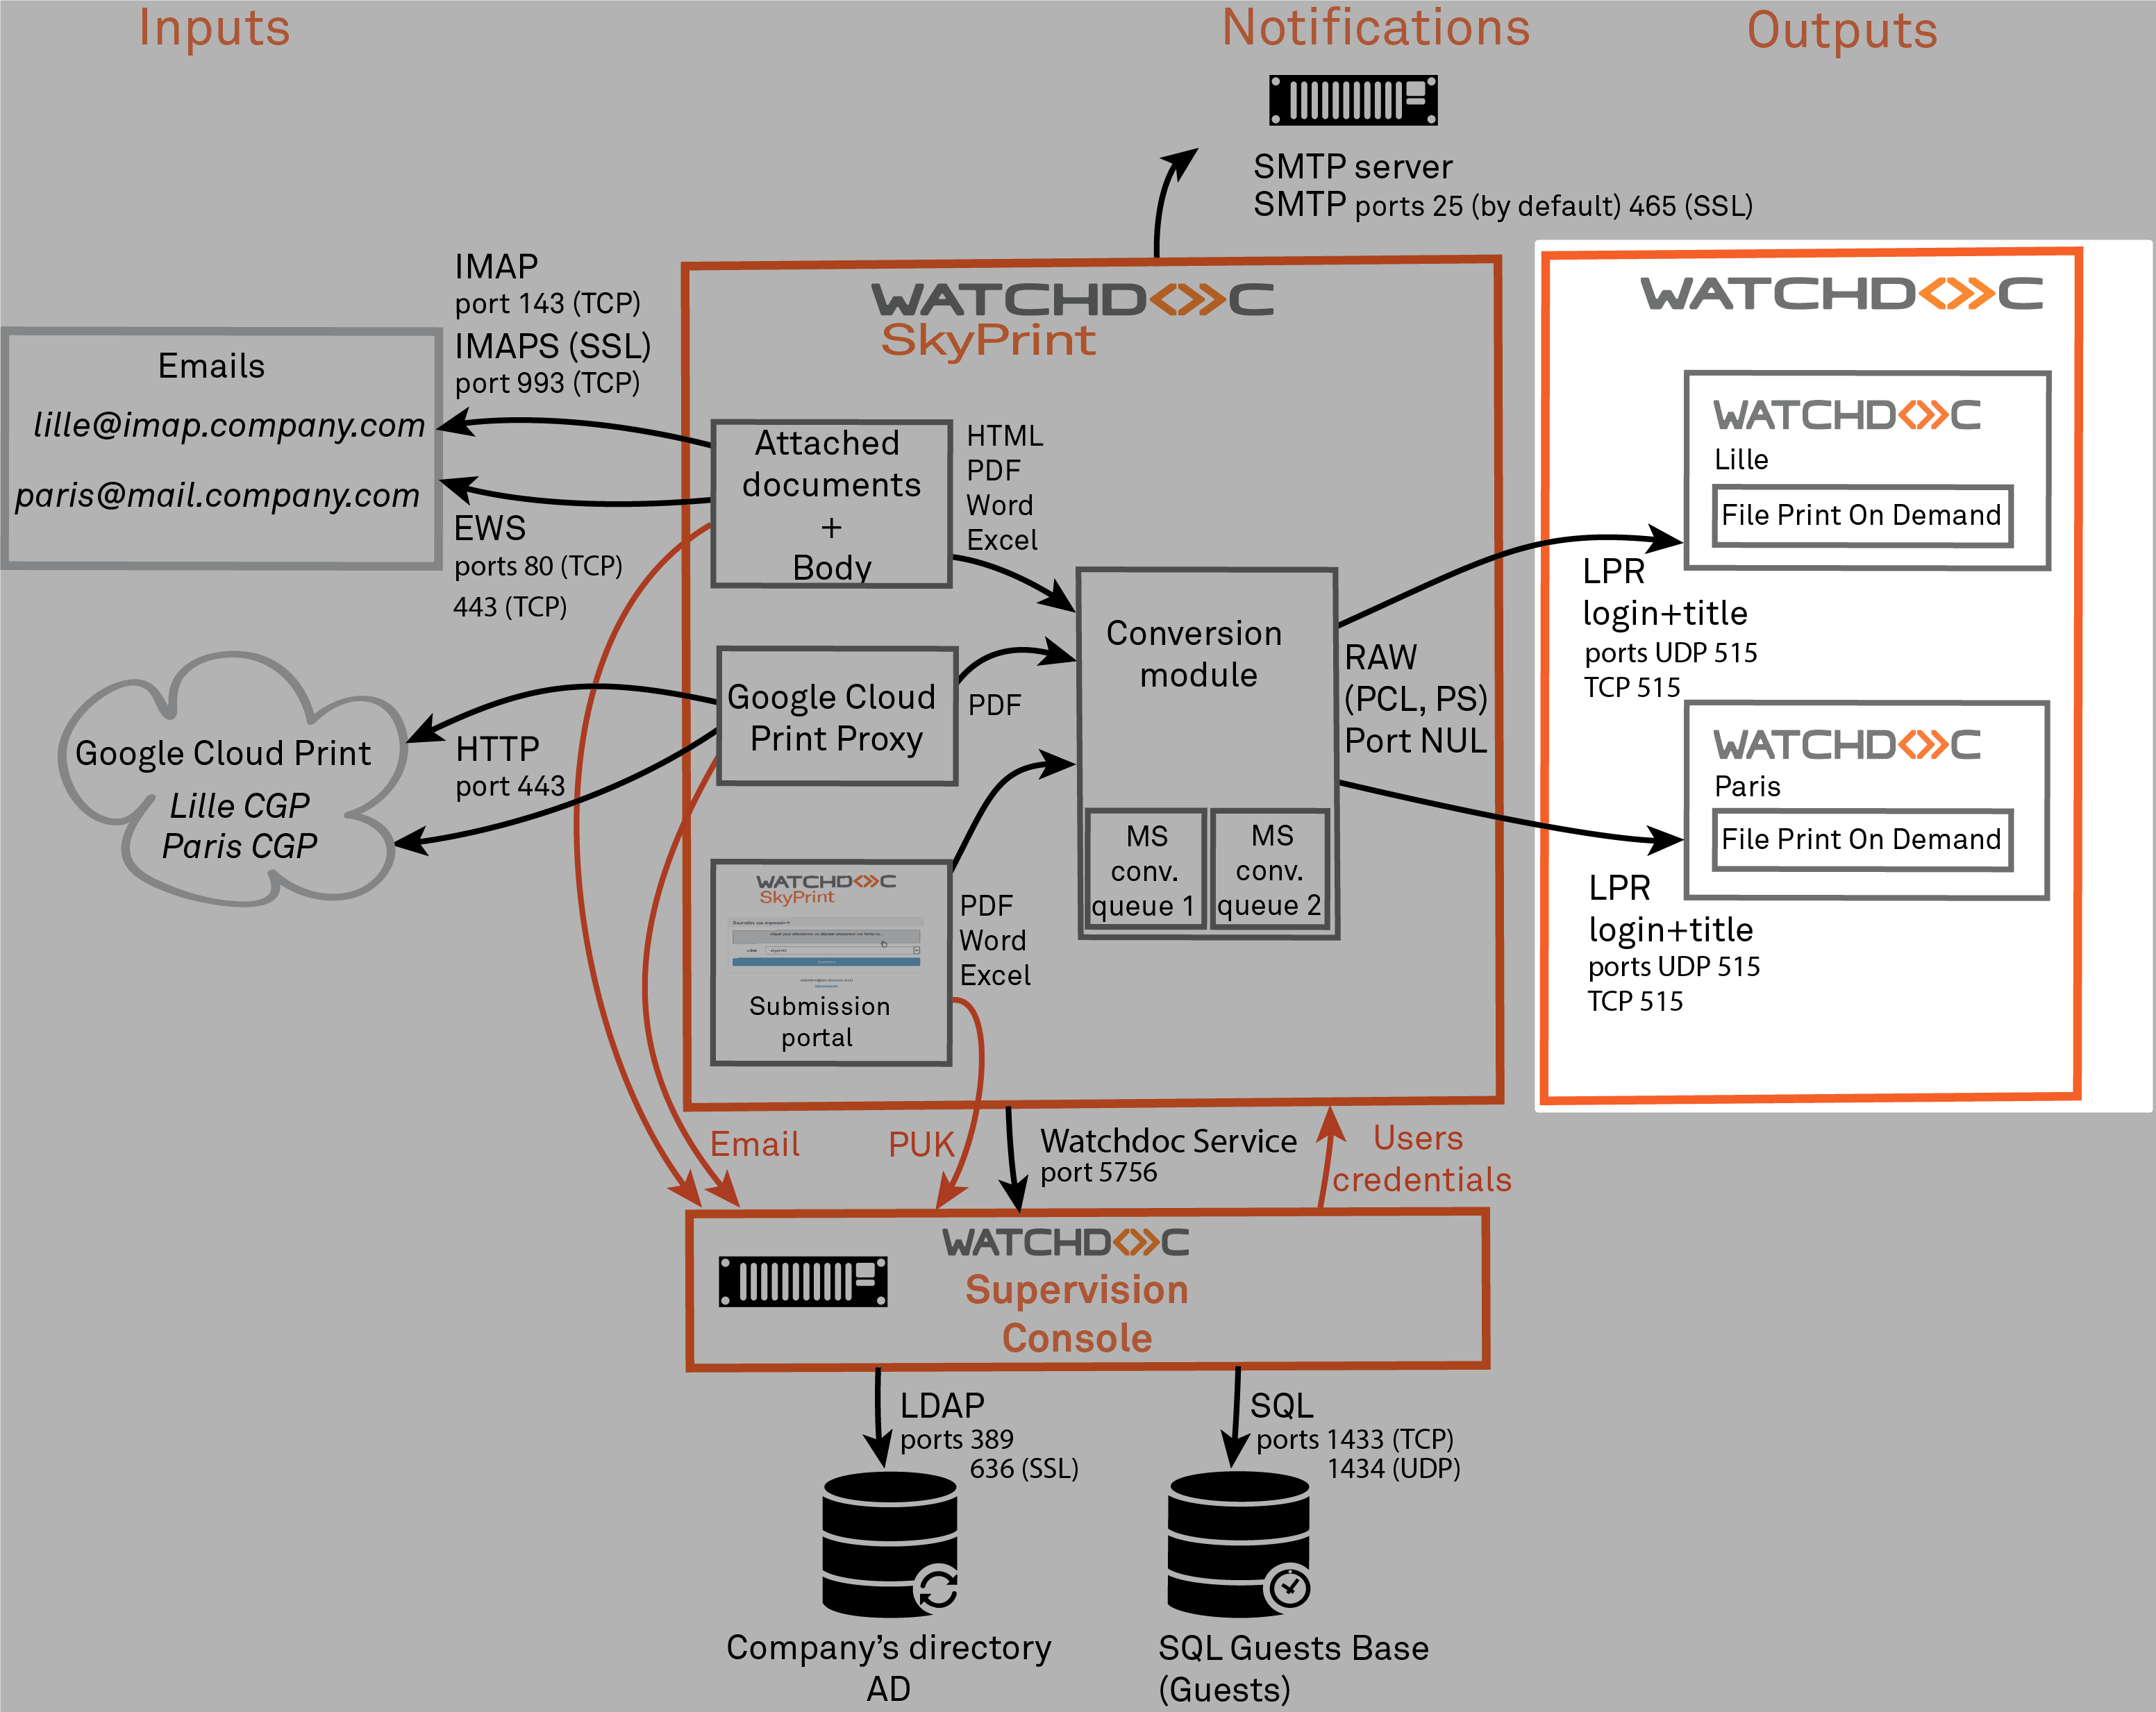
To configure the target hold queues:
-
In the Hold queue targets interface, click on the Add button:

-
In the New interface, complete the following fields:
-
Name: enter the hold queue target name;
-
Hold queue: in the list, select the device to which the print-jobs are to be sent;
-
Paper size: in the list, select the print format allowed by the hold queue target device;
-
Conversion queue: in this field, indicate the queue to which the print-jobs are to be sent.
-
Opt for Default hold queue: activate the button if you want to set this new device as the device by default;
-
Opt for Custom Lpd server (LPD): activate the button and enter information allowing to configure an other print server than the server previously configured.
-
-
Configuring User Notification
In this interface, you configure the service by which Watchdoc SkyPrint® sends users notifications informing them of the success or failure or their print-jobs.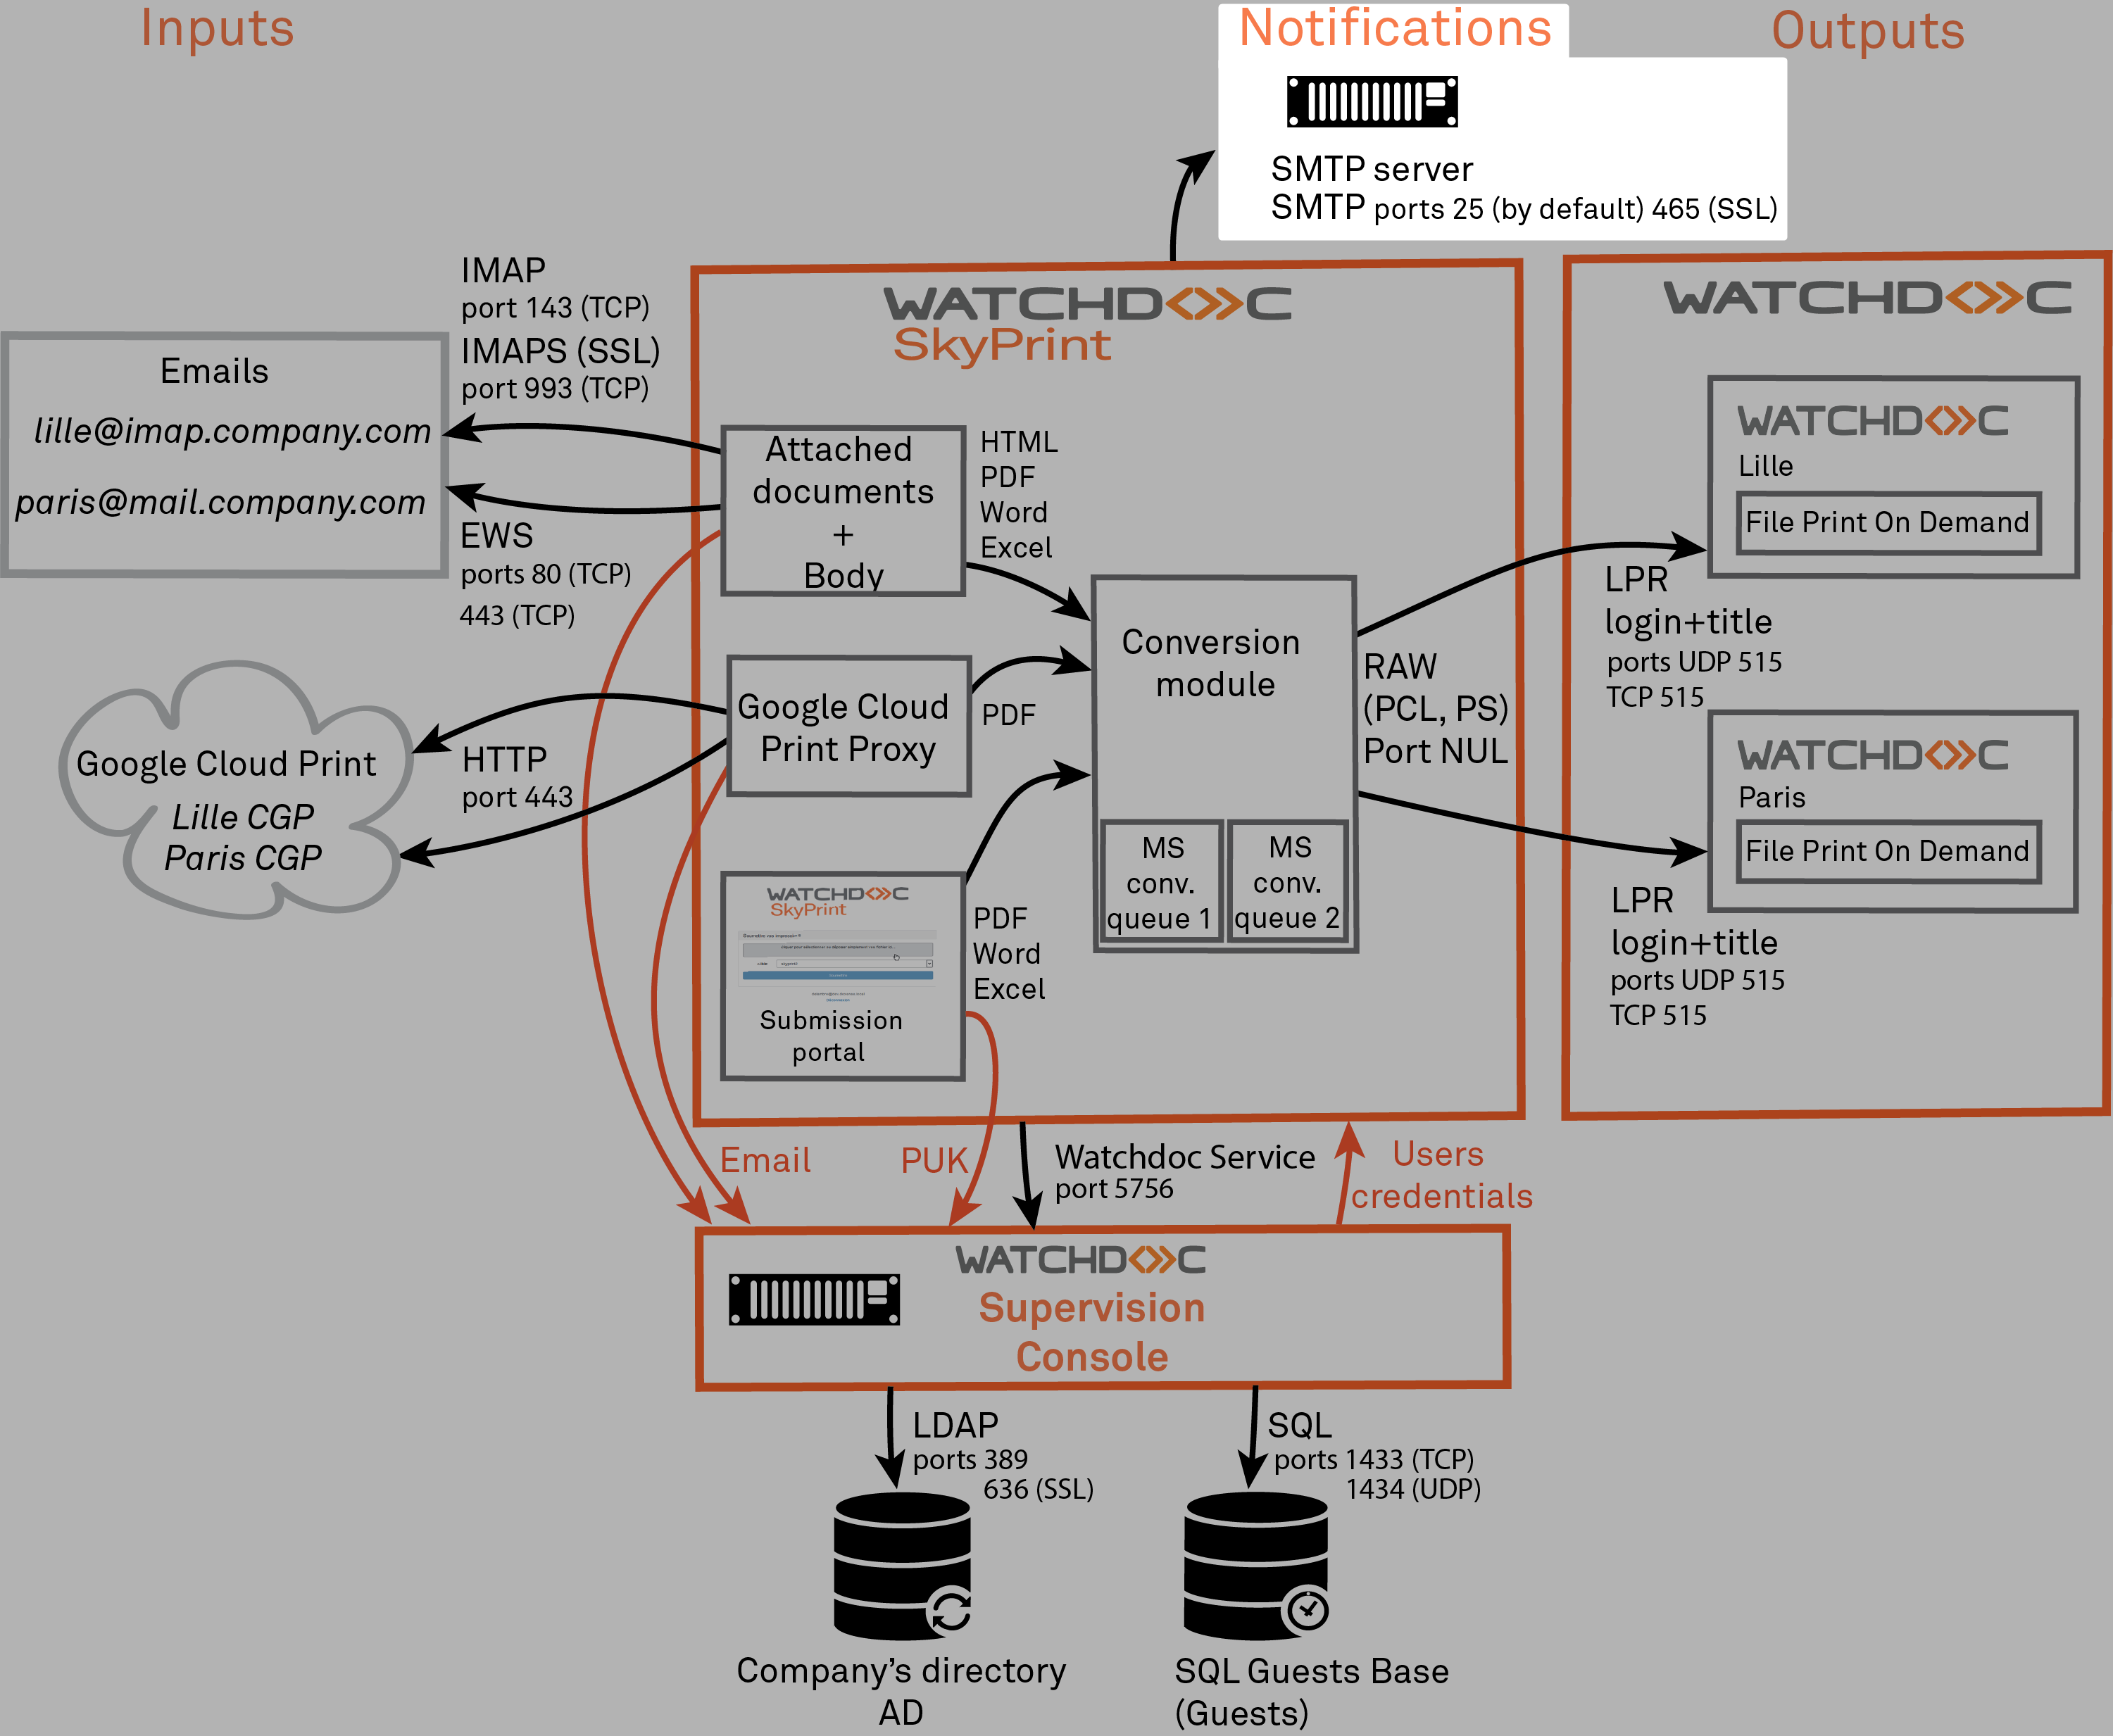
-
In the User Notification interface, enter the following settings:
-
Type : in the list, select the protocol used by the SMTP server to send emails (SMTP, SMTP SSL (SMTP securised) or SMTP StartTLS);
-
Host: indicate in this field the address of the server that sends emails (name or IP address);
-
Port: indicate the access port to the server (25 by default for SMTP, 587 by default for SMTPS);
-
Authentication: by default, no authentication is required, so that sending emails in anonymous mode.is possible. Activate the button if you want to ask for an authentication before sending emails and enter a sender account.
-
User: enter the name of the user sending emails;
-
Password: enter the password of the user sending emails;
-
Notification from address: enter the address for the sender that will appear in the email (for example SkyPrint@my-company.com);
-
Notification replay address: this address is different from the sender's address, an email address to which the recipient can reply (for example AdminSkyPrint@my-company.com).
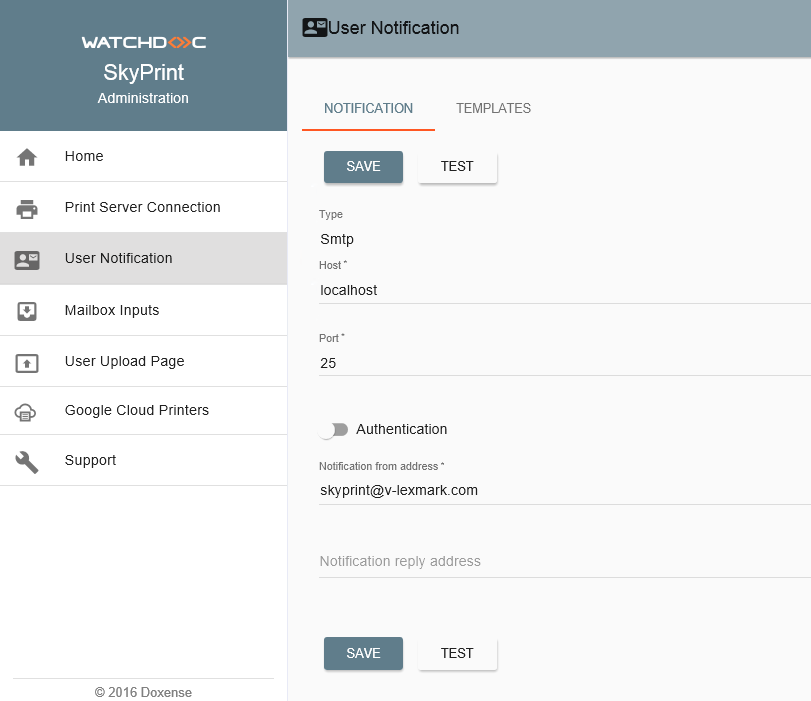
-
-
Click on Save to save the configuration.
-
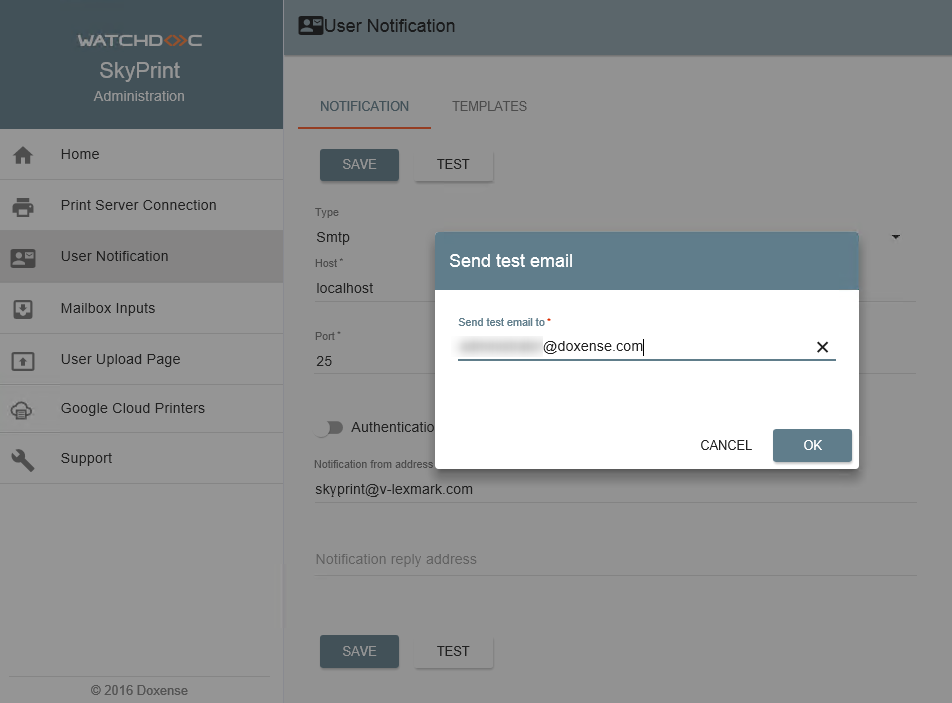
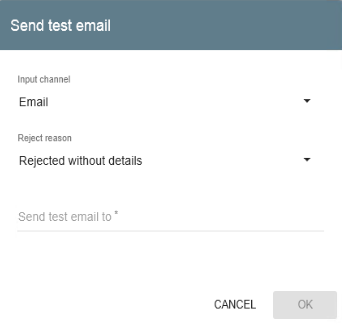
Click on the Test to check the configuration of the email sending server;
-
in the field Send test email to, enter a valid email address;
-
click on OK ;
-
check receipt of the message sent by the Watchdoc SkyPrint® SMTP server to the indicated email address.
Test the notification emails models
To check notifications sent to Watchdoc® SkyPrint users,you have several standard notifications you can test from the Templates interface.
To test notification emails:
-
in the events list, select the one for which you want to test a notification;
-
click on the Test button corresponding to the event:
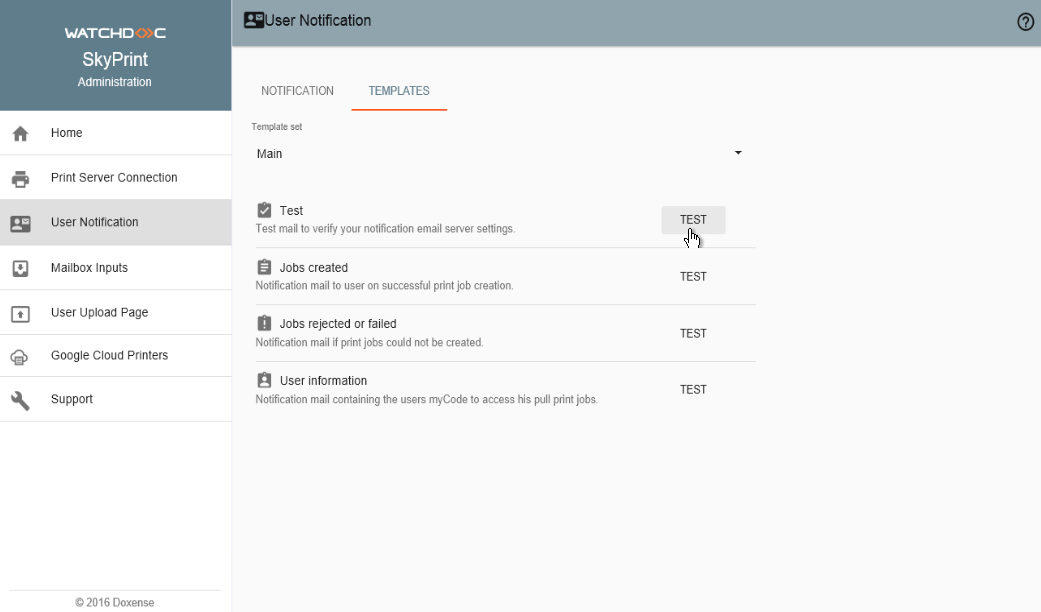
-
in the Specific local template list, select the template corresponding to one of the fourth languages of use you want to test;
-
in the field, enter the email address to which you want to send the test notification;
-
click on the OK button.
-
Check the receipt of the test email in the email box indicated.
Configuring Mailbox Inputs
In this interface, you configure the mailbox from which Watchdoc SkyPrint® sends notifications to users: registration confirmation, printing confirmation of the print-jobs, failure of the printing, etc.
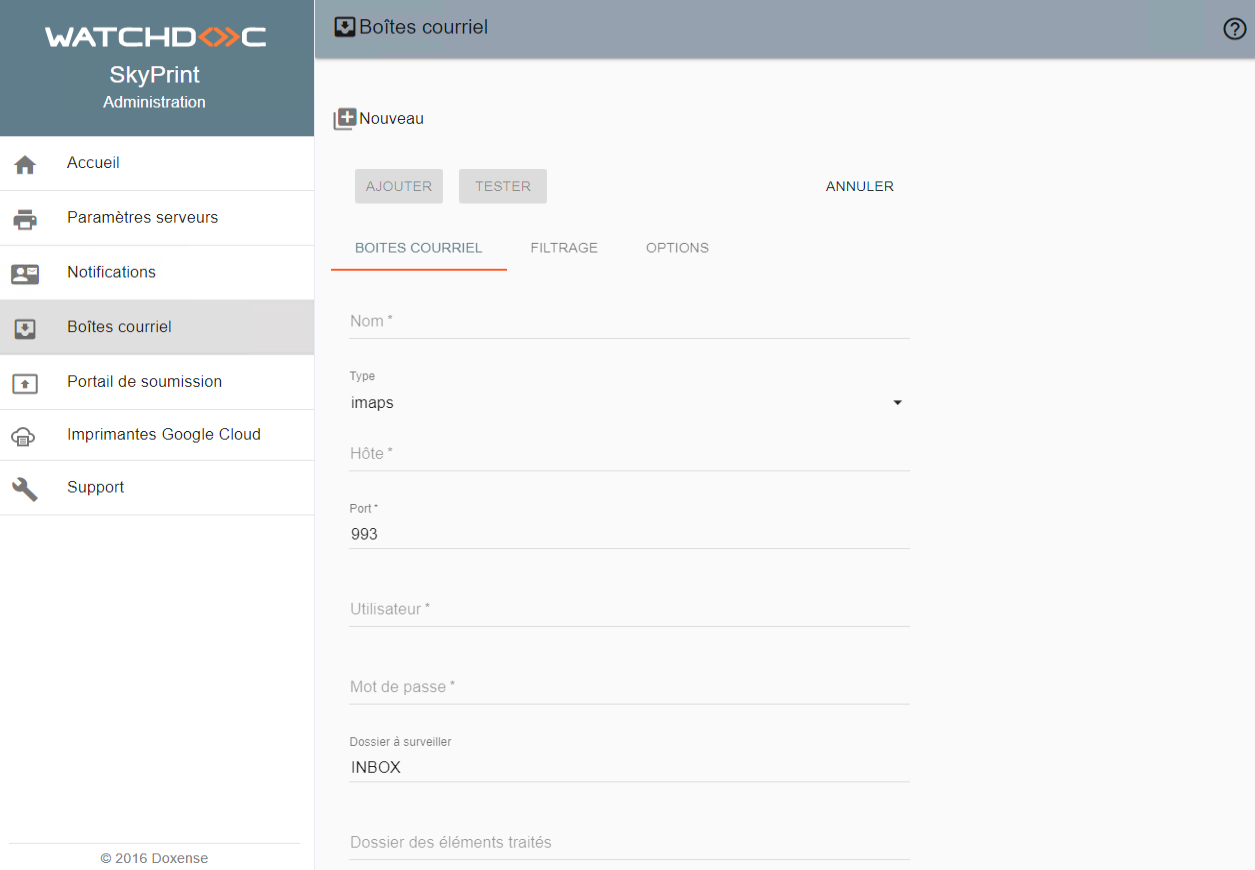
To configure the mailbox inputs, complete the following fields:
-
click on the Mailbox tab and fill the following fiels:
-
Name: e-mail address to which the print requests mails must be sent (for example: print@company-name.com) ;
-
Type: select in the list the reception protocol used (IMAPS, IMAP, IMAP with start TLS or EWS);
-
Host: server address on which the mailbox is hosted;
-
Port: access port to the mailbox;
-
Protocol: reception protocol used (IMAPS or IMAP);
-
user: name of a user or the email box;
-
Password: password or an user of the email box.
-
Inbox folder: indicate the folder of the mailbox in which the print requests are sent;
-
Move processed messages to mailbox folder: folder in which are sent the processed mails:
-
-
click on the
 button to validate the mailbox settings;.
 -
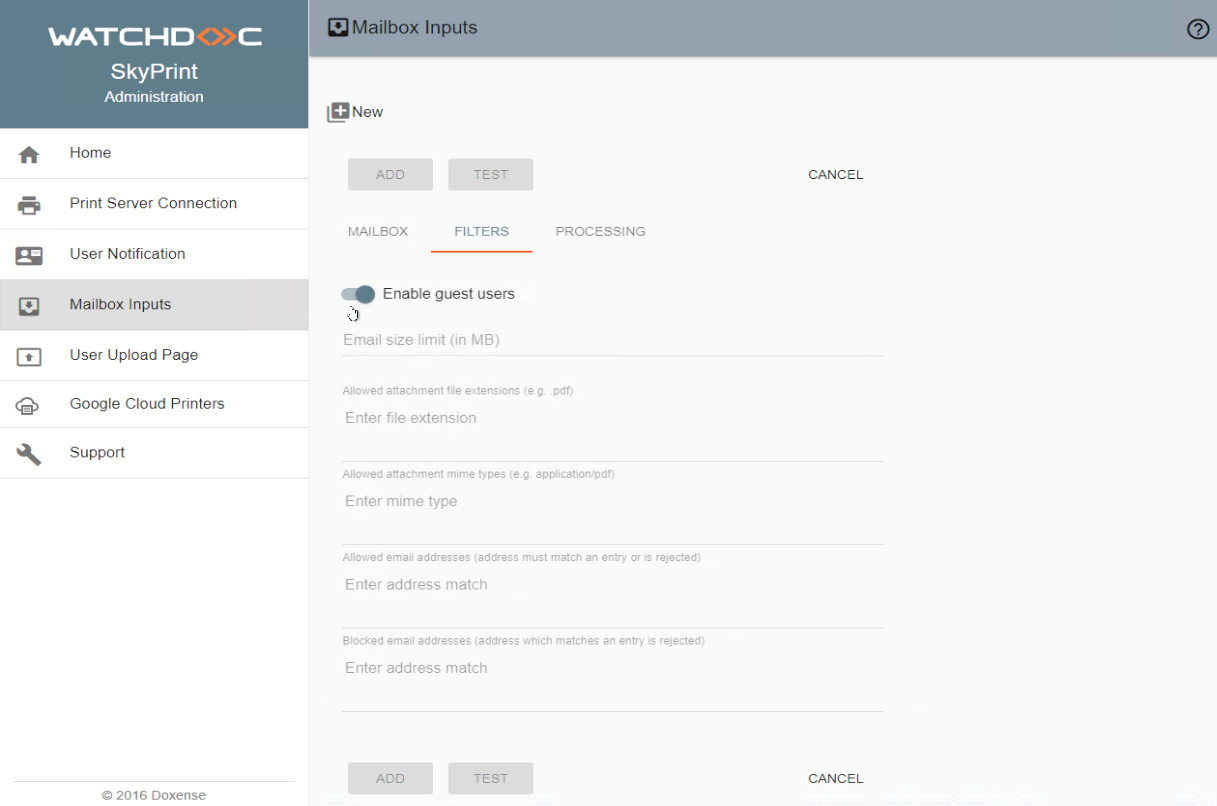
click on the Filters tab to complete the configuration thank to the filters:
-
Allowing the guests: press the button to allow users who are not registered in the directory to use Watchdoc SkyPrint®: when activated,the option saves the user in the Watchdoc® "Guests" database: the user can then use Watchdoc SkyPrint® within a predefined time;
-
Email size limit: indicates, in Mb, the email size limit of the allowed emails;
-
Attached files extensions: enter the list of file format extensions authorized for printing;
-
Enable the guests: press the button to enable the unregistered users to use Watchdoc SkyPrint;
-
MIME type: indicate the pictures MIME type of the pictures included in the message sent to the user. Use the comma as a separator;
-
Allowed addresses: enter the list or the senders enabled to send messages (use the comma as a separator between two addresses);
-
messages do. Utilisez la virgule comme séparateur entre deux adresses ;
-
Refused addresses: enter the address list of senders whose messages are to be filtered. Use the comma as a separator between two addresses;
-
-
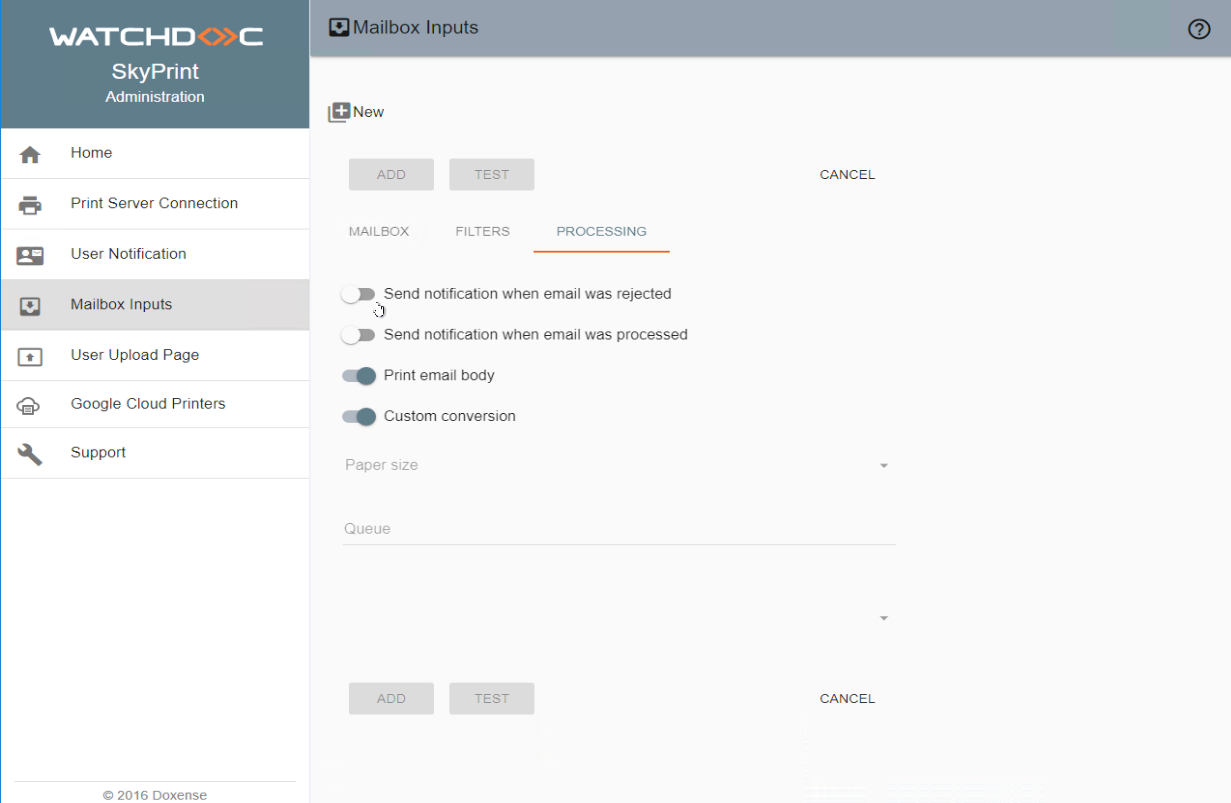
click on the Processing to complete the settings:
-
Send notification when email was rejected: tick the box to send a refusal email to the user when printing is refused;
-
Send notirication when email was processed: tick the box to send a confirmation email to the user once Watchdoc SkyPrint® has moved the converted documents in the print queue;
-
Print email body: press the button to allow the printing of the email body;
-
Custom conversion: press the button to configure a customized conversion. In this case, it is necessary to precise the nature of the conversion.
-
Configuring notifications with Office365
Documentations to configure SkyPrint with Office 365 :- Configuring a Mobile Print Inbox for outlook.office365.com with OAuth2 Authentication
- How to configure an Azure App to access an outlook365.com account with Oauth2
Configure the User Upload Page
In this interface, you configure the portal from which users will be able to submit their print-jobs to Watchdoc® SkyPrint:
To configure the submission portal:
Activate the submission web portal: press the button to make the interface accessible to users;
Enable upload user interface: : press the button to allow the saving of the users in the Watchdoc ®guests database; If you dont allow the guest saving, only the users already presents in the directory will be allowed to print thanks to SkyPrint®;
Upload file size limit (in MB) indicate, in the maximum size of the files whose printing is authorized
Max files per upload indicate the maximum number of files that a user is allowed to submit;
Allowed attachement file extensions in the list, keep the extensions of the formats allowed and delete the extension that are not allowed
Hold queue targets enabled for uploadin the input field, enter the name of the hold queue targetsto which the user can send his print jobs. This queues previously configured will be displayed to users in the submission portal. It's possible to offer several targets queues.
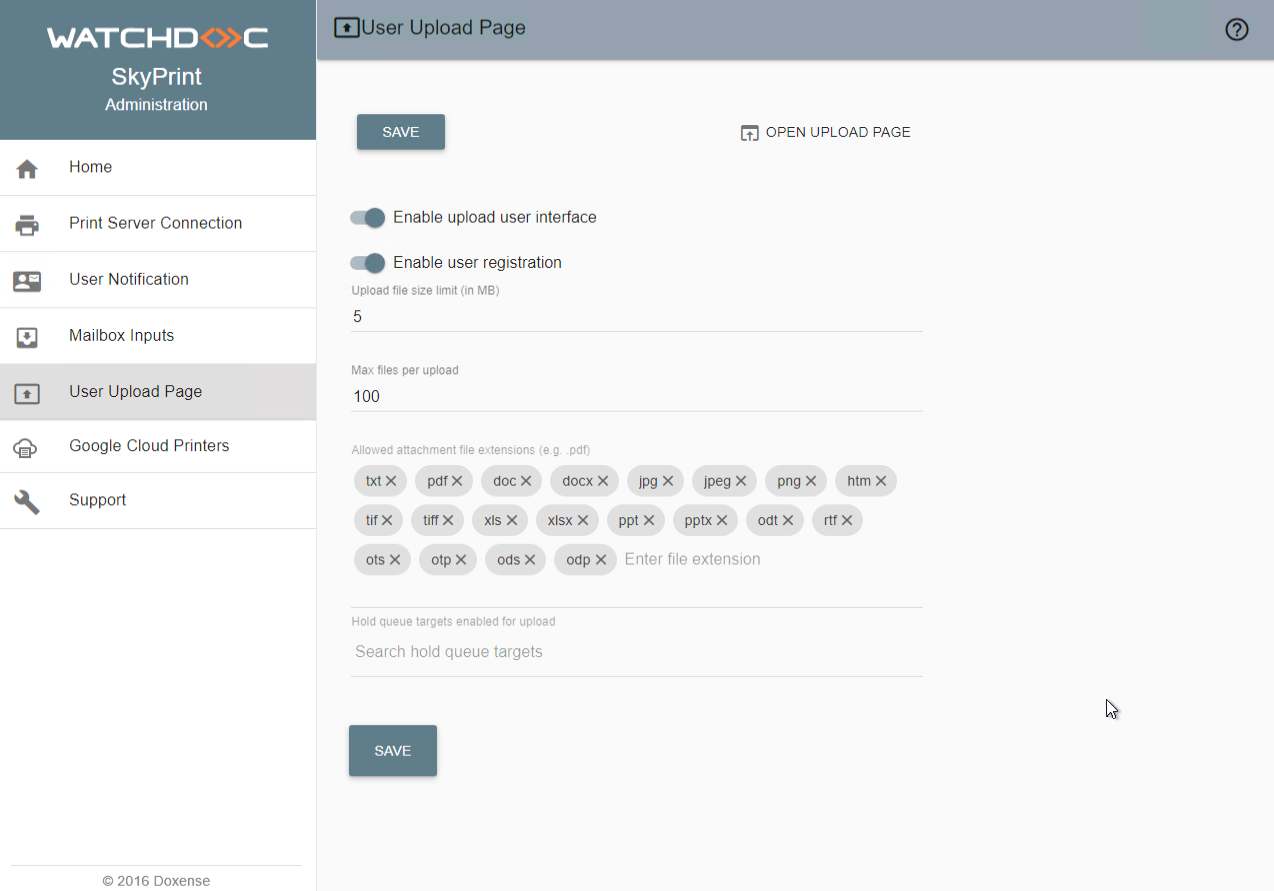
click on the
 button to obtain a preview of the user submission portal as it is configured
click on the
 button to validate the settings of the submission portal.