Initial service configuration
(Access : Main Menu > Advanced Configuration > Initial service configuration)
Configuring Watchdoc Service section
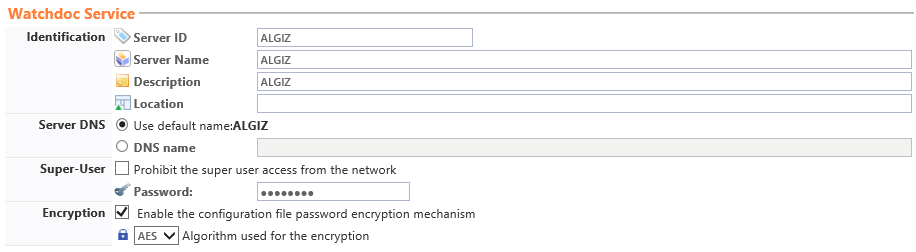
Identification subsection
-
Server ID: specify the DNS name or the IP address of the server where the Watchdoc kernel is hosted;
-
Server name: specify the friendly server name wich will be display in the interfaces and in the statistical reports. For example: "Print server 2th floor London", "Print server Site B, Sales Service",...
-
Description: if necessary, complete the name with more information about the server.
-
Location: state the precise location of the device assigned to the queue. This information facilitates the use of the queue.
Server DNS subsection
-
Click on one of the radio buttons to set the name assigned to the server. This name will be used in the access path to the administration website or to the user website.
-
Default name: the name defined in the previous section will be assigned to the Watchdoc server;
-
DNS Name:
-
DNS name: If the server name changes, enter the DNS name assigned to the print server. This name is used in emails possibly sent to users of the service.
Super User subsection
The Super-User is an administrator with permission to access the administration interface in maintenance mode and consequently allowed to change the entire Watchdoc configuration.
In this section you can:
-
Prohibit the super user access from the network: Tick the box if, as a precaution, you wish to reserve access to the administration site from the Print Server only, i.e. from url "http://localhost/Watchdoc/admin/".
-
Password: This is the password that allows access to the administration interface as the Super-User. By default, the password used is the one defined when Watchdoc was installed. If you wish to change it, enter a new password into this field.
Encryption subsection
The Encryption section new in version 5.2, allows to encrypt the passwords in the Watchdoc solution configuration file (config.xml). This option thus offers enable the tool's securisation by making unreadable the administration passwords.
In this section :
-
Enable Encryption: Check the box if you want to encrypt the passwords of the configuration file using the 258-bit AES algorithm (by default).
Configuring the Organisation section
Use this section to set the times and the days when the Watchdoc service can operate: :
-
Working Hours: enter the working hours for the organisation that uses Watchdoc e.g. "8:30-18:30". If the organization is always open, enter "0-24". This criteria is used as an indication only, in the "During working hours" filter and in the business reports.
-
Week-end: From the list, choose the days when the organization that uses Watchdoc does not work. Select No day off if the organization never closes. This criteria is used as an indication only, in the "During working hours" filter and in the business reports..
Configuring the Contact section

From this section, state the contact information for the Watchdoc contact to be reached should an issue arise during printing. This data appears in the e-mails or notifications sent to administrators and users:
-
Name: Enter the contact name;
-
E-Mail: Enter the contact's e-mail address.
-
Phone: Enter the contact's phone number.
-
Message:Enter any additional information that may help users (technical support working hours or the address of a website where users may find user documentation on the Watchdoc service, for example)..
Configuring the Spool manager section
Use this section to specify the parameters used by the administrator interface to communicate with the Watchdoc kernel.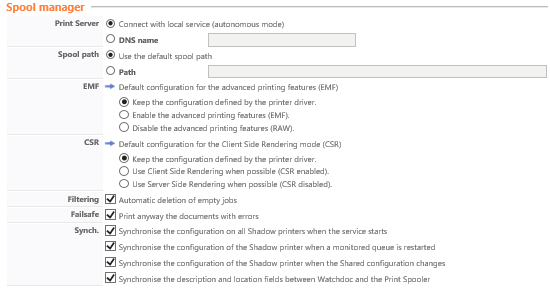
Print server subsection
Use this subsection to specify how the server will work:
-
Connect with local service: Choose this button if Watchdoc is installed in standalone mode (see Installation Manual, Installation and configuration requirements). If Watchdoc is installed in Remote or Cluster mode, untick the box and enter the DNS name of the print server.
-
DNS Name: if Watchdoc is installed in Remote or Cluster mode, enter the DNS name for the Print Server that the Watchdoc kernel is installed on (see Installation Manual, Installation and configuration requirements).
Spool directory subsection
Use this section to specify the folder where the Spools![]() Waiting queue before sending to the peripheral. The word 'spool' originally stands for 'simultaneous processing operations on line'.
The print spool is the output file sent to the printing device. It contains all the commands the printer needs to execute in order to print one or more documents. are saved.
Waiting queue before sending to the peripheral. The word 'spool' originally stands for 'simultaneous processing operations on line'.
The print spool is the output file sent to the printing device. It contains all the commands the printer needs to execute in order to print one or more documents. are saved.
-
Use the default spool path:Choose this button to let Watchdoc automatically detect where the spool files are saved (files with .shd and .spl extensions).
-
Path:: Opt for this choice if you do not want to use the default folder and specify the access path to the folder where the spool files are saved.
EMF subsection
From this section, you can enable or disable the advanced print functions (EMF![]() Enhanced Metafile (or EMF) is a digital image format for Microsoft Windows systems and some printer drivers. It is an improvement of the WMF (Windows Metafile) image file with data encoded in 32 bits for improved quality.) for MS Windows®.
Enhanced Metafile (or EMF) is a digital image format for Microsoft Windows systems and some printer drivers. It is an improvement of the WMF (Windows Metafile) image file with data encoded in 32 bits for improved quality.) for MS Windows®.
In the initial configuration, we recommend that you retain the default settings.
CSR subsection
Enable or disable the Client Side Rendring (CSR) mode.
In the initial configuration, we recommend that you retain the default settings. .
Filtering subsection.
Automatic deletion of empty jobs: Tick the box to let Watchdoc automatically delete print jobs that do not comprise any data.
SHD SHD files belong mainly to Microsoft's Print Spooler.
An SHD file is a phantom print job containing header information about a print job launched by the Print Spooler service on the Windows operating system. The information stored in an SHD file includes a copy of the print job parameters stored in the actual spool document (SPL file).
(source : https://filext.com/) subsection
SHD files belong mainly to Microsoft's Print Spooler.
An SHD file is a phantom print job containing header information about a print job launched by the Print Spooler service on the Windows operating system. The information stored in an SHD file includes a copy of the print job parameters stored in the actual spool document (SPL file).
(source : https://filext.com/) subsection
Parameter SHD. Enable or disable the SHD handler. The SHD handler is used to establish the link between the print job ID announced by MS Windows to Watchdoc and the spool file present in the file pool. It is now deactivated by default, as it is rarely used when the file pool is activated and cannot be deactivated.
Failsafe subsection
Print anyway the documents with errors: This box is ticked by default and lets Watchdoc print all print jobs, even where the spool files have errors that inhibit interpreting the metadata.
Synch. subsection
Keep the following boxes ticked by default:
-
Synchronise the configuration of the Shadow printer when a monitored queue is restarted.
-
Synchronise the configuration of the Shadow printer when the Shared configuration changes.
-
Synchronise the Shadow printer when the shared configuration is modified.
-
Synchronise the description and location fields between Watchdoc and the Print Spooler.
Click on Next to confirm the configuration.