Domains - Installation procedure
Steps
To set up a domain consisting of a master server and other servers:
-
Install Watchdoc on the master server
-
Designate the server as the master to trigger domain creation
-
Register the other servers in the domain
-
Configure the IIS servers in the domain.
You can complete this installation by enabling centralized configuration:
-
Enable centralized configuration
-
Enable synchronization mode
Access the Domain management interface
-
From the administration interface Main Menu, Configuration section, click on Advanced Configuration;
-
in the [Server_Name]>Advanced_Configuration interface, click on Domain management:
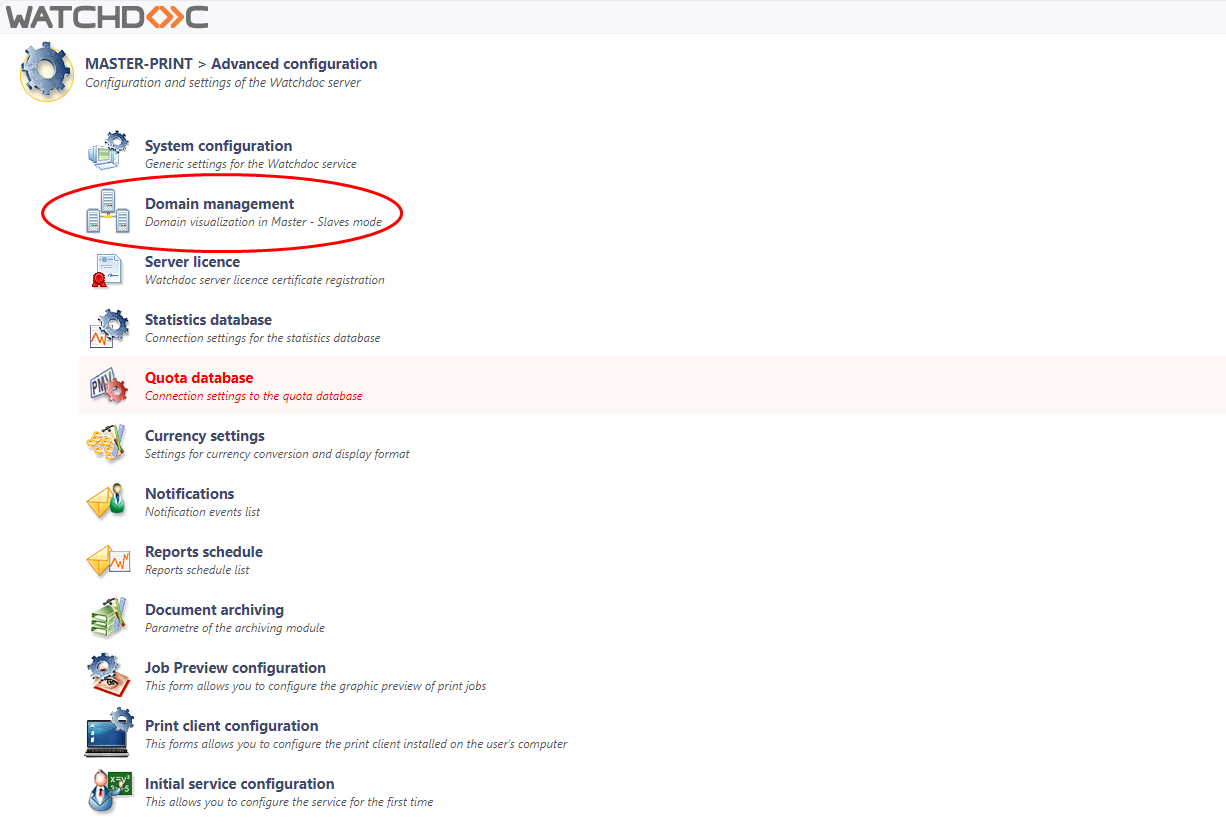
èyou will access the Watchdoc Domain Management interface.
Some of the information that appears here is the same information that was entered when Watchdoc was installed, in the Initial Service Configuration interface.
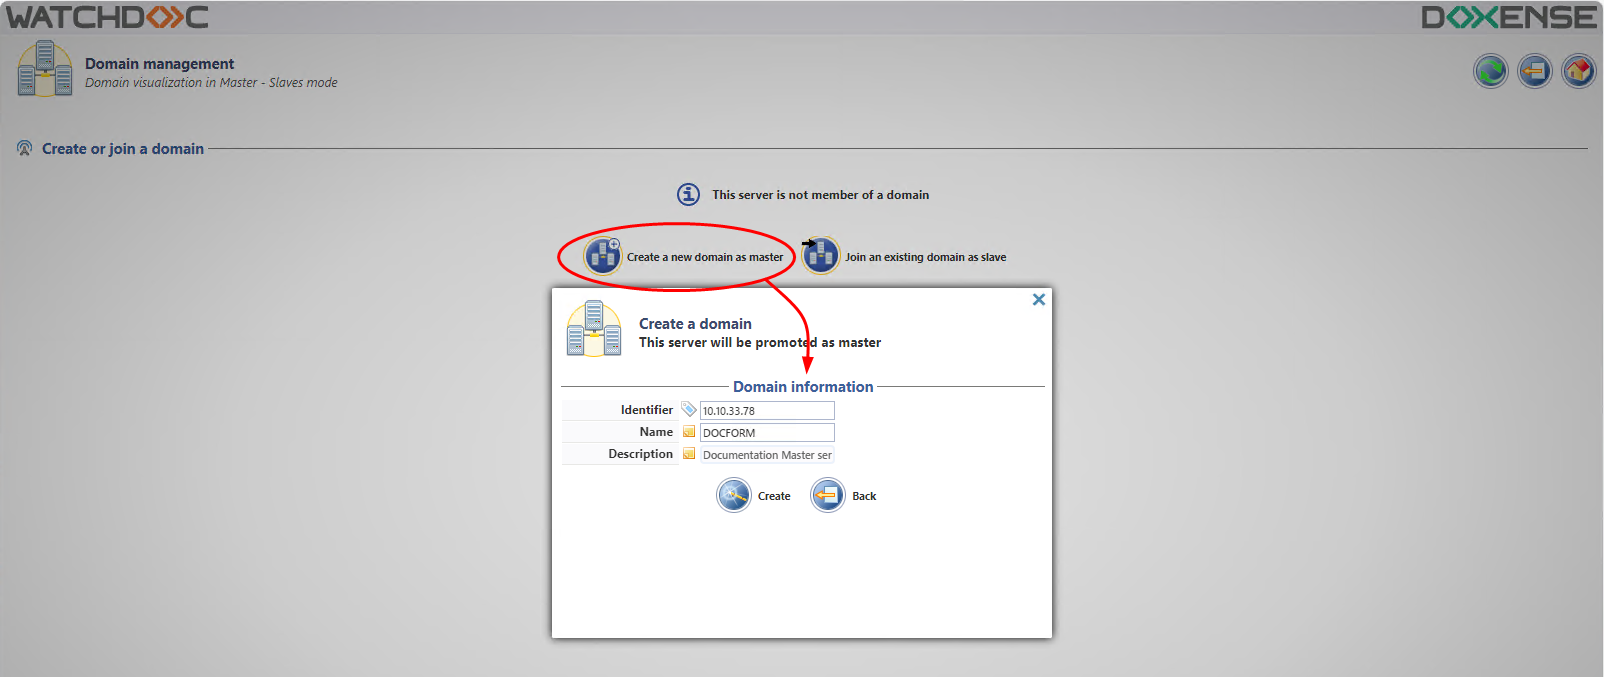
Declare the master server
-
From the Domain Management interface, click Create a domain as master;
-
in the Create a domain interface, enter :
-
Identifier: the IP address of the master server;
-
Name: the name of the server which will be used to identify it in Watchdoc;
-
Description: additional information to identify the server if necessary:
-
-
Click Create to confirm the creation of the domain and its master server.
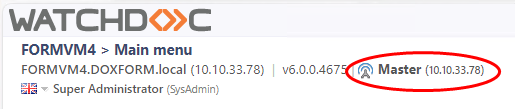
Check the master server statut
-
in the Watchdoc Main Menu, the server new status is displayed:
-
in the Domain management interface, the domain information and certificates are displayed:
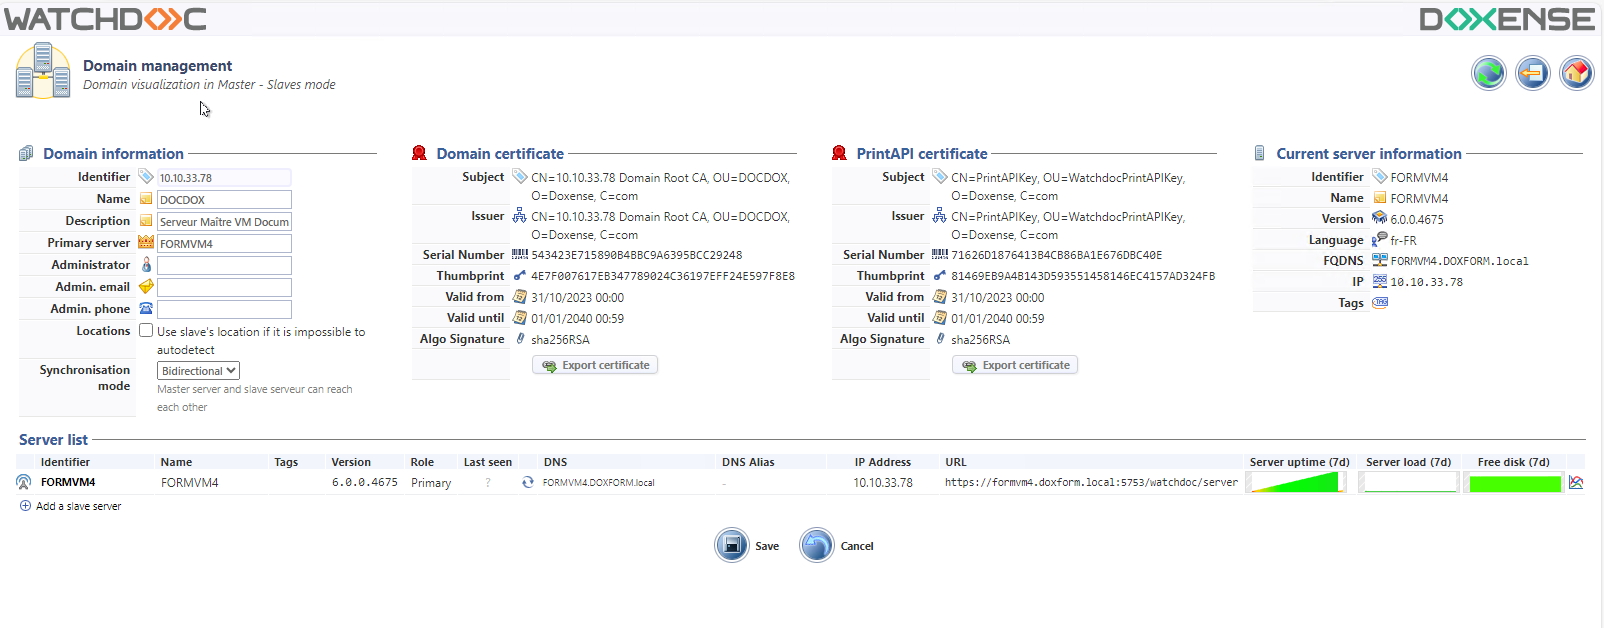
èYou can complete in the information for the master server, and also add other servers in the domain.
Note: To remove the master role from a server, see the procedure Downgrade a master server.
Declare Watchdoc others slaves servers
Once the master has been declared and the domain created, you can add slaves servers to it:
-
Access the master Watchdoc administration interface as an administrator;
-
From the Main Menu, click on Advanced Configuration;
-
In Advanced configuration, click on Domain management:
-
in the Domain Management interface, Server List section, click Add a slave server;
-
in the Add a slave server interface, enter the Watchdoc slave server address and port (DSP service port);
-
click on Add to validate the addition of the slave server:
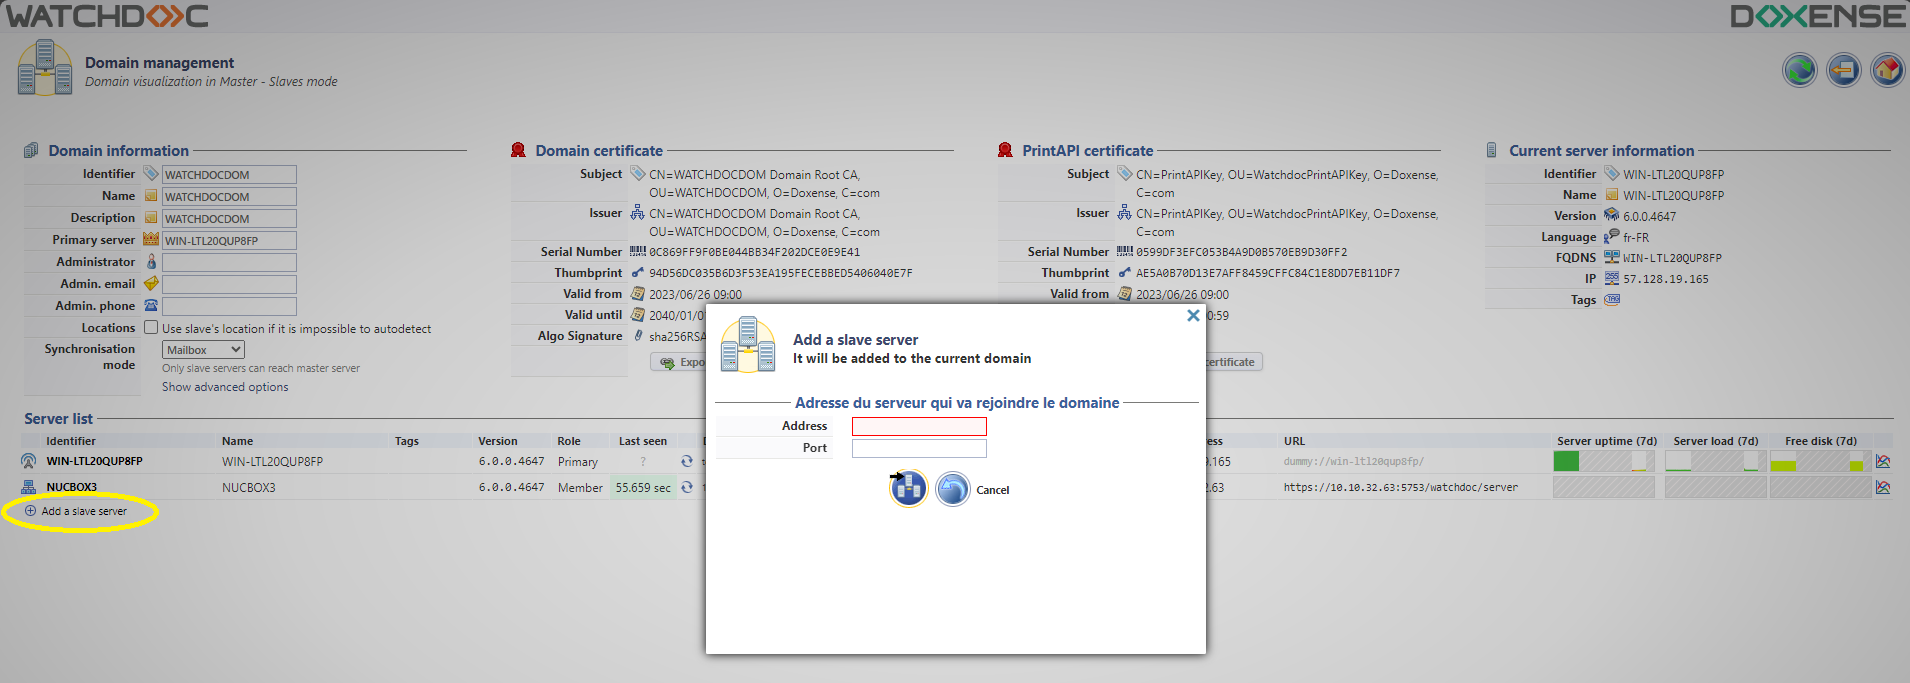
N.B. This configuration can also be done in the slave server administration interface.
If the list of slave servers is long, it is paginated. A page contains a maximum of 30 servers.
Configure access to the master server's web server
Once the domain has been set up, you must specify which slave web servers are allowed to access the master's IIS web server. This operation uses the WebSiteConfig.exe tool:
-
from the domain administration interface, in the list of servers, click the
-
the export generates a “servers.xml” file listing all servers in the domain;
-
copy this file and log in as an administrator on the master server;
-
on the server, run the WebSiteConfig.exe tool (located by default in the C:\Program Files\Doxense\Watchdoc\Tools folder);
-
Open the “servers.xml” file in a separate window;
-
In the WebSiteConfigurator tool, click Add new;
-
In the Server Connection Properties interface, enter the ID and URI of a slave server from the domain listed in the “servers.xml” file;
-
Click OK to add the slave server to the list of servers authorized to access the master’s web server;
-
Repeat this process for all slave servers in the domain listed in the “servers.xml” file:

Activate settings replication
Watchdoc enables various configuration items to be synchronised between the master and the slaves. These items are managed from the Watchdoc administration interface and from the master server's supervision console (WSC).
Replicating configuration items from Watchdoc
When configuring the master server, the Global parameter is used to replicate the configuration of certain configuration items on the Slavic servers included in the domain. This parameter can be activated for the following configuration items:
-
Printing queues
-
Pricings
-
Directories
-
Filters
To enable replication from one of these elements from the master server to the slave servers:
-
in the Watchdoc master administration interface, select the configuration item to replicate;
-
click on the Edit properties button for the configuration item to be replicated (group of files and directories in the example);
-
in the General information section, tick the Global box ;
-
click Validate to save the configuration:
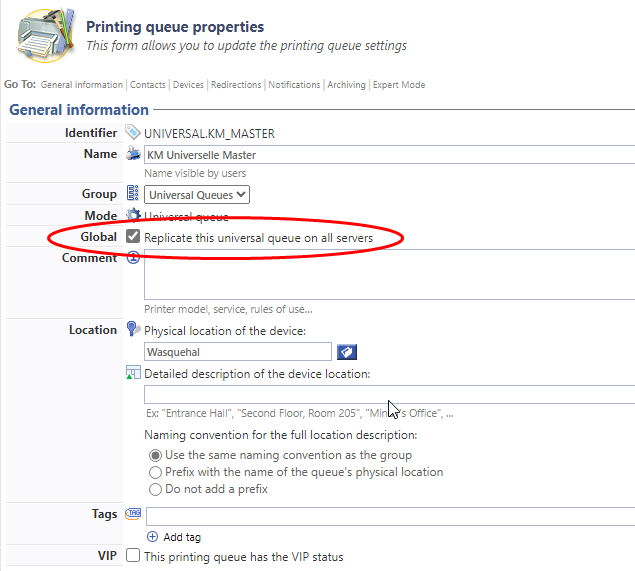
→ Once a master server setting is declared as Global, it is directly replicated on all the Watchdoc servers.
→ Once a setting is replicated, the Global check box can't be unchecked.
→ The logo ![]() reports on the Master server configuration items replicated on the other servers.
reports on the Master server configuration items replicated on the other servers.
→ The logo ![]() specifies on other servers that the item is configured on the Master server.
specifies on other servers that the item is configured on the Master server.
Enable maintenance tasks on servers
To activate maintenance tasks on the server:
-
Access the Supervision Console of the Master server as an administrator;
-
From the Main Menu, click on Advanced Configuration, then Maintenance Operations:
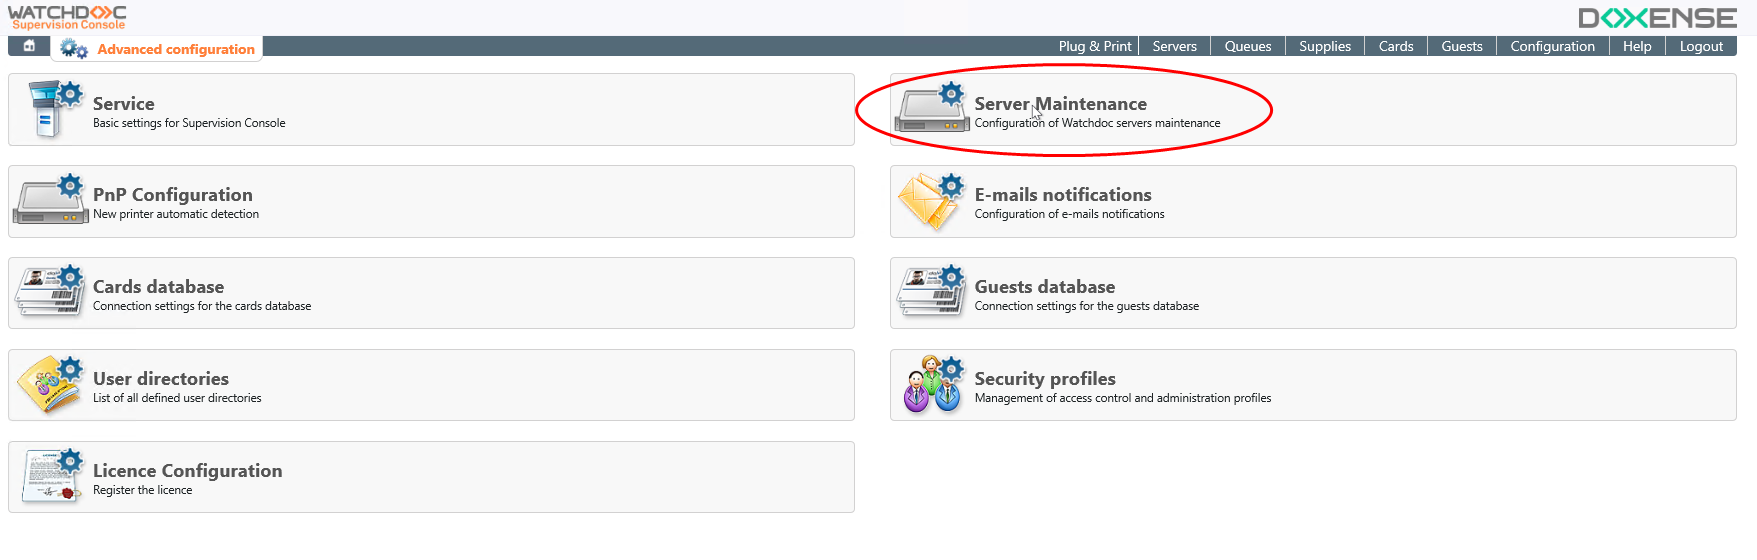
-
Tick the box Enable the maintenance tasks on servers, and set frequency:
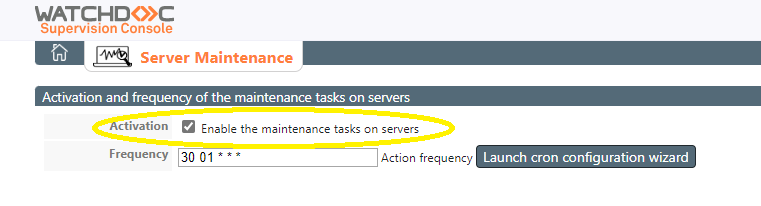
-
Validate the setting.
Manage domain with WCLI tool
To declare domain's servers, you can use the WCLI tool (cf. Watchdoc Command Line tool).
Declare the master from WCLI
The Watchdoc Master declaration is carried out with the command line tool WCLI (Watchdoc Command in Line).
The WCLI![]() (Watchdoc Command Line) is a command line tool that allows you to
generate recurring tasks in Watchdoc.
In particular, it can be used to manage the Master/Slave configuration, create an ASSETS database, create external queues on a server, for example.
ASSETS database, create external queues on a server, for example. tool does not have to be launched from the server to be declared. It can be launched from any Watchdoc server, as long as there is network connectivity between the target Watchdoc service and the command tool. The role declaration is carried out using the WCLI command line tool.
(Watchdoc Command Line) is a command line tool that allows you to
generate recurring tasks in Watchdoc.
In particular, it can be used to manage the Master/Slave configuration, create an ASSETS database, create external queues on a server, for example.
ASSETS database, create external queues on a server, for example. tool does not have to be launched from the server to be declared. It can be launched from any Watchdoc server, as long as there is network connectivity between the target Watchdoc service and the command tool. The role declaration is carried out using the WCLI command line tool.
-
with the inline command tool, go to the Watchdoc installation directory
cd "\Program Files\Doxense\Watchdoc" -
launch the master creation command
WCLI CREATEMASTER /master=address /password=maintenance_password

In this command, the value Address may have the following shapes:
-
an IP address (ex: 10.10.0.110) ;
-
an hostname (ex: printserver1) ;
-
a FQDN (ex: printserver1.doxense.local) ;
-
an URI (ex: https://printserver1:5753/watchdoc/server).
-
-
verify you received the following confirmation message:

→ In the Watchdoc Main menu the new server status is displayed: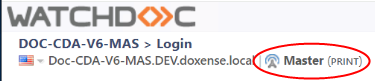
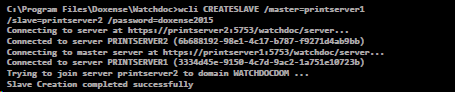
Declare slaves servers from WCLI
The WCLI tool does not have to be launched from the server to be declared. It can be launched from any Watchdoc server, as long as there is network connectivity between the target Watchdoc service and the command tool.
-
Using the command line tool, go to the Watchdoc installation folder;
-
run the command to register the server in the domain (case sensitive):
WCLI CREATESLAVE /master=server_master /slave=server_watchdoc /password=maintenance_password -
check that you receive the following confirmation message: