Prerequisite
WSC v. 6.1 includes a security module for print drivers. From this version onwards, only drivers certified by Microsoft® with a valid WHQL signature can be installed on the monitoring console. An exception is made for Epson® and Ricoh® drivers. To obtain accurate user information in the Watchdoc print history, it is necessary to configure the confidentiality settings on the printing device. Access the device configuration interface as an administrator.
To prepare the driver packages to be downloaded in WSC v 6.1, you need :
-
for all drivers (except Epson and Ricoh): use the DriverPackageExtractor.exe tool supplied by Doxense in the Watchdoc installation package.
-
to have the 7-Zip® compression tool (see https://7-zip.org/).
If you do not have permission to install 7-Zip on the WSC server, prepare the package in another workspace. In this workspace, install 7-Zip and the following tools, available in the Watchdoc installation package:
- DriverPackageExtractor.exe
- DriverPackageExtractor.exe.config
- CliWrap.dll
- Doxense.Core.dll
- Doxense.IO.Compression.dll
- Doxense.Watchdoc.SpoolMonitor.dll
-
for Epson and Ricoh drivers, they must first be signed by Doxense, by contacting Support via Connect.
Procedure
Download the certified package (all drivers except Epson and Ricoh)
As an administrator, access the server hosting WSC.
-
Using a browser, visit the manufacturer's official website.
-
Download the driver package corresponding to the model of printing device to be installed: generally, this is an archive/compressed file.
-
If it is not a compressed file (.exe, for example), compress it as WSC only processes drivers in .zip format.
-
Save the package on the server.
-
WSC v6.1 includes a print driver security module. From this version onwards, only drivers certified by Microsoftc® with a valid WHQL
 The Windows Hardware Quality Labs (WHQL) test signature program supports test-signing of drivers that will subsequently be submitted for a WHQL release signature. Independent hardware vendors (IHVs) that participate in this program can submit driver packages to be test-signed.
(Source : https://learn.microsoft.com) signature can be installed on the Supervision console.
The Windows Hardware Quality Labs (WHQL) test signature program supports test-signing of drivers that will subsequently be submitted for a WHQL release signature. Independent hardware vendors (IHVs) that participate in this program can submit driver packages to be test-signed.
(Source : https://learn.microsoft.com) signature can be installed on the Supervision console.
Prepare the drivers
All drivers except Epson and Ricoh
Using Explorer, go to the CC:\Program Files\Doxense\Watchdoc_Files_folder.
Run DriverPackageExtractor.exe as administrator:
In the DriverPackageExtractor tool:
Path to 7Zip: enter the path to the 7-Zip utility;
Driver archive: enter the path to the compressed driver file (downloaded earlier);
Temporary folder: specify the path to a folder in which the files extracted from the driver package are temporarily stored.
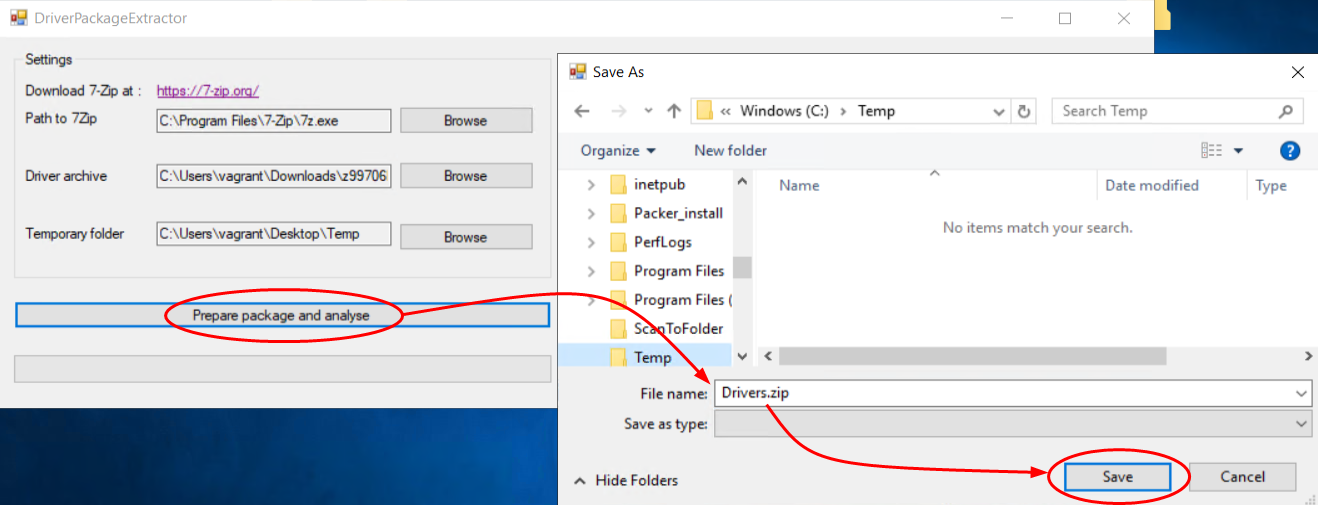
Click on the Prepare package and analyse button.
Indicate where you want to save the driver package once it has been analysed by DriverPackageExtractor.
In the File name field, enter a name for the driver.
Click Save:
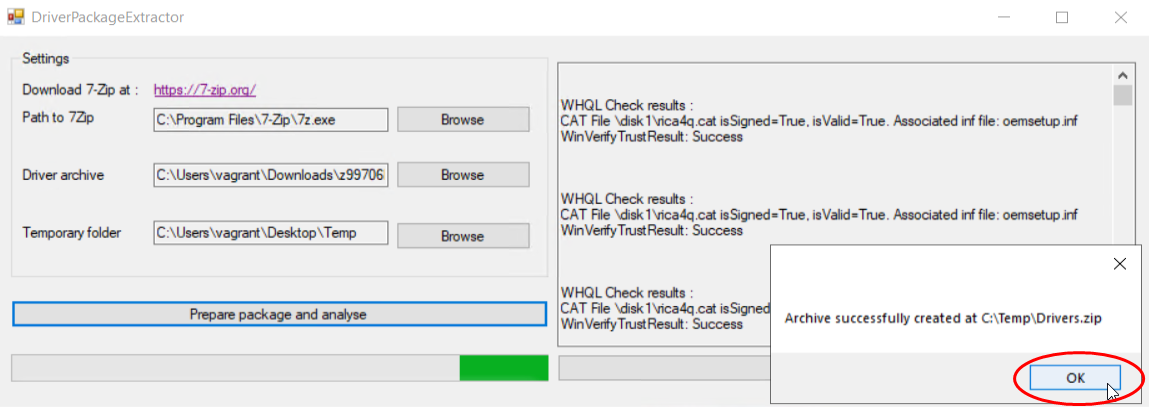
Click on OK in the interface that informs the package creation is ready
èThis package therefore complies with WSC expectations and you can add it to WSC.
If preparation takes a long time or ends with an error message, this may be due to the weight of the archive (see Lighten the archive folder).
Epson and Ricoh drivers
Use your browser to visit the manufacturer's official website.
Download the driver corresponding to the printing devices to be installed.
Send the downloaded driver packages to Doxense Support via Connect, requesting that they be signed.
Save the package supplied in return by Doxense on the server hosting WSC.

Add a driver
-
Access WSC as an administrator.
-
From the WSC Main menu, click on Plug and Print > Divers entry:

-
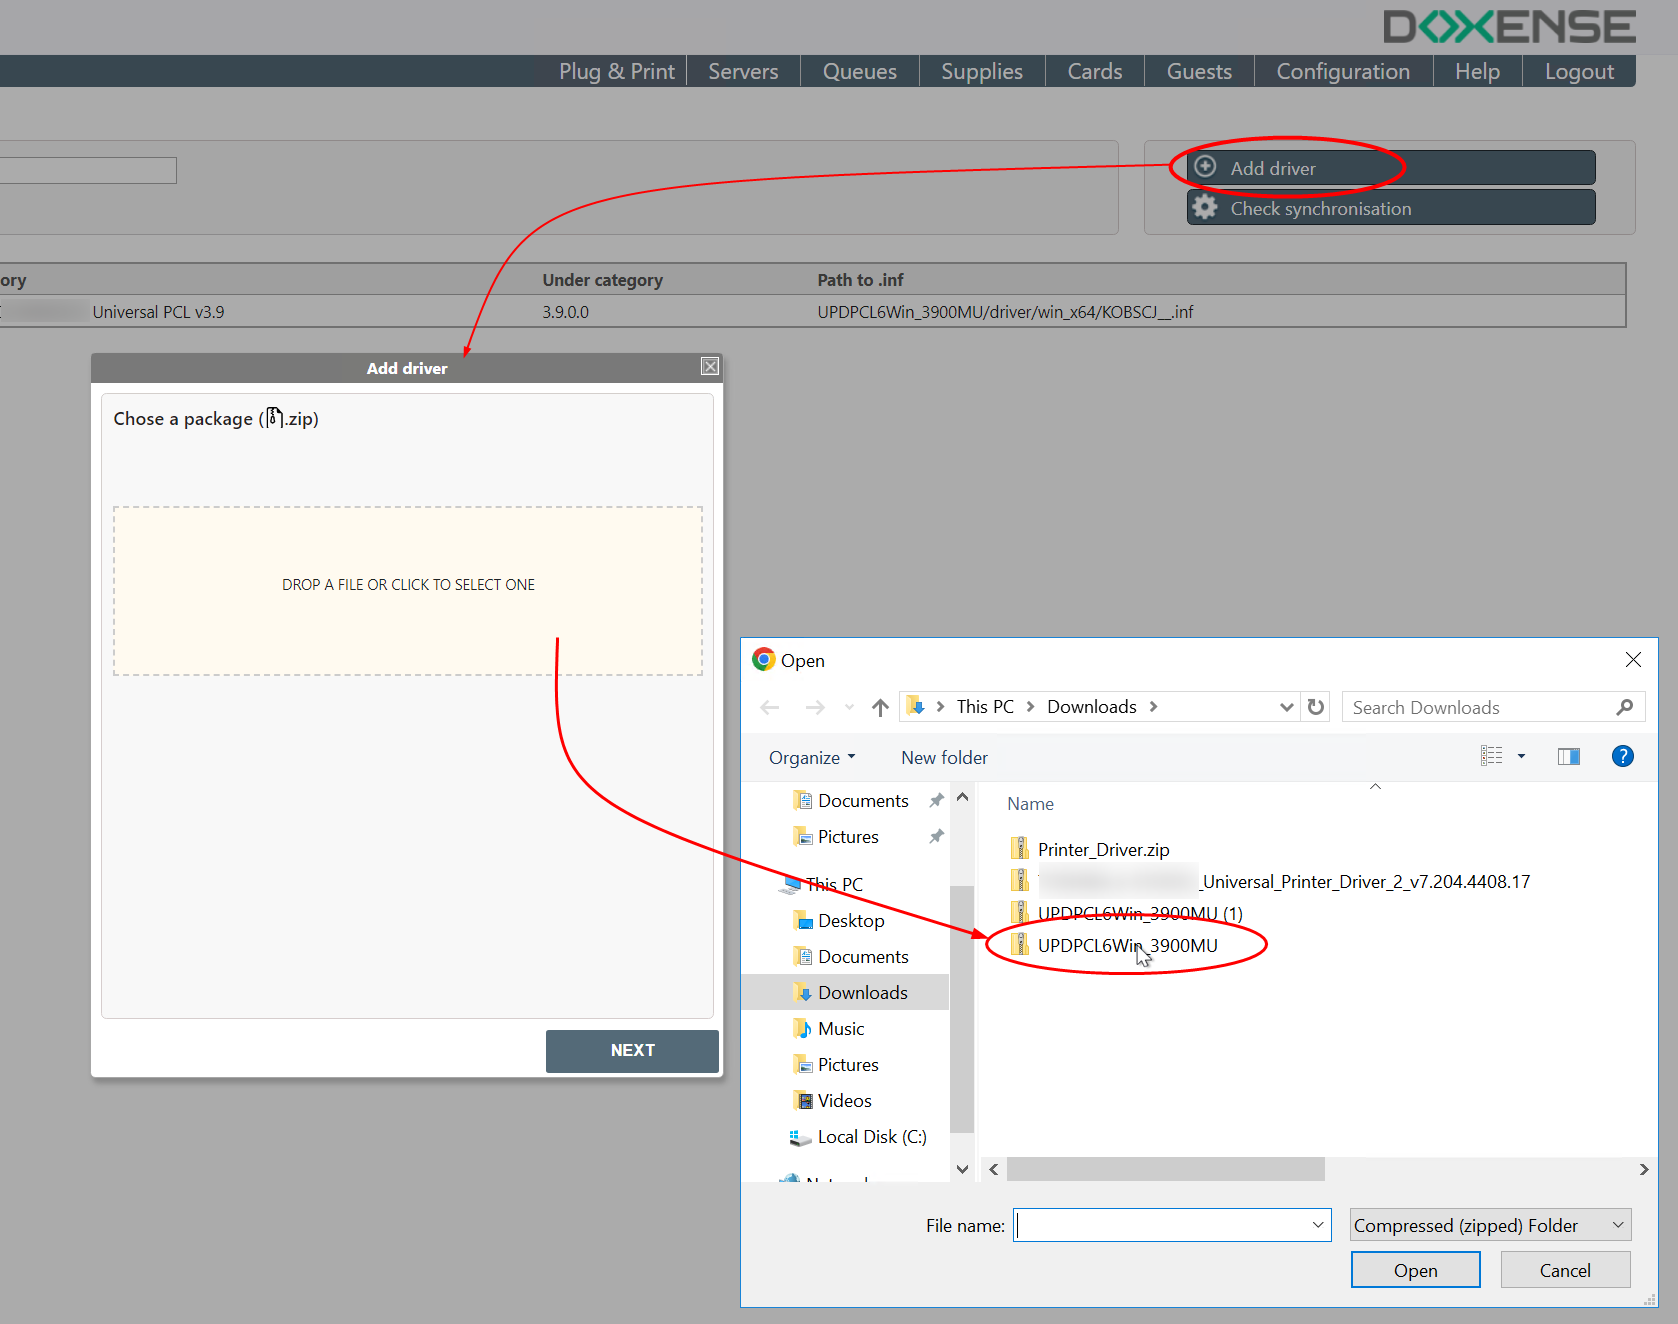
in the top right menu, click on Add Driver, then fill in the fields in the Add Driver interface;
-
in the Add Driver window, drag the archive file (or click to access the download folder where the downloaded driver is located);
-
Once you have selected the archive folder, click Next.
-
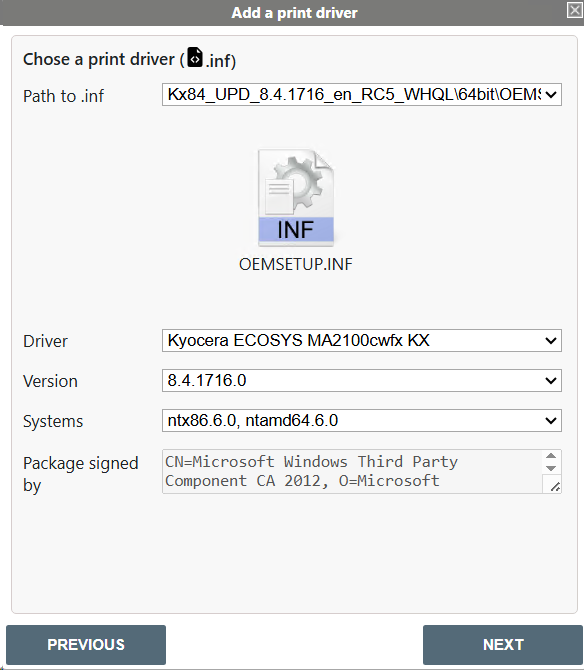
The driver information is displayed for validation or adjustment purposes.
You can edit them or click Next if they are appropriate:
-
Path to .inf: path to the installation file (.inf) present in the driver package and in which the value DriverName.
-
Driver: name of the driver or drivers contained in the installation package. If there are several, choose the one that is compatible with the device(s) you are using from the list.
-
Version:
-
Systems: select in the list the system adapted to your configuration:
-
Package signed by: name of the issuer of the package's certificate (Microsoft for WHQL's driver or Doxense for an Epson or Ricoh driver):
-
Click on the Next button.
The window Associate a configuration is displayed.
-
in the Create a universal queue window,
-
check the Create box if you want to create a universal queue;
-
Name: give this queue a name.
-
Click Validate.
è If the operation was successful, a success message is displayed.
If not, an error message is displayed. If you are unable to understand the error and repeat the operation successfully, attach these logs to a Connect ticket sent to Doxense Support.
Associate a configuration
It is possible to add one (or more) print queue configuration(s) when adding a driver.
This allows the driver to be associated with one (or more) existing configurations in order to save time when installing the queues. In fact, it is then possible to install the queues without having to configure them. In addition to saving time, this association guarantees the harmonization of configurations when adding files en masse.
If you have a sample configuration file (.dat) available in your workspace, add it directly. If you don't have any configuration file, proceed first to upload a template configuration file.
Download a configuration file
If you do not have a configuration file (.dat), do the following
-
From the Link Configuration box, click the Printer Queue Menu link;
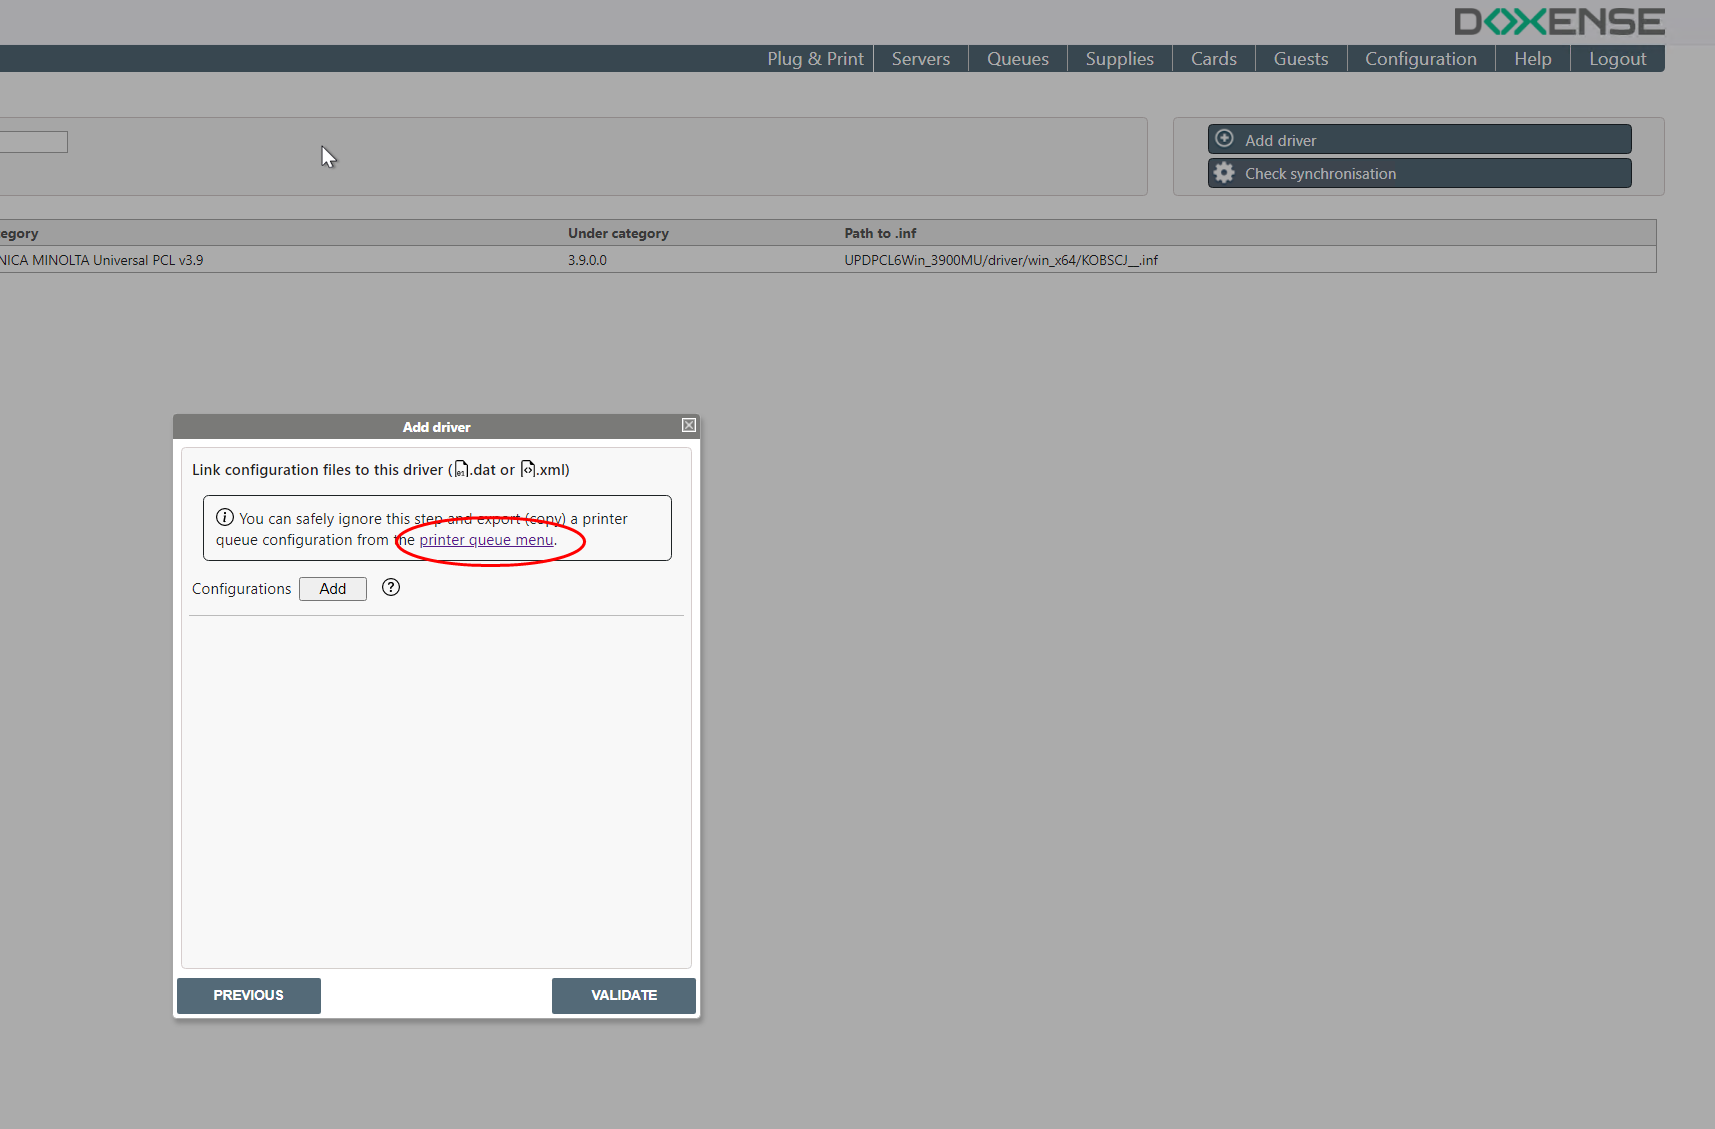
è This will take you to the list of print queues already configured.
-
In this list, select the print list already configured that you wish to use as a template and right-click;
-
In the menu, click on Download configuration:
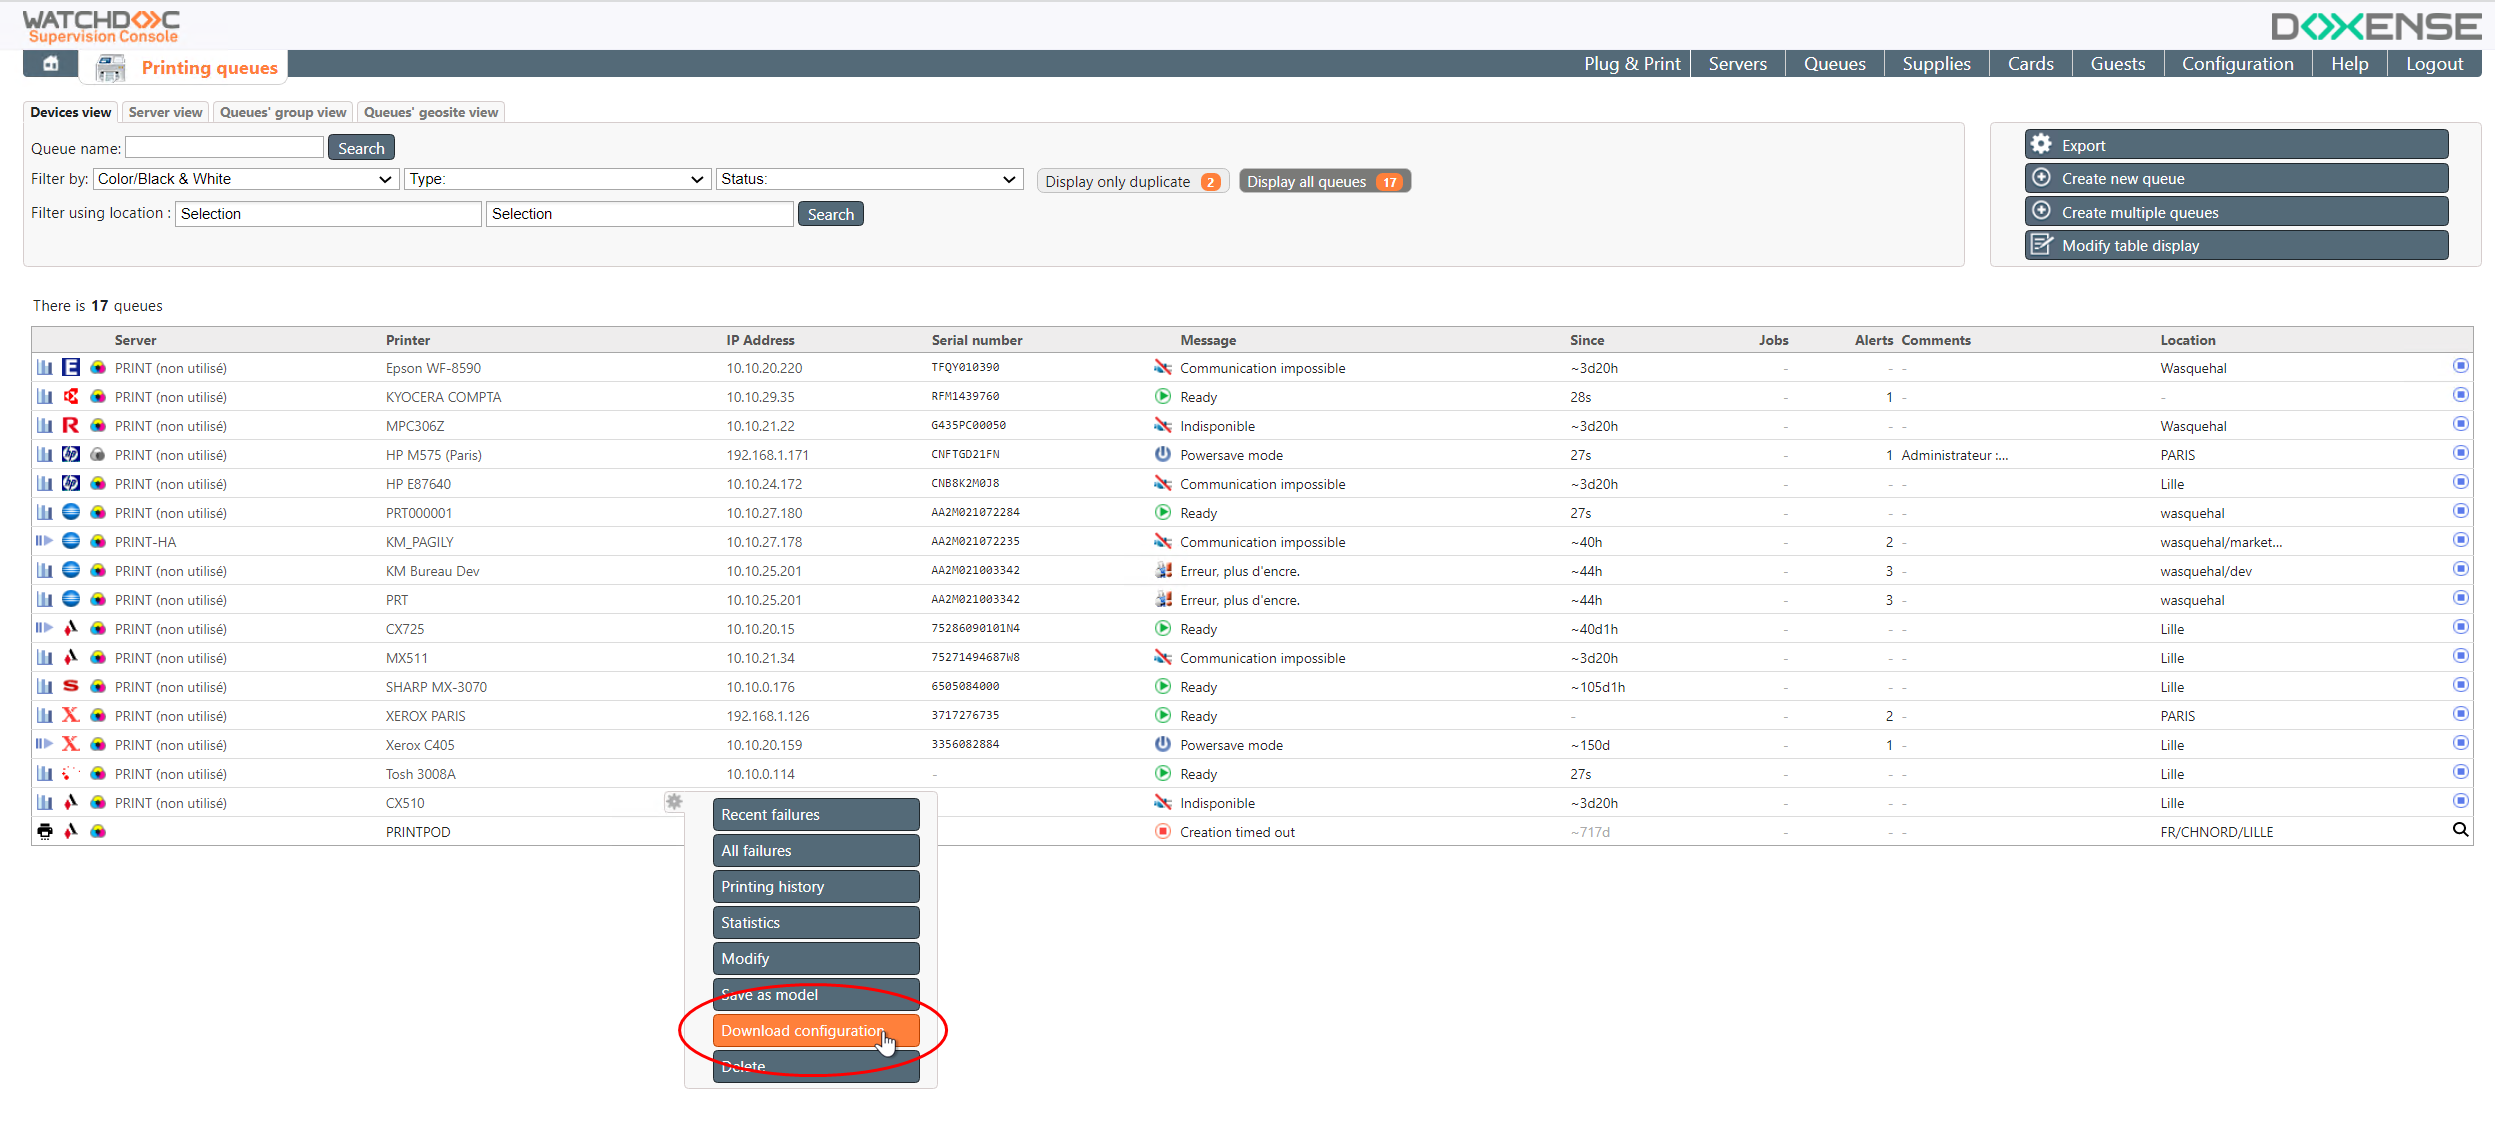
è The configuration file is automatically saved in the download folder. You can then add it to associate it with the driver.
Associate a configuration file
If you have a configuration file (.dat), do the following:
-
from the Add Driver > Associate Configuration window, click on the configuration: Add button;
-
select the .dat configuration file to associate with the driver;
-
When the file is displayed in the selection zone, click on Validate ;
-
Repeat the operation as many times as the number of configuration files to be added (up to 10).

èAfter the driver is configured, you can set up the device model.
Xerox-specific procedure
The Xerox driver configuration is not standard, as Xerox provides a .xml file specific to the customer's printing policy. When adding the configuration file for a Xerox device, the CommonConfiguration.xml file provided by Xerox must be selected.
This file must have been set up by us beforehand, a file corresponding to a print queue configuration.
èOnce the driver is configured, you can configure the device model.
Troubleshooting
Lighten the archive folder
The weight of a file containing the driver varies between 10 and 30 Mb.
If the file is compliant but too heavy, the preparation stage takes a long time and ends with an error message (RequestEntityTooLarge or End of Central Directory record could not be found). If you try to import the compressed archive directly into WSC, the message is the same: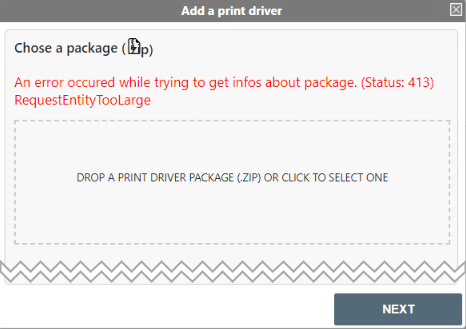
In this case, the archive should be made smaller.
-
Using 7-Zip®, unzip the driver archive.
-
Among the unzipped folders, select the folder marked 64 (bits) (or 32 bits if your user workstations require this version).
-
Re-compress this single folder, which becomes the driver package.
-
Open DriverPackageExtractor, specifying the compressed 64-bit folder in the Driver archive field.
-
Click on Repare package and analyse.