WES - Customize the colors and images of a WES v3
Customize the buttons color
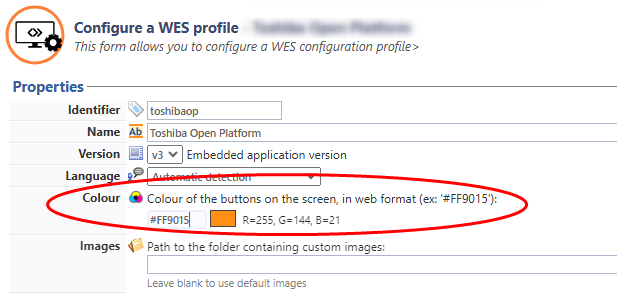
To change the color of the WES buttons :
-
in the interface Configure a WES profile interface, section Properties, for the Color parameter, enter the hexadecimal code corresponding to the coloour you want to give to the interface buttons:
-
click on Validate to register the WES profile configuration ;
-
check that the new color is applied on the WES
Customize the images
To change the default images to your own images:
-
go to the server where Watchdoc is installed;
-
in the folder including the Watchdoc installation files (C:\Program Files\Doxense\Watchdoc\Images\Embedded\Brands\, by default), choose the folder of the device manufacturer and copy it;
-
paste the folder you just have copied and rename it clearly (for example: [Manufacturer]_Custom before customising it:

-
in the Manufacturer_Custom folder, replace each original image with your own images, respecting the size of the original images (go to the images properties to know the detailled sizes).
To make sure that the dimensions are respected, you can resize the custom images by overlaying them on the default images:
-
open the default image in an image editor (such as MS Paint);
-
overlay the custom image on the default image and size it by overlaying;
-
save the resized custom image with the name of the default image.
-
-
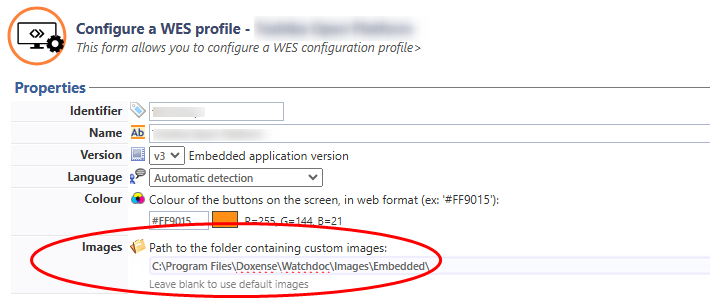
in the WES profile interface, go to the WES Properties section;
-
In the Custom Image field, enter the path to the folder where your customised images are saved (C:\Program Files\Doxense\Watchdoc\Images\Embedded\Brands\[ACME]);
-
click on Validate to save the WES profile configuration;
-
then verify onto the device screens that the WES is customized with your images.
N.B.: The number of images contained in the folder varies depending on the manufacturer and functionality of the WES:
-
large banner: image displayed on the authentication screen before choosing the authentication mode (absent if the WES does not offer authentication) ;
-
small_banner: image displayed on the authentication screen after the authentication mode has been chosen (absent if the WES does not offer authentication);
-
logo_small: image displayed at the top of the print management interfaces;
-
logo: image displayed on the WEScan home panel (220x25 px).
| Large.banner.png | Logo.png | Small_banner.png | Small_logo.png | Spinner | Icon | |||||||
| Width | Height | Width | Height | Width | Height | Width | Height | Width | Height | Width | Height | |
| Canon | 640 | 275 | 362 | 40 | 640 | 107 | 320 | 60 | 69 | 39 | ||
| Epson Big/Large | 800 | 276 | 220 | 25 | 800 | 105 | 800 | 60 | 69 | 39 | ||
| Epson ss | 480 | 117 | 220 | 25 | 480 | 55 | 69 | 39 | ||||
| HP Aurora | 1280 | 373 | 220 | 25 | 1280 | 131 | 1280 | 60 | 69 | 39 | 144 | 144 |
| HP Phantom | 1024 | 373 | 220 | 25 | 1024 | 131 | 1024 | 60 | 69 | 39 | 144 | 144 |
| HP wj15 | 797 | 271 | 220 | 25 | 797 | 60 | 797 | 60 | 69 | 39 | 144 | 144 |
| HP wj26 | 797 | 131 | 220 | 25 | 144 | 144 | ||||||
| HP wj27 | 480 | 112 | 220 | 25 | 69 | 39 | 144 | 144 | ||||
| KM | 800 | 276 | 220 | 25 | 800 | 105 | 800 | 60 | 69 | 39 | ||
| Kyocera | 800 | 276 | 220 | 25 | 800 | 105 | 800 | 60 | 69 | 39 | ||
| Lexmark | 800 | 276 | 220 | 25 | 800 | 105 | 800 | 60 | 69 | 39 | ||
| Ricoh sop | 1024 | 276 | 220 | 25 | 1024 | 105 | 1024 | 60 | 69 | 39 | 144 | 144 |
| OpenPlatform wvga1 | 797 | 271 | 220 | 25 | 797 | 101 | 800 | 60 | 69 | 39 | 144 | 144 |
| OpenPlatform wvga3 | 1024 | 321 | 220 | 25 | 1024 | 151 | 800 | 60 | 69 | 39 | 144 | 144 |
| Sharp svga | 800 | 276 | 220 | 25 | 800 | 105 | 800 | 60 | 69 | 39 | ||
| Sharp wvga | 797 | 209 | 220 | 25 | 800 | 105 | 800 | 60 | 69 | 39 | ||
| Sharp wxga | 800 | 276 | 220 | 25 | 800 | 105 | 800 | 60 | 69 | 39 | ||
| Xerox standard | 220 | 25 | 800 | 60 | 69 | 39 | ||||||
| Xerox 5 inches | 220 | 25 | 69 | 39 | ||||||||
| Xerox 10 inches | 220 | 25 | 800 | 60 | 69 | 39 | ||||||