Canon WES - Troubleshoot the WES
General troubleshooting rules
-
What? What procedure can be used to reproduce the incident?
-
When? What date and time did the incident occur?
-
Where? On which printer did the incident occur?
-
Who? On which user account did the incident occur?
-
Watchdoc.log: thank you for providing the Watchdoc.log file;a
-
config.xml file: thank you for providing the Watchdoc.log file;
-
server/device communication logs: please activate the trace files on each file.
Once this information has been gathered, you can send a resolution request from the Connect portal, the incident management tool dedicated to partners.
To obtain the best possible record of the data required for diagnosis, use the Watchdoc DiagTool® supplied with the Watchdoc installation program (cf. Creating a log report with DiagTool).
Scan, fax and photocopying are not in Watchdoc
If the scan, fax and photocopy jobs are not counted by Watchdoc, verify that the address (host name or IP) of the Watchdoc server configured in the device is correct:
-
Iin the configuration interface of the queue, in the WES section, click on the button Application status (displayed when the WES is properly installed);
-
Click the Download button to download the log files and WES configuration;
-
In the downloaded .zip file, open the Config.json file using a text editor and check the information corresponding to the address of the server (Address) and ports;
-
If the configuration of the address and / or ports is not correct, click on the Configure button on the queue configuration interface.
-
Verify that the procedure has resolved the problem.
Activating WES Traces
To diagnose a problem with WES applications, you need to activate the log files specific to WES communications :
-
in the Watchdoc web administration interface, from the Main Menu, Production section, click Printing queues, queues groups & pools;
-
In the list of queues, click on the name of the queue with the WES for which you want to activate the trace files;
-
in the queue management interface, click on Properties;
-
in the WES section, click on the Edit the settings button:
-
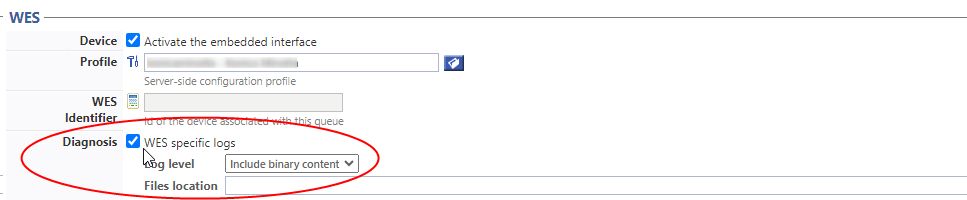
in the WES>Diagnostics section, tick the Enable traces box;
-
in the Trace level list, select:
-
Auto: retains standard traces;
-
Include binary content: retains detailed traces.
-
-
In the Path field, enter the path of the folder in which the trace files should be saved. If you leave the field blank, the trace files will be saved by default in the Watchdoc_install_dir/Logs/Wes_Traces/QueueId installation folder:
Error message: The configuration of the Embedded application is not possible. WES Java request to [IP du serveur] failed with status 302 Moved Temporarily - jan. 2026
Context
When installing WES, the profile is noted as "unsecurred" and a warning message displays in the Status section: The configuration of the Embedded application is not possible. WES Java request to [IP du serveur] failed with status 302 Moved Temporarily :

Cause
This message indicates that the printing device is configured to support SSL only, whereas the WES is configured with SSL disabled.
Resolution
To resolve this issue, configure the Canon WES profile by enabling SSL connection mode (see Configuring the WES profile).
SSL connection mode disabled is not saved when configuring WES - Dec. 2025
Context
When configuring Canon WES on a print queue, I select SSL connection mode disabled and enter the device security settings (account/password), then save. When I edit the Canon servlet configuration (Edit Configuration button), I notice that the host server address has not been retained as a setting.
Cause
The problem is related to a connection mode incompatibility between the printing device and Watchdoc, as some Canon devices do not support non-SSL mode communications.
Resolution
To resolve the problem, update Watchdoc to version v., which includes the following fixes: if Watchdoc attempts to communicate in non-SSL mode, the error is reported in the trace files; the ‘Use a secure connection with the device’ box, which is checked by default, forces Watchdoc to communicate in SSL mode, even if this connection mode is disabled on the device.
To resolve the issue, update Watchdoc to version v., which includes the following fixes:
-
if Watchdoc attempts to communicate using non-SSL, the error is reported in the logs file;
-
The ‘Use a secure connection with the device’ box, which is checked by default, forces Watchdoc to communicate with the device using SSL, even if the device is configured to communicate with Watchdoc using non-SSL.
ScanToFolder doesn't work
Context
ScanToFolder has been available with Canon WES since Watchdoc v6. However, it may not work after installing the WES.
Cause
This message relates to device options that need to be changed.
Resolution
In the device options, go to Function settings > Send > Common settings > Personal folder specification method:
-
select User login server;
-
deselect Use authentication info for each user.
An unexpected error has occurred
Context
When authenticating by badge and/or login, regardless of the user, a beep sounds and the message "an unexpected error...." is displayed (problem on the ir-ADV Canon 5500 model).
Cause
The problem is linked to the activation of service number management on the device.
Resolution
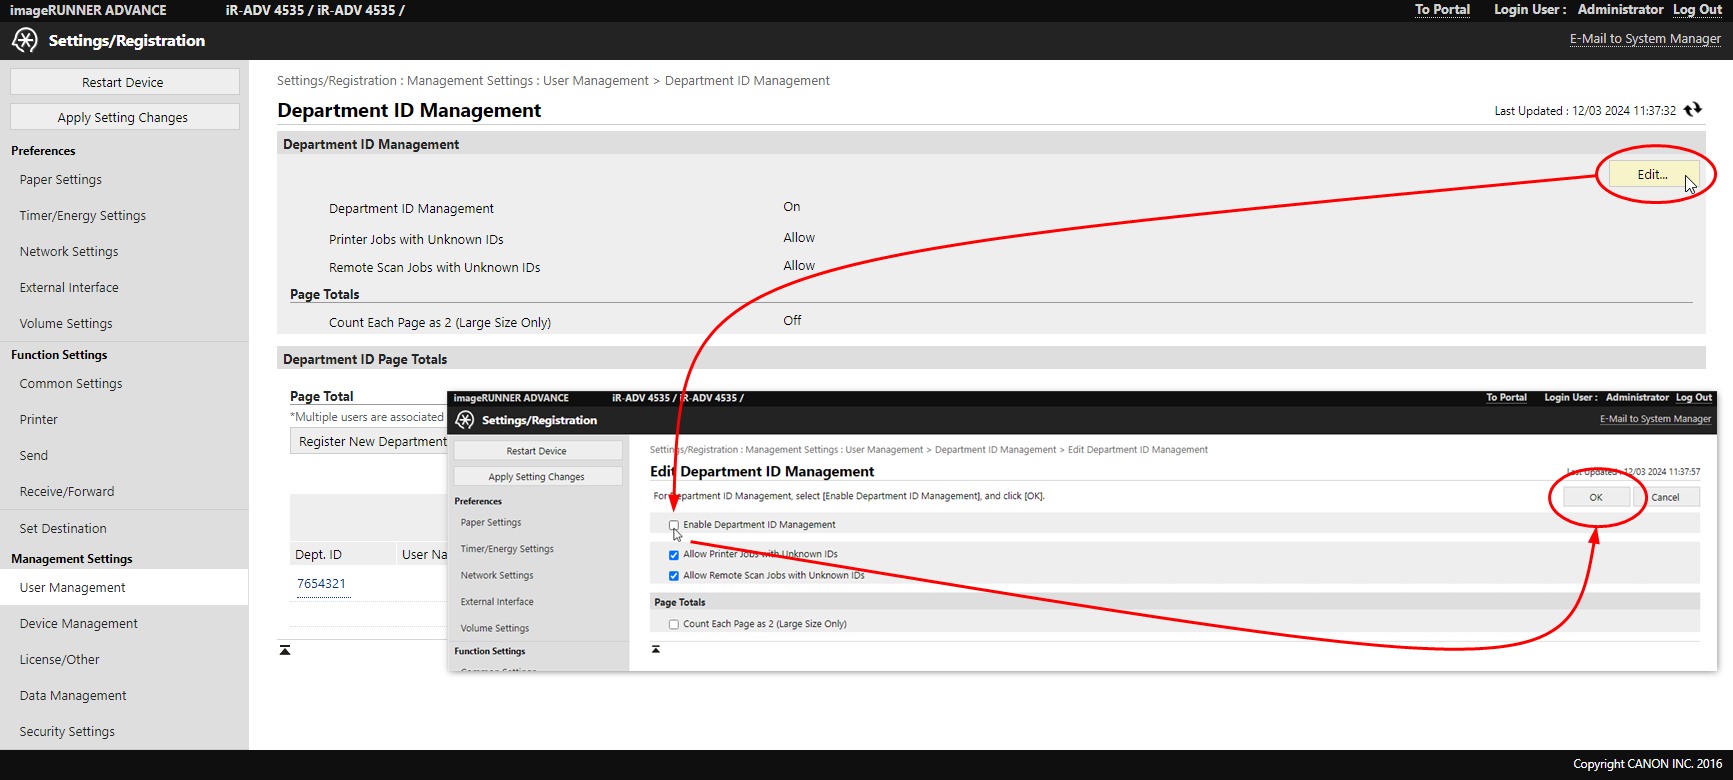
The problem needs to be resolved in the Canon device configuration interface:
-
Using a web browser, go to the print device administration interface (SMS portal);
-
From the menu, click Settings/Registration > Management Settings > User Management > Service Number Management.
-
In the Modify service number management interface, uncheck the Enable service number management box;
-
click OK to confirm deactivation:
*click on the image to enlarge
-
Test authentication on the WES to check that the problem has been solved.
Unable to configure the embedded application (WES) - Error message 'The WEB page may be temporarily inaccessible or may have been moved...'
Context:
When installing Canon WES, after selecting the application file to be configured, an error message is displayed: ‘Unable to configure the embedded application WES Java request to [IP_web] failed with status 404 Not Found’.
In the interface for selecting Canon application files, the following message is displayed: ‘The web page at [url] may be temporarily inaccessible or may have been permanently moved to another web address.
Cause
This error is due to the response buffer limit of the IIS Web server being insufficient to download the configuration files.
Resolution
To solve this problem, increase the response buffer limit of the IIS web server .
To do this, you can either run a script provided in the Watchdoc installation package automatically or do it manually.
Automatic procedure:
-
on the Watchdoc server, go to the Watchdoc installation package, Support folder.
-
Click on the Update IIS.bat file;

-
Once the script has been executed, the window will close.
-
Resume the WES installation to verify that the issue has been resolved.
Manual procedure:
-
Access the Internet Services Manager (IIS) as administrator;
-
In the list of sites, select your Watchdoc site and right-click;
-
select the ASP applications module;
-
in the Behaviors list, click on Limits Properties;
-
Increase the size of the Response Buffer Limit (we recommend specifying a size of 10 MB (10,485,760 bytes) :
-
repeat the WES installation to check that the problem has been solved.
Enable sspi failed
Context
When configuring the Canon WES, clicking on Configure the wes on a print queue gives you the following message:
"enable SSPI failed" et A call to SSPI failed
Cause
This problem may be due to the configuration of the ssl certificate or the machine's ssl communication.
Bypass
To get around this problem, change the WES Connection Mode:
-
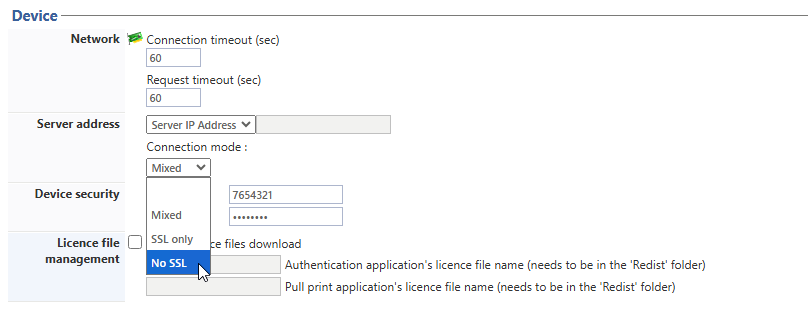
in the WES profile, Device section, Server address parameter, change the Connection mode :
-
select SSL disabled:
The My prints button is not displayed on the Home page
Context
After installing WES on a device, the Watchdoc-specific My Printouts button is not displayed on the screen of the printing device.
Cause
This anomaly may be due to the display settings defined for the print device's home page. The number of buttons may be limited or there may be a restriction on the functions displayed on the home screen.
Resolution
Check and modify the personalisation settings for the Home screen on the device:
-
disable Watchdoc (see step 2 of installing WES on the queue, operation 6 ) ;
-
from the print device screen, log on as administrator to the device ;
-
click on the Print device Menu button;
-
From the Menu, click the Home Management Settings entry;
-
for the Restrict function display parameter, check that Watchdoc is not one of the restricted functions;
-
if the Watchdoc function is restricted, remove the restriction;
-
confirm this parameter.
If you want the ‘My Prints’ button to appear in a specific place on the home screen :
-
click on the Move buttons entry ;
-
Scroll through the screens to find the My Prints button;
-
select this button by clicking on it;
-
drag it to the previous or next screen where you want it to appear;
-
once you have placed it where you want it, confirm the configuration (see the Customising the home screen section of the print device user manual).