Lexmark WES - Install the WES on a queue
Presentation of the WES section
Once the WES profile has been enabled on the queue, the Lexmark section appears in the Queue Properties interface. This section contains several buttons:
-
WES Devices: provides access to a page displaying all WES devices configured on the server;
-
Access Device WEB Interface: provides access to the device administration website;
-
Application Status: provides access to the Monitoring section (below in the interface);
-
Configure: once the WES is installed, allows you to send information to the Java® application. The configuration requires the server address;
-
Reset: refreshes the page;
-
Enable logs / Disable logs: buttons to enable/disable the saving of WES-related logs;
-
Download logs: button to download the log file (if enabled) for diagnostic analysis;
-
Uninstall: allows Watchdoc to uninstall WES from the device. Once WES has been uninstalled, the device must be restarted;
-
Install: allows Watchdoc to install WES on the device (may take 30 seconds), as well as the Elatec badge module;
-
Edit configuration: gives access to the WES configuration interface on the print queue;
-
WES configuration page: gives access to the WES configuration interface in Watchdoc;
-
Resources Delete: allows you to delete the Java® resource selected below:
-
Language packs: language packs for managing WES in various languages;
-
Logs: Java® application log files;
-
Configuration: Java® application configuration. The configuration is then reset;
-
Accounting: accounting for current items not yet sent to the device;
-
All: all Java® information.
-
Procedure
-
In the section Lexmark eSF, click ont the Install button to complete the installation of the application:
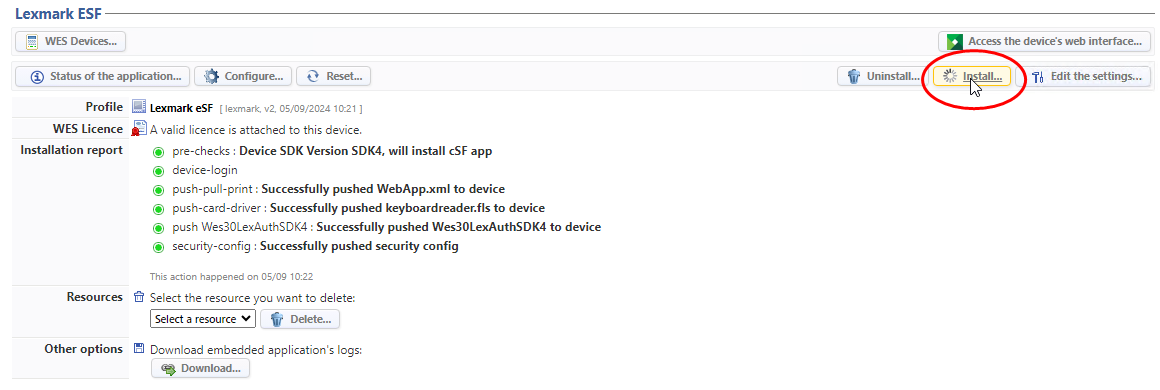
There are several stages in the installation process, which are listed in the Installation report.
è When all the dots in the installation report are green, this means that the installation has gone well and the WES is ready to use :
-
click on the button Configure to send the server address to the WES, enabling communication between the two.
Other settings
Other buttons can be found in the installation section:
- Resources Delete: enables to delete the selected Java® resource:
-
language pack:
-
Logs: Java® application logs files;
-
Configuration: delete Java®'s application configuration (that is then reset to zero);
-
Accounting: account for current items not yet sent to the device;
-
All: all Java®'s information.
-
-
Other options - download logs: the logs of a JAVA-based device can be downloaded directly from the WEB interface. Click on the Download button.