WES Oki - Create and configure the WES profile
Create the WES profile
On a clean Watchdoc installation, a first WES profile is automatically created with default parameters at the end of the wizard procedure, but you can, at any time, edit existing profiles to modify them or create a new profile.
-
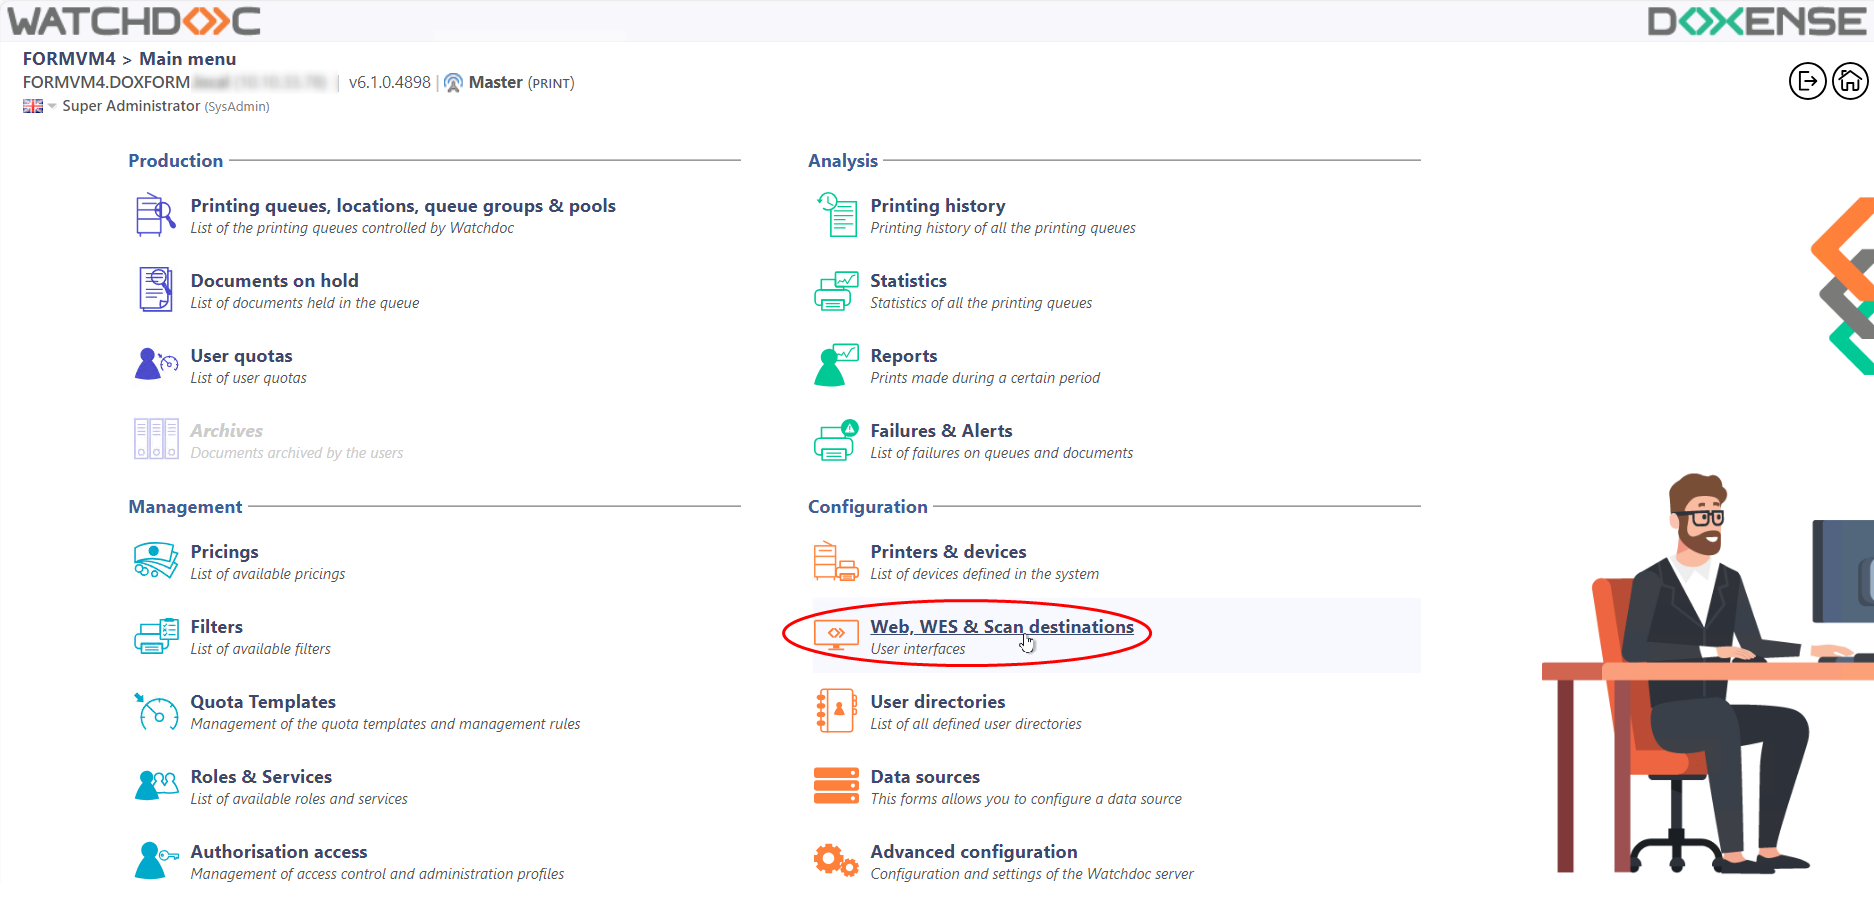
From the Main menu in the administration interface;
-
in the Configuration section, click on Web, WES & Scan destinations:
-
in the Web, WES & Scan Destinations - Client Interface Management interface, click on Create a new WES profile;
-
in the list, select the profile you want to create:
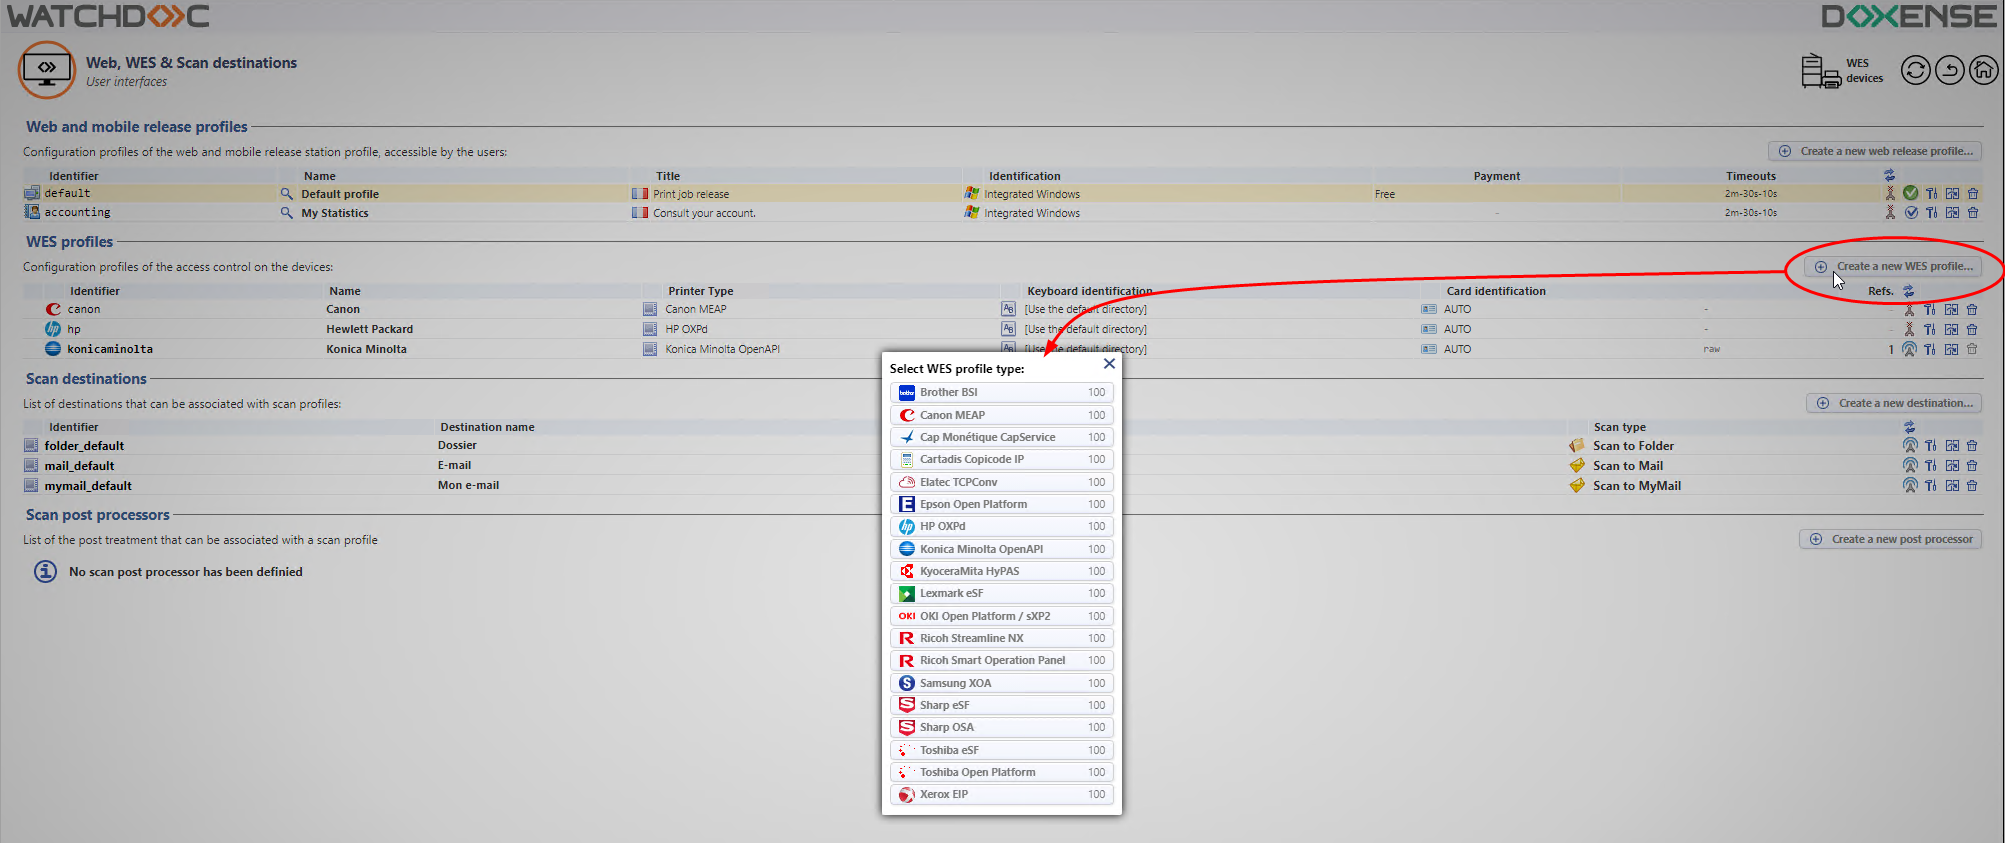
è you will access the Create a WES profile form, which contains a number of sections in which you can configure your WES.
A navigation bar helps you quickly access the desired section:
Configure the Lexmark WES profile
Properties section
Use this section to state the main WES properties:
-
Identifier: Enter the single identifier for the WES profile. It can comprise letters, numbers and the '_' character with a maximum of 64 characters. This identifier is only displayed in the administration interfaces.
-
Name: Enter the WES profile name. This explicit name is only displayed in the administration interfaces.
-
Global: In the case of a domain configuration (master/slaves), tick this box to replicate this profile on the slave servers.
-
Language: Select the WES display language configured from the list. If you select Automatic detection, the WES adopts the language it finds by default in the device configuration.
-
Type: Select the device technology (sXP2 or Open Platform).
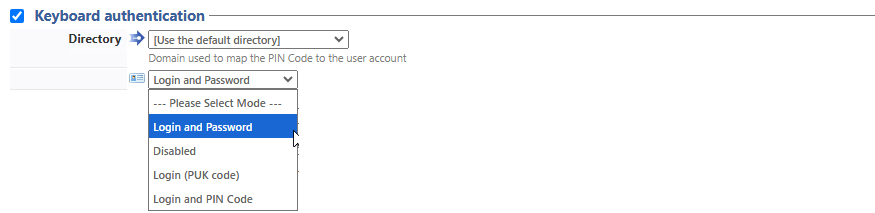
Keyboard authentication mode section
-
Keyboard authentication: tick the box (at the section level) to enable user authentication from a physical keyboard or the touch screen one, then set out how this authentication works:
Allow PUK
(Print User Key). In Watchdoc, this is a code (associated with a user account but used alone) sufficient to allow the user to authenticate in a WES. The PUK code is generated thanks to an algorithm. The user can consult it in the "My account" page of Watchdoc. For security reasons, we advise against using the PUK code and recommend using a login (user account)/PIN code. Code authentication: the PUK code is automatically generated by Watchdoc according to the parameters defined in the directory and communicated to the user on the "My account" page.
Allow Login and PIN Code authentication: consisting of 4 or 5 digits, the user PIN code (1234, for example) is registered as anLDAP attribute or in a CSV file. It is associated to the user login (available with the Watchdoc 5.1 version).
Login and password authentication: users will use their LDAP credentials. We do not recommend using this mode.
-
Directory: From the list, select the directory to query during keyboard authentication. If no directory is set, Watchdoc will query the default directory.
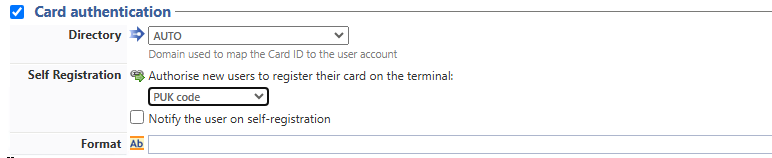
Card authentication section
Card authentication: tick the box (at the section level) to enable user authentication from a card, then set out how this authentication works:
-
Directory: From the list, select the directory to query during cards authentication. If no directory is set, Watchdoc will query the default directory.
-
Self registration : If you enable the self-registration
An action in which a user account is associated with its own card code. Registration is carried out the first time a card is used. The registration can be carried out by the IT manager when he issues the card to a user or by the user himself who enters his identifier (PIN code, PUK code or username and password) which is then associated with his card code. Once the registration is completed, the card code is permanently associated with its owner. from the WES, state how the user assigns their card to their account:-
with PUK code: the embedded solution will ask the user for its PUK code. If the PUK code is correct, Watchdoc stores the card number with the user's login in its database;
-
with login and PIN code: the embedded solution will ask the user for his login and his PIN cpde.
-
with login and password: the embedded solution will ask the user for his login and his password. If the data keyed in are correct, Watchdoc stores the card number with the user's login in its database.
-
Notify the user on self-registration: check this box to send a notification to the user when his badge has been enrolled.
-
-
Format : State, where necessary, how the character string for the badge number string is to be transformed. E.g. raw;cut(0,8);swap.
Accounting section
In this section, specify whether you want the accounting to be performed by the device itself or from the Watchdoc parser.
- Device > Uses the prints accounting information from the device : tick this box if you want accounting to be supported by the device instead of the Watchdoc parser. This only applies to print jobs. Results are more reliable especially when the job is not fully printed (canceled).

Pull-print section
In this section, you can change options about the Watchdoc release application: sort order of the document, tariff information and optional pages.
-
Sort Order: Set the documents order on the device screen:
-
Reverse chronological: More recent documents will top the list ;
-
Chronological: Older documents will top the list.
-
-
Release all documents at login: When the user logs on, Watchdoc releases all user documents on the device where he logs on. In this case, the user cannot access the list of pending jobs to delete or print them one by one.
-
Display options: monetary information presented to the user Select which information will be displayed to the users (none, cost, price);
-
Optional pages: Tick the box o enable user adding more pages previews:
-
Enable Page Zoom: User can have a page by page preview (PCL 6 driver required)
-
Enable spool edition: User carn modify the initial printing criteria;
-
Use a custom logo: (WES v2 only) Tick the box to custom the WES by applying your organisation logo. In this case, the logo must be recorded in the Watchdoc server dedicated folder (C:\Program Files\Doxense\Watchdoc\Images\Embedded\Logo.png).

-
Device section
This section is used to define the connection mode between the server and the print devices.
-
Roles definition file: here you specify the path to the file in which the pre-device access roles are saved.
-
Server Address: The device needs to contact the Watchdoc server when the user tries to connect or wants to release his documents. You can specify the Watchdoc server address in three different ways: IP Address, DNS Address and Custom Address ;
-
Session Timeout: Lexmark devices natively manage the automatic closing of the user session after a time configured in its options. To facilitate configuration, it is possible to specify this time in the form. The duration is taken into account when the embedded application is installed or when its configuration is updated.
- Device security: enter the administrator login and password required to access the device.
- Use a secured connection when interacting with the device for SOAP calls: tick this box if SOAP calls must be secure.
- Email: indicate whether the email destination field of the device screen can be modified by the user:

Validate the profile
1. Click on the  button to validate the WES profile configuration.
→ Once validated, the WES profile can be applied to a print queue.