Sharp WES - Configure the WES onto the queue
Access the interface
-
From the Main Menu of the Watchdoc administration interface, in the Production section, click Print Queues, Queue Groups & Pools:
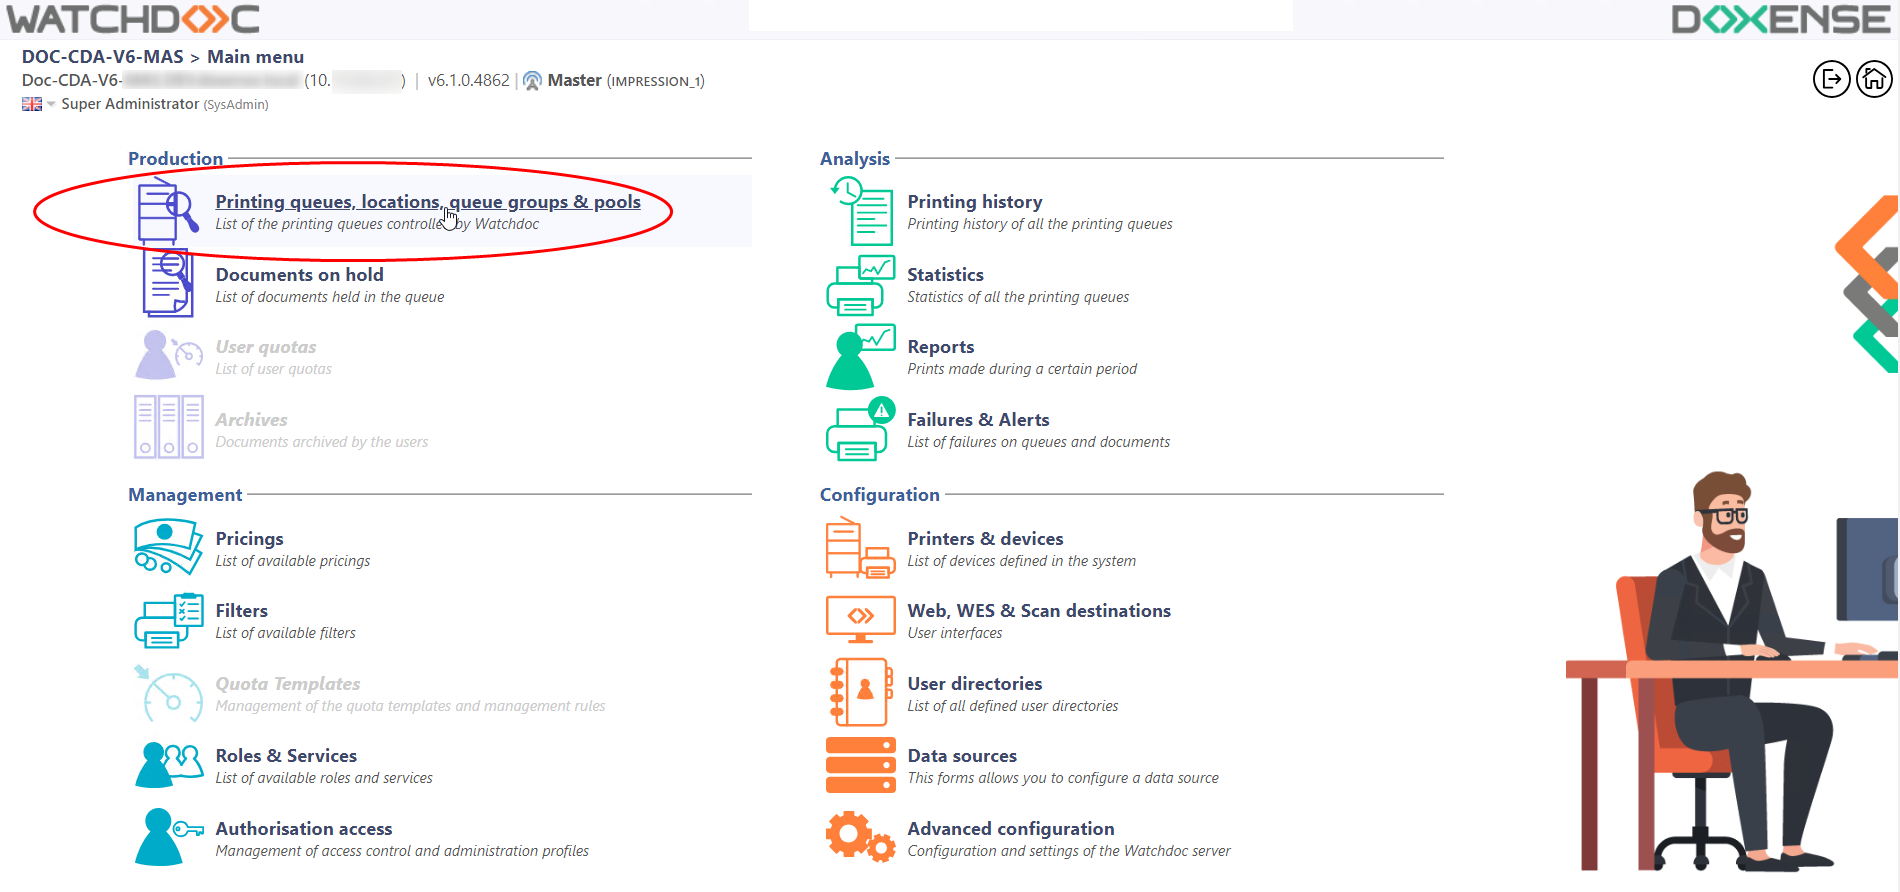
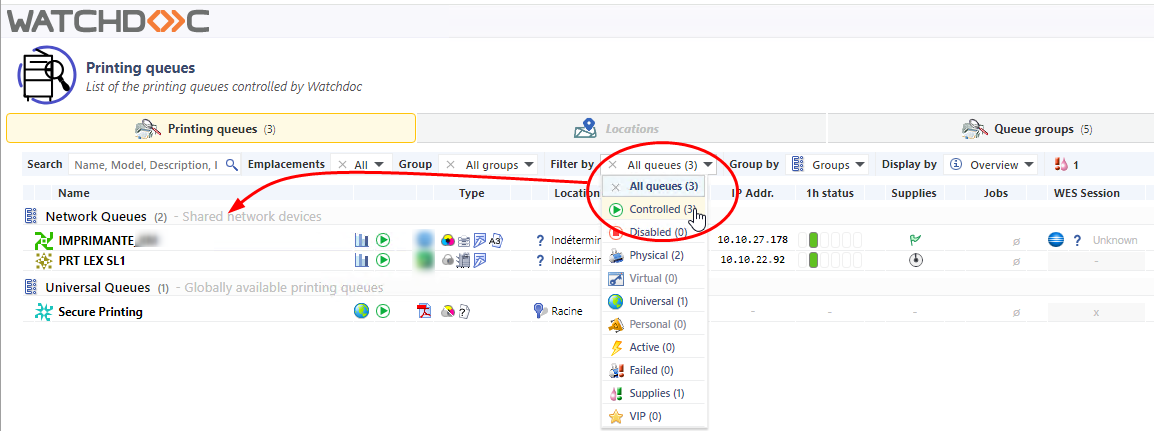
è This takes you to the print queues interface. In this queue, activate the Controlled filter, then select the queue you want to configure:
-
For this queue, click the Edit Queue Properties button
 at the end of the line.
èYou are taken to the Print Queue Properties interface in which several sections are displayed. WES properties are managed in the WES section.
Configure the print queue mode
In the Print Queue Properties interface, General Information section, select the operating mode for the queue:
-
Mode: select Validation to have users validate queued jobs so that they are actually printed. If the queue belongs to a group configured in Validation mode, you can also select Like Group.
Configure the max. users number
To speed up authentication on the print queue, Watchdoc stores a number of users who have already been authenticated in a specific file (which is not a cache file). In the Print Queue Properties interface, in the General Information section:
-
Maximum number of users: enter the maximum number of users to be kept in this file in the field.
If the queue belongs to a group and you do not specify a value, the number entered for the group is taken into account.
Configure the WES onto the queue
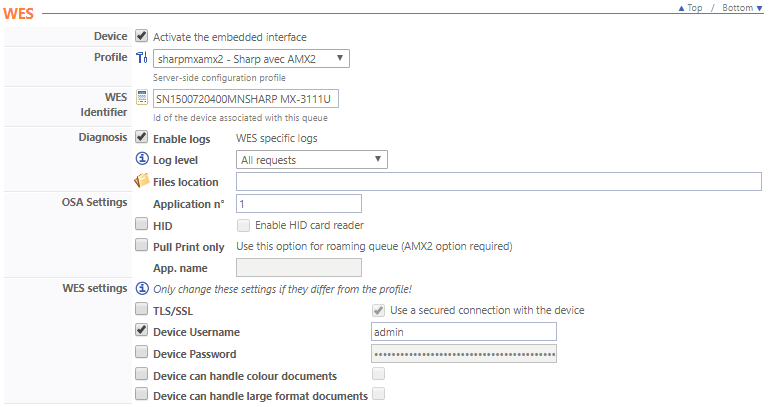
In the Print Queue Properties interface, click on WES to access the dedicated section.
-
Activate embedded interface: tick the box to use a WES.
-
Profile subsection: From the list, select the WES to configure. The list comprises profiles created ahead of time in your instance of Watchdoc. If the desired profile is not found there, you will need to configure it (see Configure a WES article).
-
WES identifier subsection: Once you have ticked the box and selected the profile, the ID of the WES field will fill itself with “$AUTOSERIAL$”. Keep it that way so that the server will determine itself the serial number of the device and use it as the WES ID. You can also input directly the serial number of the device in this field.
-
Diagnosis subsection: It may be useful to activate WES trace logging, especially to diagnose an anomaly. Use this subsection to specify settings relating to WES trace log files:
-
Enable logs: Tick the box if you would like to generate trace log files on communications between Watchdoc and the WES and to keep them on the server.
-
Log level:From the list, select the type of requests you wish to trace:
-
Network trace: Communications between server and WES.
-
All requests: Used to keep a trace of all of the requests (to APIs, to RPCs).
Although all options are possible, we recommend strongly to opt for the activation of All Requests so that as much information as possible can be View of the diagnosis. For the sake of performance, the traces must not Be activated only for analytical and diagnostic purposes.
-
Requests to APIs and RPCs: Used to retain traces of requests to the API and the RPC requests sent,
-
API Requests: Used to retain traces of the requests sent to the APIs,
-
None: Not used.
-
-
File locations: Use this field to enter the path to the folder where you wish to save the trace files. If no path is specified, then by default, Watchdoc saves the trace files to C:\Program Files\Doxense\Watchdoc\logs.
-
OSA Settings:
-
Application n°: automatically correctly filled during the installation, this value corresponding to the number done to the WES application in the device interface ;
-
HID - Enable HID card reader: Tick this box if your use a HID card reader;
-
Pull Print only: Tick this box to allow the pull print application to be accessible directly after the user is logged in (this setting is available with AMX2 option)
-
-
-
Wes Settings subsection: Use this section to configure the connection settings between the WES and Watchdoc in cases where the connection is a secure one, so that you can override the device username, password and the type of connection that is configured in the instance just for one queue:
-
TLS/SSL: Tick this box if the connection is secured using this protocol and fill-in the following fields:
-
Use the default credentials: Tick this box to use the identifiers already preset when the WES was configured.
-
Device Username: Use this field to enter the device administrator's account;
-
Device Password: Use this field to enter the password assigned to the device administrator;
-
Device can handle colour documents: Tick this box if the if the print device offers;
-
Device can handle large format documents: Tick this box if the print device offers large format printing
-
Configure the Spool transformation
The Spool transformation function lets Watchdoc impose or propose to users changes to the initial print criteria to better match the print policy implemented:
-
Activate monochrome conversion: Tick the box to propose that a print job requested in colour be changed into a one colour document;
-
Activate a change in the number of copies: Tick the box to propose that the numberof copies of a print job can be changed;
-
Activate conversion to two-side printing: Tick this box to propose that a print job requested for one-side printing be printed on two-sides;
-
Activate conversion to one-side printing: Tick the box to propose that a print job requested for two-side printing be changed to one-side printing.
-
Dump spool sub-section: Watchdoc enables spool dumping, especially to analyse the printing activity;
-
Enable spool dumping: tick the box if you want that the spools may be save and set the tracing conditions;
-
Trace level: in the list, select the traces that you want to save (none, errors, edited spools and all);
-
Enable for: in the list, select how long you want to enable spool tracing (an hour, a day, a week or a month).

-
Validate the configuration
1. Click on  to validate the WES configuration on the print queue.
2. After having configured the WES onto the queue, you must install it.