Sharp WES - Troubleshoot the WES
General troubleshooting rules
In order to enable the Doxense Support team to establish a fast and reliable default diagnosis, please communicate as much information as possible during the declaration of the inciden
-
What? What procedure can be used to reproduce the incident?
-
When? What date and time did the incident occur?
-
Where? On which printer did the incident occur?
-
Who? On which user account did the incident occur?
-
Watchdoc.log: thank you for providing the Watchdoc.log file;a
-
config.xml file: thank you for providing the Watchdoc.log file;
-
server/device communication logs: please activate the trace files on each file.
Once this information has been gathered, you can send a resolution request from the Connect portal, the incident management tool dedicated to partners.
To obtain the best possible record of the data required for diagnosis, use the Watchdoc DiagTool® supplied with the Watchdoc installation program (cf. Creating a log report with DiagTool ).
Scan, fax and photocopying are not in Watchdoc
If the scan, fax and photocopy jobs are not counted by Watchdoc, verify that the address (host name or IP) of the Watchdoc server configured in the device is correct:
-
Iin the configuration interface of the queue, in the WES section, click on the button Application status (displayed when the WES is properly installed);
-
Click the Download button to download the log files and WES configuration;
-
In the downloaded .zip file, open the Config.json file using a text editor and check the information corresponding to the address of the server (Address) and ports;
-
If the configuration of the address and / or ports is not correct, click on the Configure button on the queue configuration interface.
-
Verify that the procedure has resolved the problem.
Activating WES traces
To diagnose a problem with Sharp OSA on-board applications, you need to activate the log files specific to WES communications.
To activate the traces
-
in the Watchdoc web administration interface, from the Main Menu, Production section, click Printing queues, queues groups & pools;
-
In the list of queues, click on the name of the queue with the WES for which you want to activate the trace files;
-
in the queue management interface, click on Properties ;
-
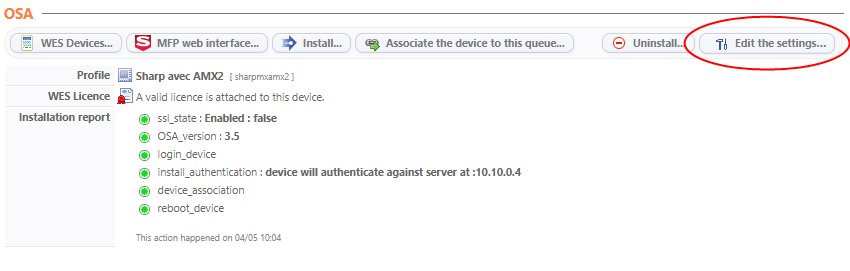
in the OSA section, click on the Edit the settings button:
-
in the WES>Diagnostics section, tick the Enable traces box ;
-
in the Trace level list, select :
-
Auto: retains standard traces ;
-
Include binary content: retains detailed traces.
-
-
In the Path field, enter the path of the folder in which the trace files should be saved. If you leave the field blank, the trace files will be saved by default in the Watchdoc_install_dir/Logs/Wes_Traces/QueueId installation folder:
WES installation not possible of an error message "Moved Temporarily" - Dec. 2025
Context
When installing WES on a print queue, after clicking the ‘Install’ button, the following error message appears in the installation report: ‘WES Java request to [server_IP] failed with status 302 Moved Temporarily’. WES cannot be installed.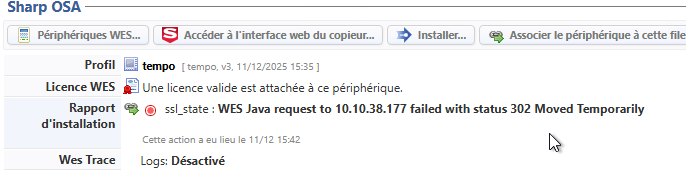
Resolution
Watchdoc should be updated to v. 6.1.1.546(, which corrects this anomaly.
The ‘My Print jobs’ and ‘WEScan’ icons are incorrectly sized on the device screen - Dec. 2025
Context
On the screen of the device where I have enabled the display of the Watchdoc and WEScan functions, the icons representing these functions are not the same size.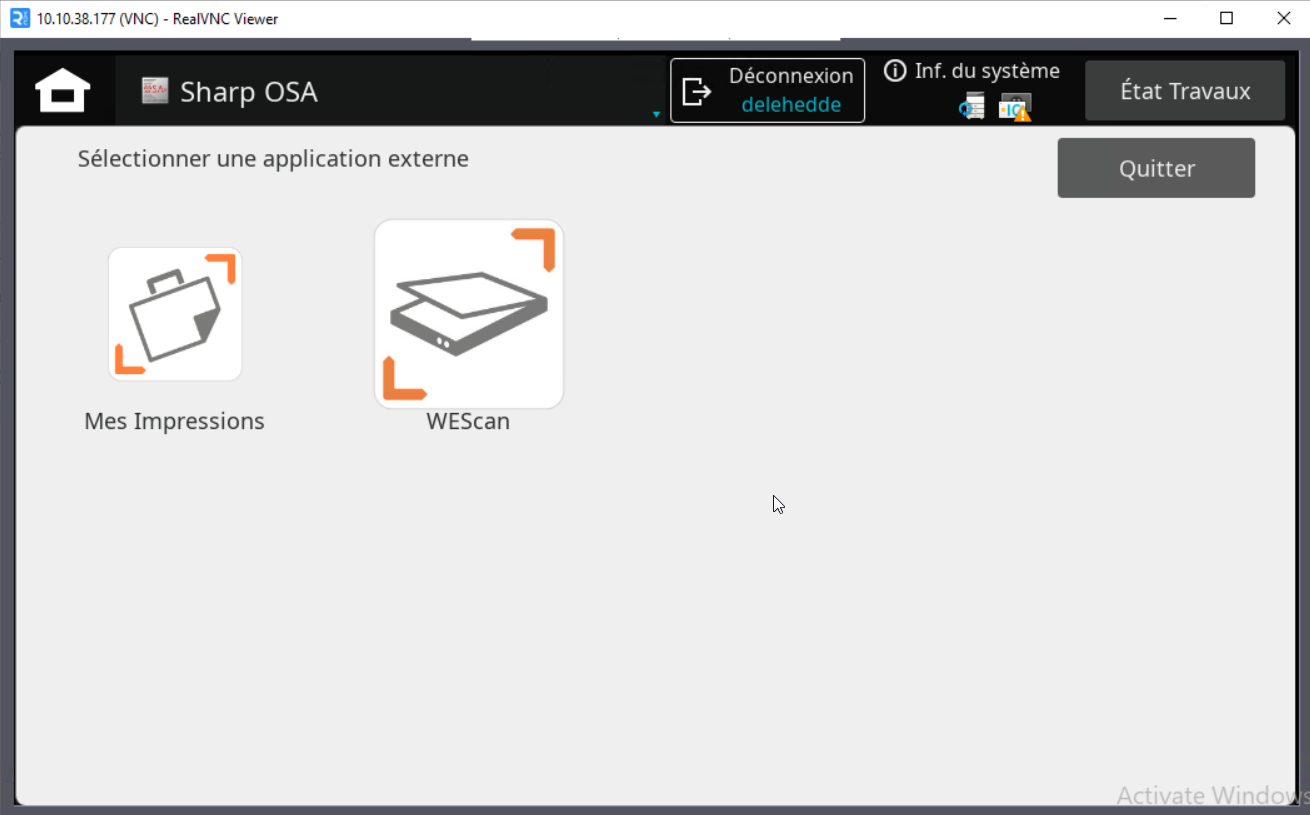
Resolution
It is therefore necessary to update Watchdoc to version 6.1.1.5486, which corrects this anomaly.
WES installation not possible because of AMX2 and AMX3 options problems
Context
When installing WES on Sharp MX-M2651, MX-M3051, MX-M3551, MX-M4051, MX-M5051 or MX-M6051 devices, the following error message appears in the report, preventing WES installation:
WES Java request to [IP Adress] failed with statuts 404 Not Found
Login failed (check credentials)
In the device configuration interface, under the System Settings > Sharp OSA Settings > Standard Application Settings tab, in the Application Name section, "Not determined" is displayed.
Cause
This problem is due to the AMX2 (application communication module) and AMX3 (external accounting module) modules not being installed on the device*. The device cannot communicate with Watchdoc.
* These modules are installed by default on the MX-M3071, MX-M3071S, MX-M3571, MX-M3571S, MX-M4071, MX-M4071S, MX-M5071, MX-M5071S, MX-M6071, or MX-M6071, but must be installed on the MX-M2651, MX-M3051, MX-M3551, MX-M4051, MX-M5051, or MX-M6051 printing devices.
Resolution
To resolve this issue, contact Sharp Support,
-
activate the AMX2 on the printing devices
-
Using a browser, access the device's web interface;
-
Log in with an administrator account;
-
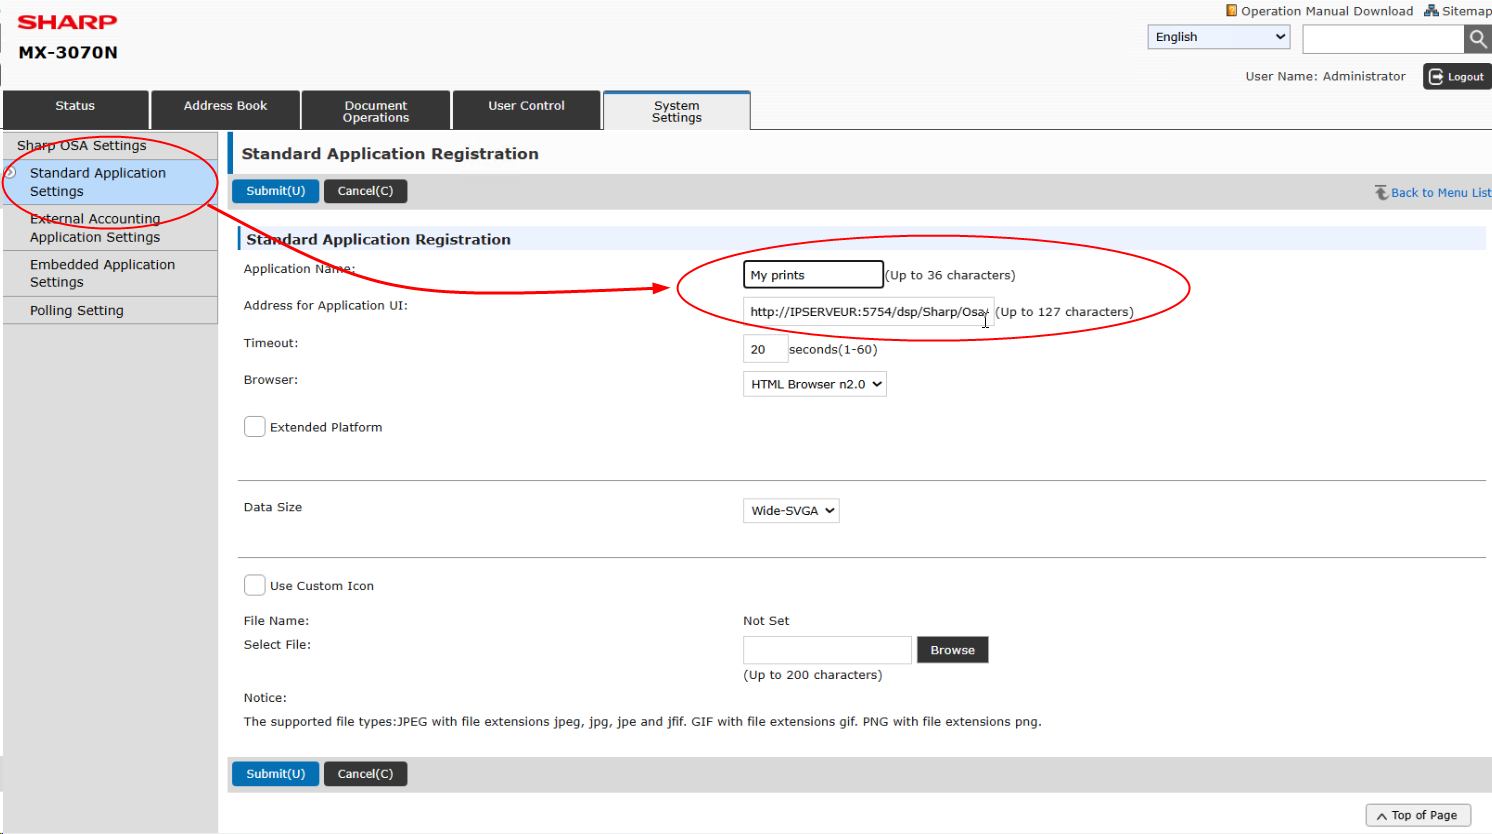
in the menu, click System Settings > Sharp OSA Settings > Standard Application Settings ;
-
in the Standard Application Registration interface, click Add and complete the following fields:
-
Application name: enter the name of the "Watchdoc" or "My Prints" application;
-
Application user interface address: enter the url http://IPSERVEUR:5754/dsp/Sharp/Osa/2.0/Web/Jobs
or, if you are using SSL, enter the url https://IPSERVEUR:5753/dsp/Sharp/Osa/2.0/Web/Jobs
-
-
Activate the AMX3 - BP-MX11 option
-
Using a browser, access the device's web interface;
-
Log in with an administrator account;
-
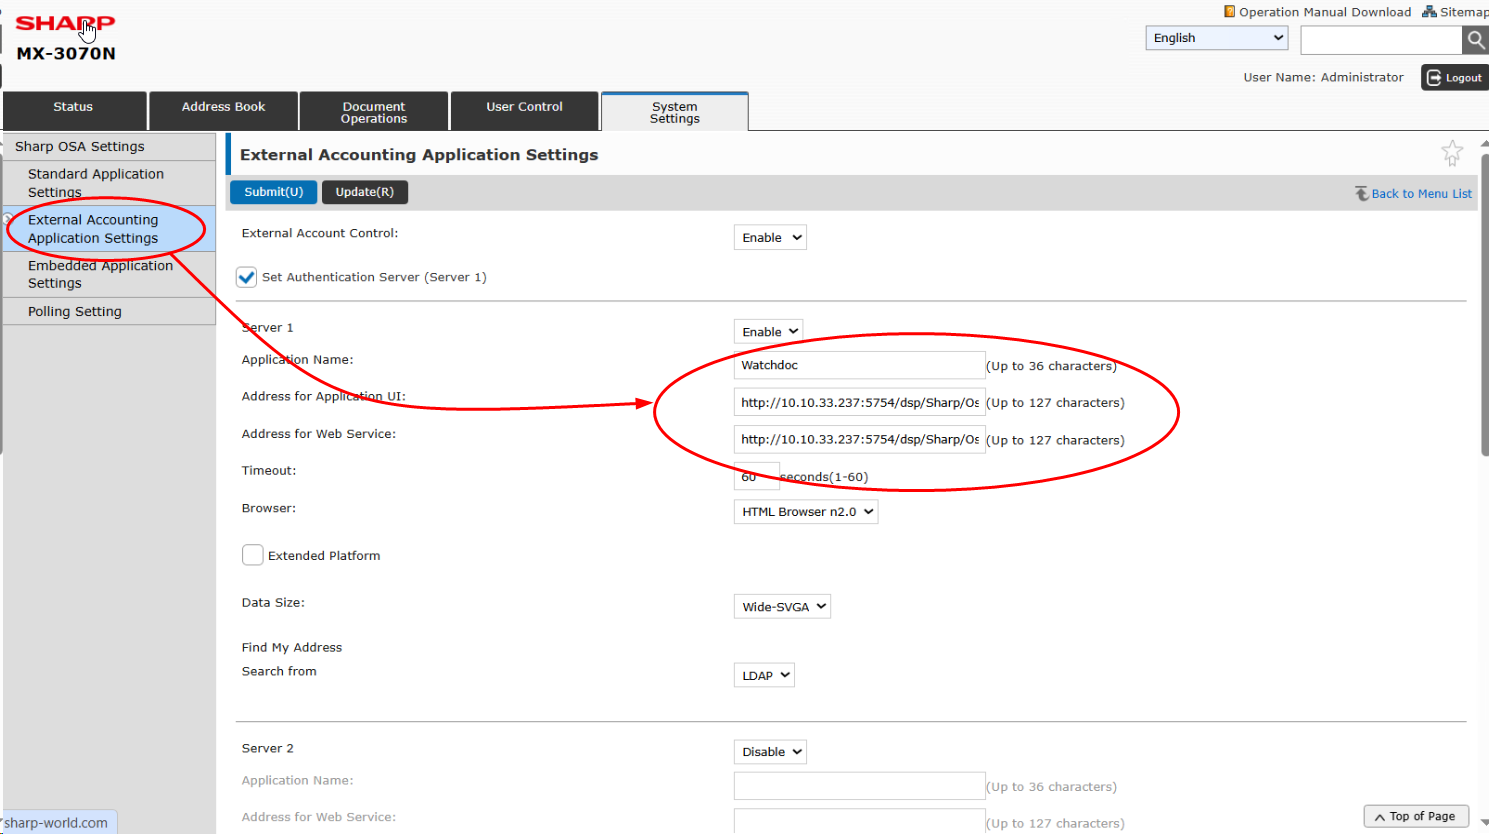
in the menu, click on System settings > Sharp OSA Settings > External Accounting Application Settings;
-
in the interface External Accounting Application Settings, set the parameters and complete the following fields;
-
External Account Control: select Enable;
-
Set Authentication Server: tick the box;
-
Application Name: enter the name of the ‘Watchdoc’ or ‘My prints’ application;
-
Address for Application UI: enter the url http://IPSERVEUR:5754/dsp/Sharp/Osa/3.0/Web/Login
or, if you are in SSL, https://IPSERVEUR:5753/dsp/Sharp/Osa/3.0/Web/Login
-
Address for Web Service: enter the url http://IPSERVEUR:5754/dsp/Sharp/Osa/1.0/Service
or, if your are in SSL, https://IPSERVEUR:5753/dsp/Sharp/Osa/1.0/Service
-
Timeout: keep the value chosen as the time during which the device talks to the server:
-
-
-
Once the 2 options activated, check that these 2 options are displayed on the tab System Settings > Sharp OSA settings >Standard Application Settings.
Sharp WES cannot be accessed from the device's home screen
Context
When installing the WES on newer devices, no error message appears and the installation report indicates that it was successful.
However, the WES ("My Prints" button) does not appear on the Sharp device's home screen.
Cause
This problem may be due to the fact that WES is not enabled on the device, which therefore does not recognize it.
Resolution
-
To resolve this issue, go to the device configuration interface;
-
under the System Settings > Home Screen Settings > Condition Settings tab, the Sharp OSA option is checked;
-
check the Application option ;
-
validate this new setting;
-
from the device's home screen, check that you are accessing the WES "My prints" application.
Printing device's malfunction with SNMP following preventive maintenance
Context
When SNMP is enabled on Sharp devices, sometimes these devices stop working after and send an error following preventive maintenance.
Sharp MFPs send information about preventive maintenance via SNMP through the MFP. Normally, the preventive maintenance messages are not supposed to block the MFPs, but the MFPs are in error in Watchdoc and impossible to print.
Cause
Sharp devices use SNMP to send out preventive maintenance information (e.g. empty toner or paper tray).
Watchdoc is then informed via SNMP that the device is down when it is not. The message remains even after the problem has been solved (e.g. by changing the toner and feeding the paper tray).
Resolution
One-time change
To solve the problem, it is possible to disable SNMP altogether, but this may result in the loss of device usage data. It is therefore recommended that you disable device status monitoring from the Watchdoc administration interface:
-
from the Watchdoc Main Menu, section Printers and MFPs, select the Sharp device affected by the problem;
-
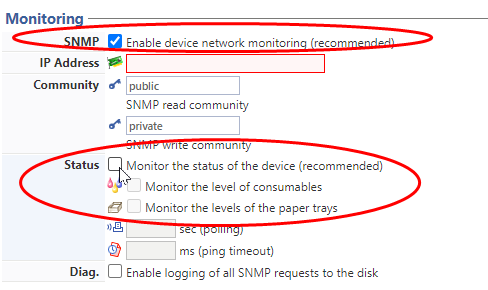
In the device configuration interface, Monitoring section:
-
check the SNMP Enable Network Monitoring box;
-
Clear the Status > Monitor consumable levels check box;
-
Clear the Status > Monitor paper tray levels check box.
Mass modification
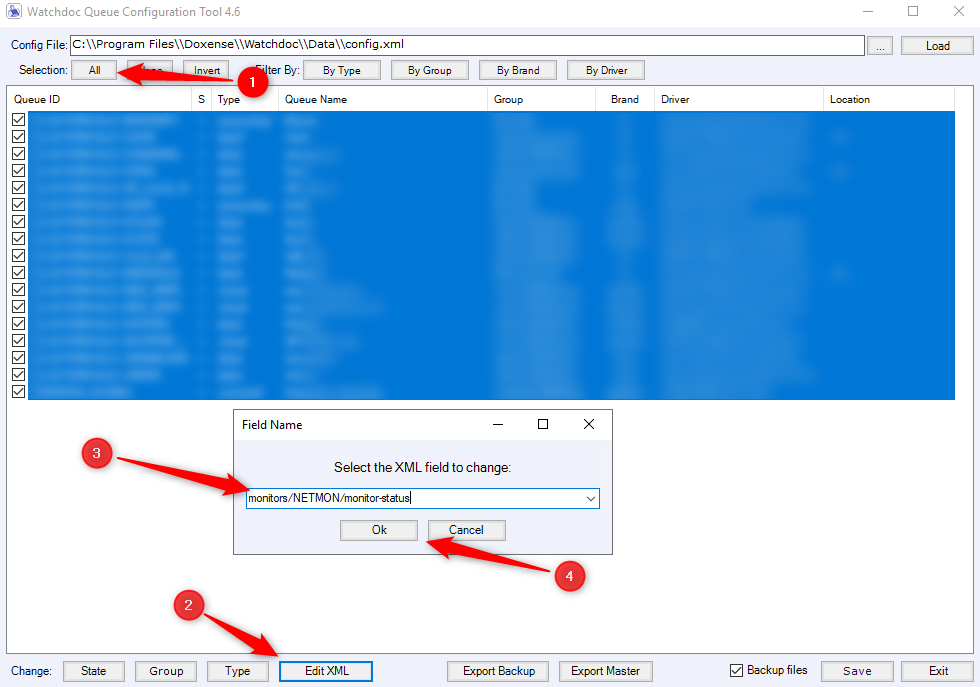
In case a large number of devices are affected by the problem, it is best to use the ConfigTool mass modification tool.
-
As an Administrator, access the server where Watchdoc is hosted;
-
go to C:\Program Files\Doxense\Watchdoc\Tools\ConfigTool and click on ConfigTool.exe
-
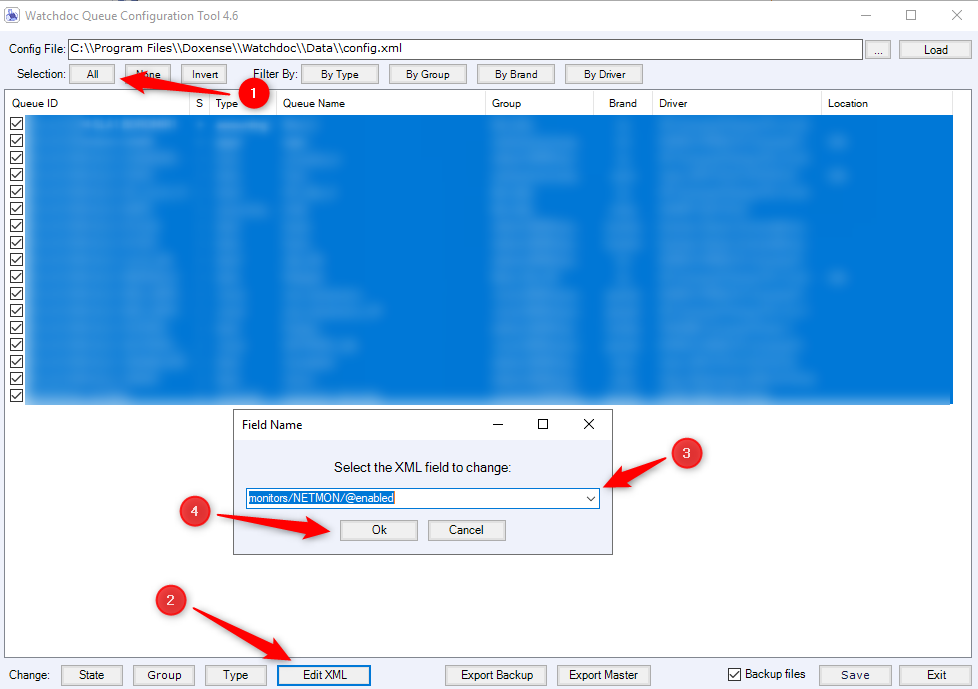
In ConfigTool, select the print queues to modify.
-
Stop the Watchdoc service
-
click on All at the top left, then on Edit XML
-
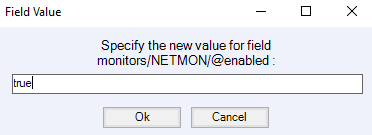
in the Field name box, select monitors/NETMON/@enabled
-
in the Field value box, enter the value "true" to enable SNMP in bulk.
-
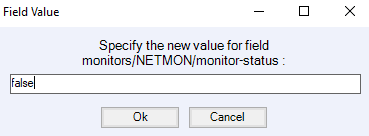
in the Field Name box, then select monitors/NETMON/monitor-status:
-
in the Field value box, enter the value "false" to disable monitoring
-
Click on Save to start the operations, then restart the Watchdoc service.
Impossible to print from a virtual queue
Context
On Sharp WES-equipped devices with a print policy in place, the job does not print.
The job is started and displays in the WES queue. When the user validates, the device activates, but the document is not printed.
In the logs, the users are not recognized for printing or the "scan all" copy is found in ?META/anonymous.
However, the pending jobs appear in the virtual queue.
Cause
The problem is related to a configuration of the Sharp virtual print queue driver that does not recognize the login name as the user name.
Resolution
The problem must be resolved in the Sharp driver configuration interface:
-
go to the Sharp device administration interface as an administrator;
-
in the menu, click on Configuration ;
-
In the Configuration interface, click Print Policy:
-
in the Print Policy interface, check the boxes
-
Use the MSWindows login name as the 'Login Name'
-
Use 'Login Name' as 'User Name':
-
-
Apply this setting.
-
Then go to the Default Printing Preferences interface and click on the Job Management tab.
-
In the Initial Settings section, for the Authentication setting, select Login Name:
-
Click OK to confirm the settings.
Error message - Unable to reach the auth. server
Context
Although all the installation prerequisites have been met and the WES has been installed without a problem on v.6 models, the error message ‘Unable to reach the authentication server’ is displayed on the print device when a user tries to identify himself.
Cause
The malfunction is due to a configuration on the printing device: when the WES was installed, the ‘Enable offline authentication’ parameter was activated.
Resolution
After installing the WES:
-
go to the device configuration interface;
-
on the System Settings tab, click Authentication Settings > Default Settings;
-
in the Authentication Information Usage Settings section, uncheck the box Enable Offline authentication with stored User Information...
-
check that a user can authenticate without encountering the error message.