Companies
Tab Companies contains the list of companies, with basic information about their current state.
Displayed information according to columns are as follows:
-
Company name, as column says, this is company name together with the main location below it (by choosing company name you can go to selected company settings)
-
Prefix, shortcut representing a given company
-
Locations, number of added location for certain company(by clicking on them you will go to company location settings)
-
Billing type, represents method of settlement with each company
-
Agent, last used agent with date and current state
-
Number of devices, represent information about amount of devices attached to a company(by pressing it you will go to device tab with filter on for the chosen company)
-
Volumes in last month, number of prints from previous month
-
Action, by clicking 3 dots you can choose edit and go to company settings, or deactivate company.
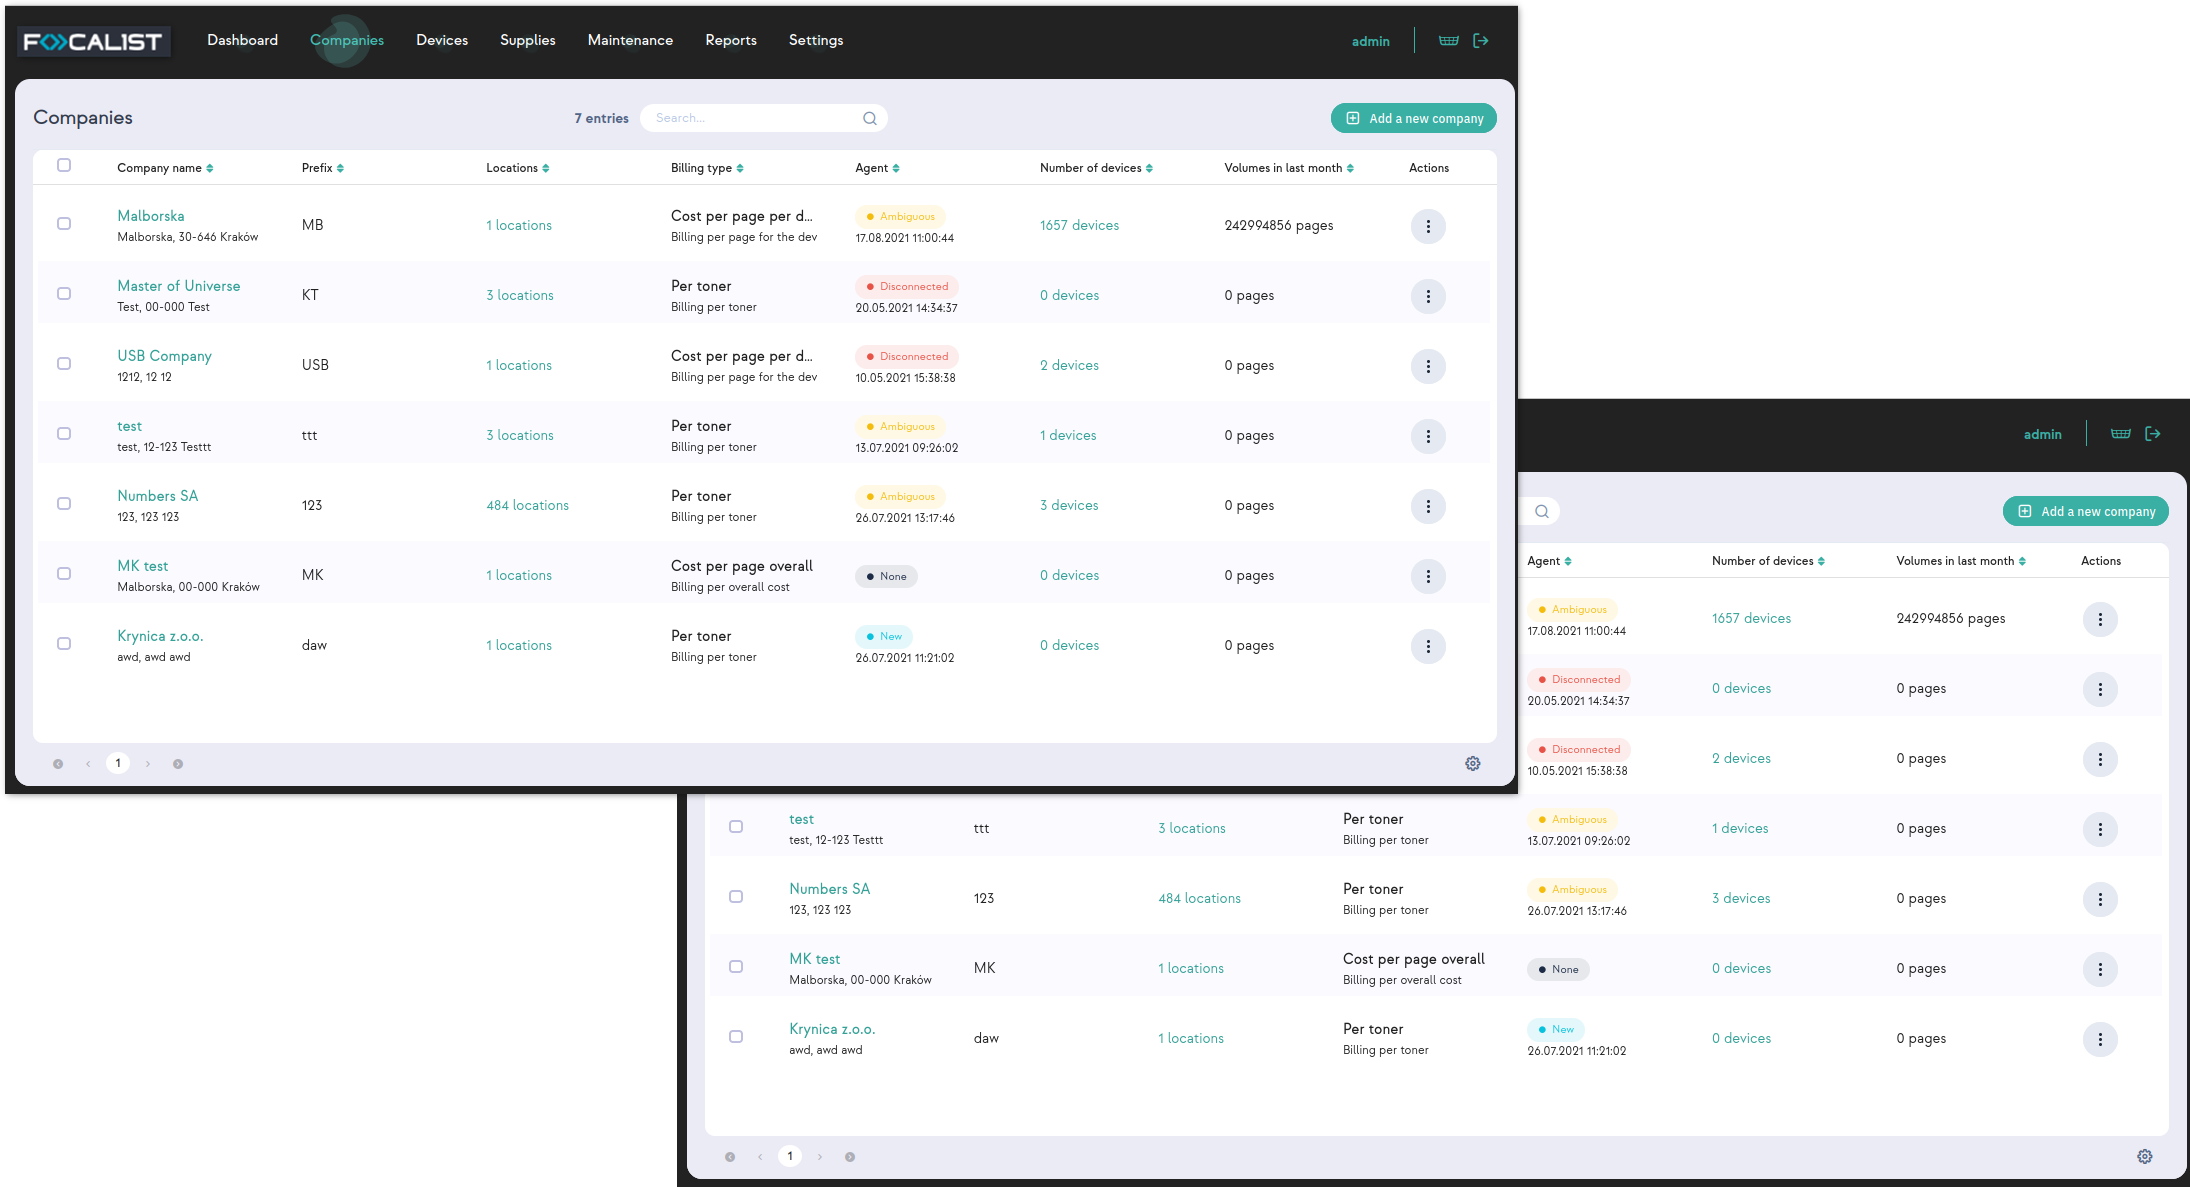
The search is based on data in columns: Company name and prefix.
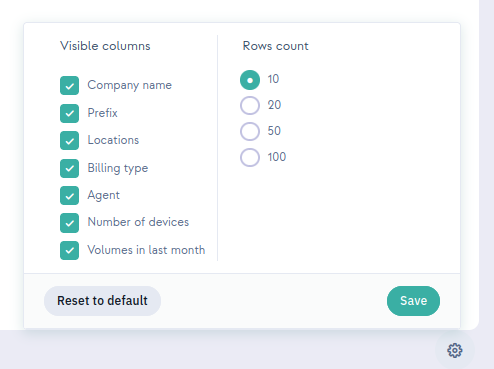
In the lower right corner there is a gear icon where you can change the default display information about each company. Such as visible columns and rows count.
Company
Company is a module generated for each company, which can be specified as company settings. You can go there by pressing on company name or choosing edit from possible actions on companies list in Companies tab. In this module, you can modify the settings for the selected company. The settings are splitted into individual elements depending on their subject and functionality. Each of them will be discussed in detail.
Statistics
Statistics is the first tab in company settings, it contains basic information about company and statistics of made prints in the company.
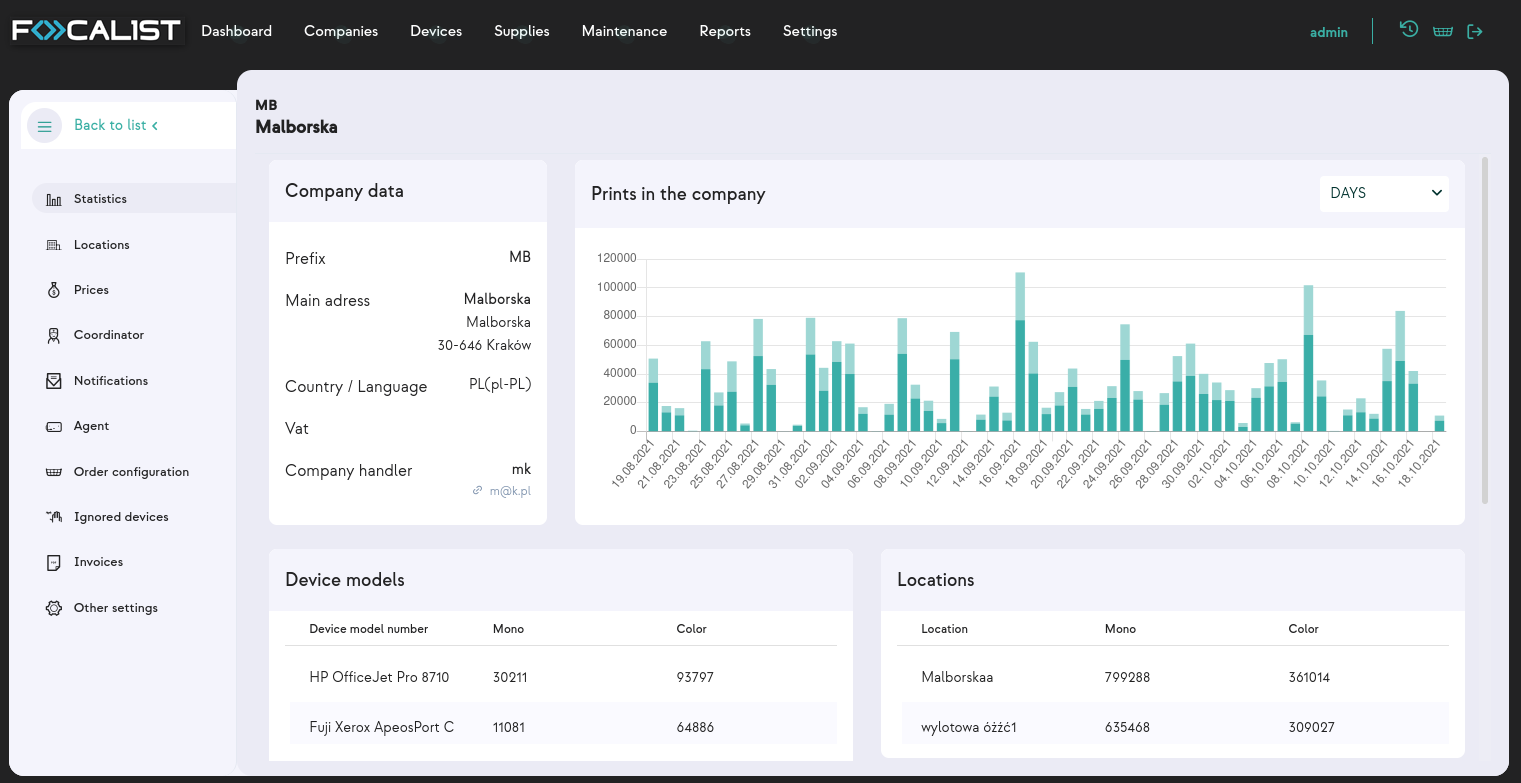
Statistics were divided into four labels:
-
Company data, information about Company
-
Prints in the company, visual representation of pages used, which can be displayed by days or months
-
Device model, list of devices as well as printed pages(mono and color) for each device
-
Locations, list of all locations added to the company, together with printed pages(mono and color) in each
Locations
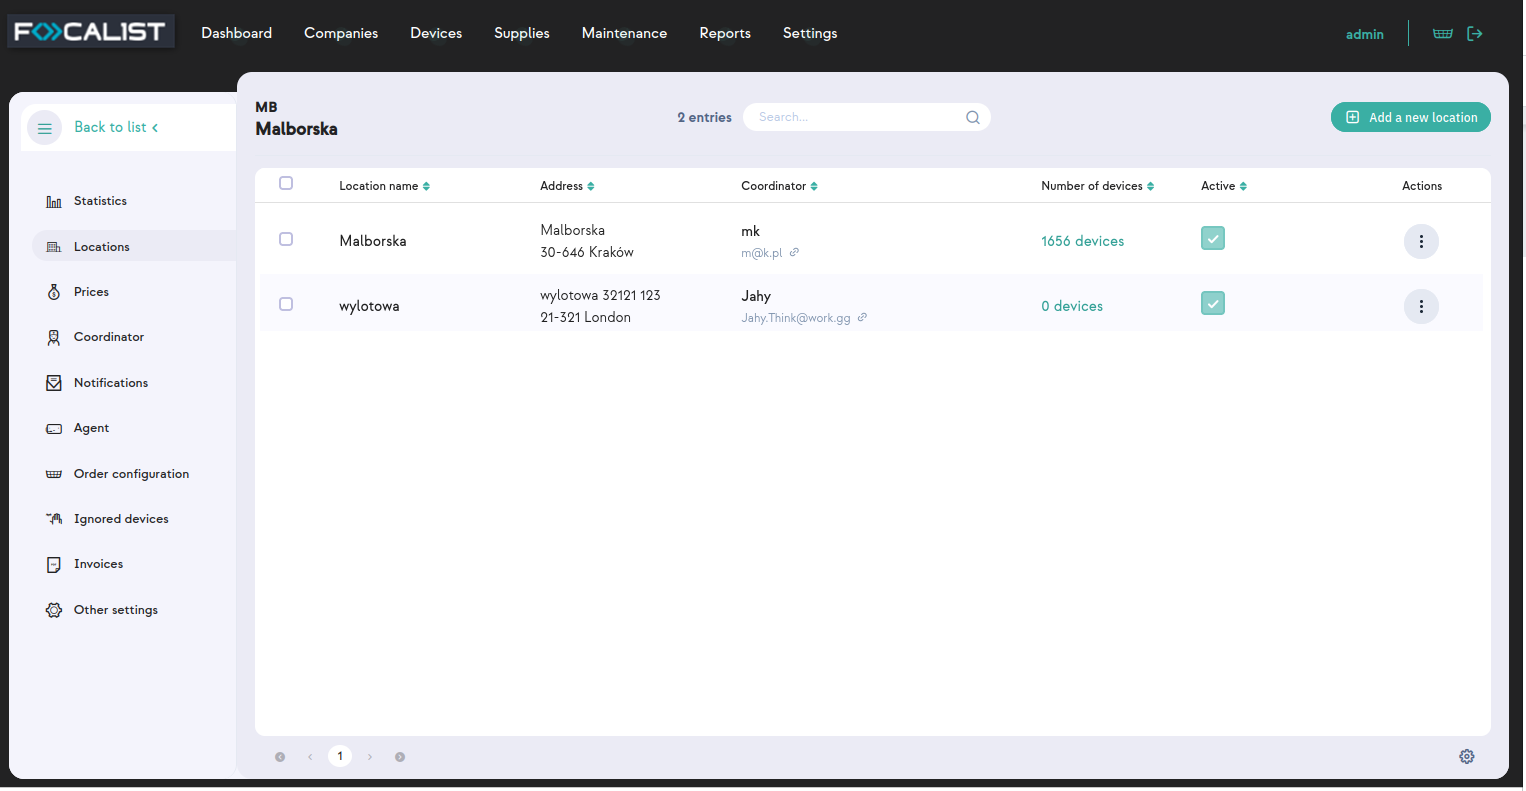
This tab contains information about the locations of printers within a given company. Each location in the table by default contains information about:
-
Location name, given name to location
-
Address, accurate address with street name, number, postal code and city
-
Coordinator, a person assigned to be responsible to perform maintenance activities in the location
-
Number of devices, devices in the location
-
Active (Active or Deactive)
-
Action (Statistic, Edit, Activate/Deactivate, Delete)
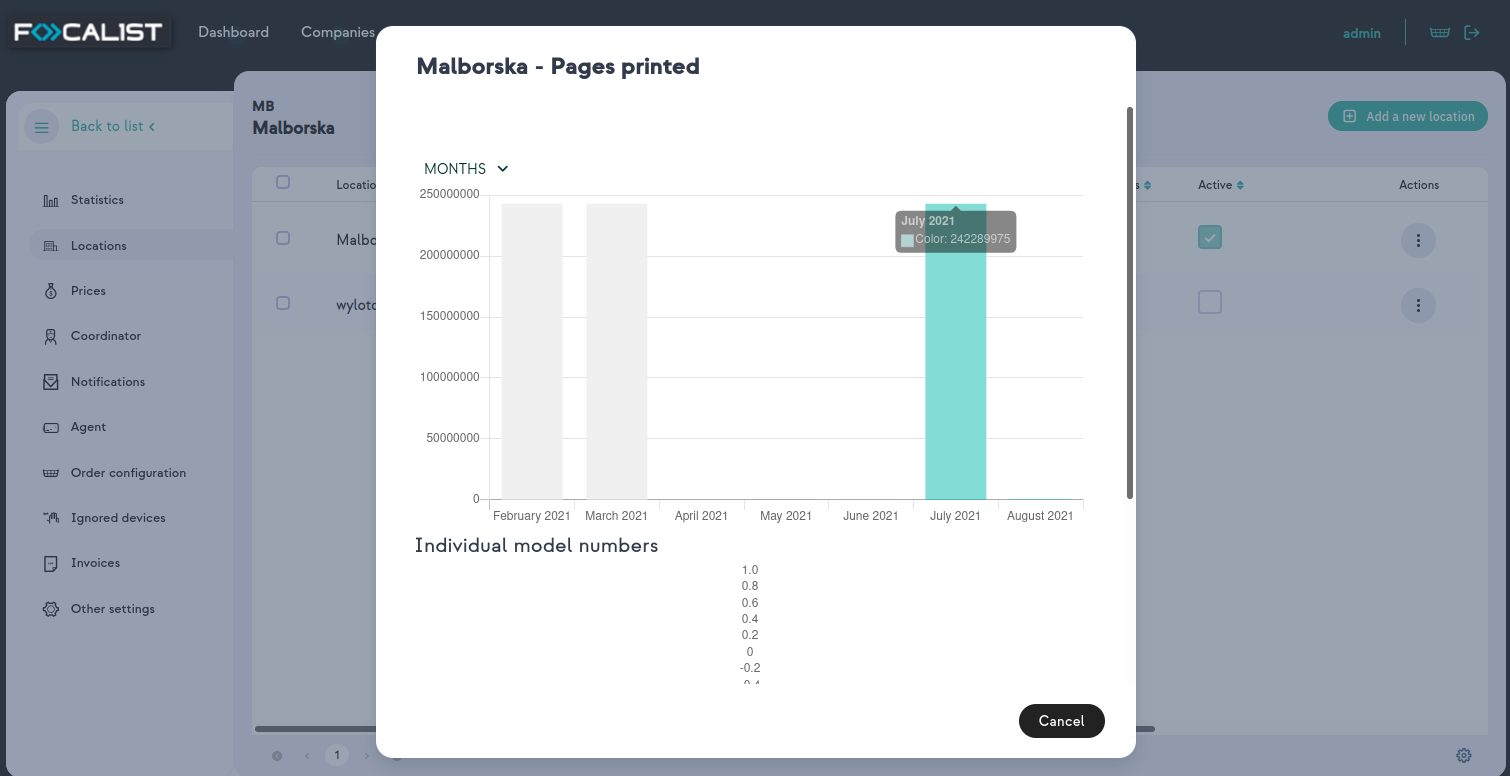
Action
Statistic, display statistical information about printed pages, per month or day in a given location.
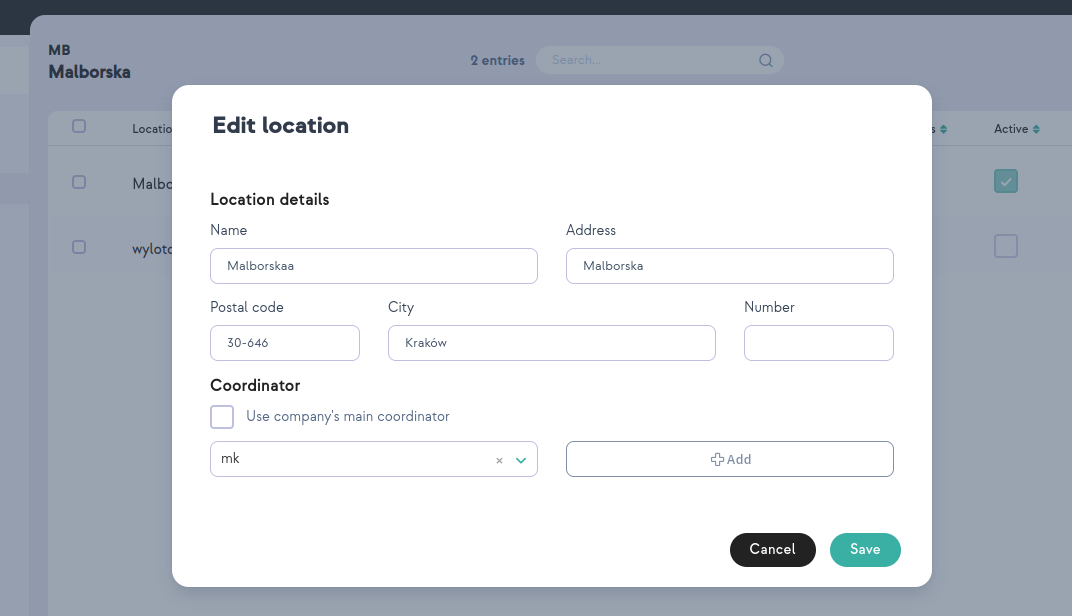
Edit, allow you to modify/update location details, such as address and coordinator. You can choose a coordinator from the list or create a new one which would be added to the database after saving.
Activate/Deactivate, you can activate or inactivate selected locations. If location is active then it can be chosen during adding a new device, if it is set to inactive at that point it is not displayed there.
Delete, it is used to delete permanently selected branches from the locations in a given company.
Prices
Prices is a modul where you can specify the billing type for the chosen company. You can choose your billing type by clicking on the “Advanced settings” and selecting one from the drop-down list. User can't create or change the settlement model, he only has the option to modify the selected model.
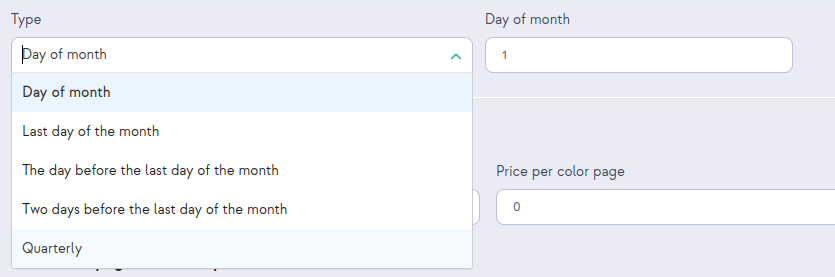
There are four different billing types, but each of them has one common option on top to choose. It's "Type". This option is responsible for defining the range of data responsible for billing reports .
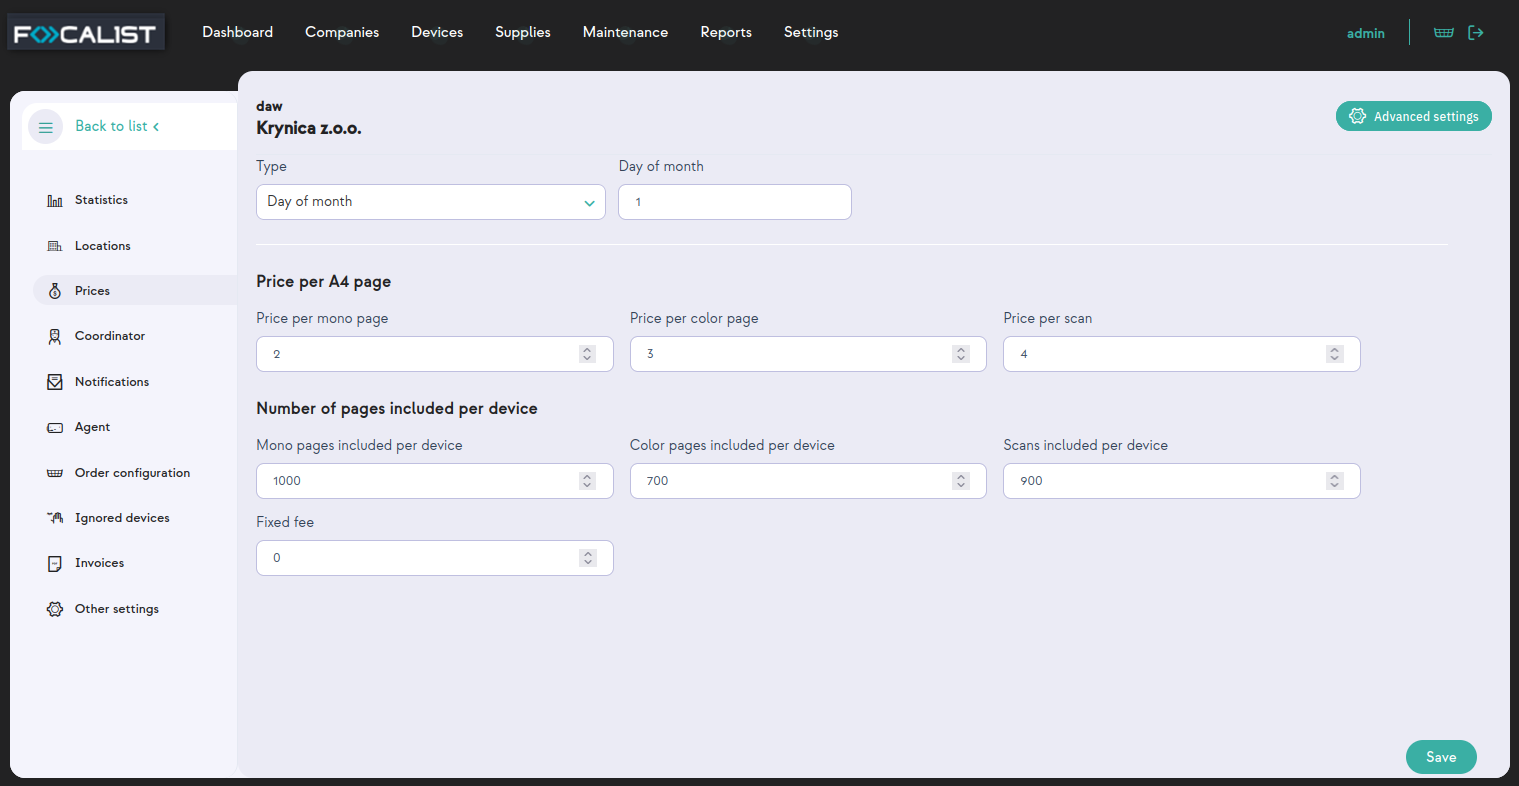
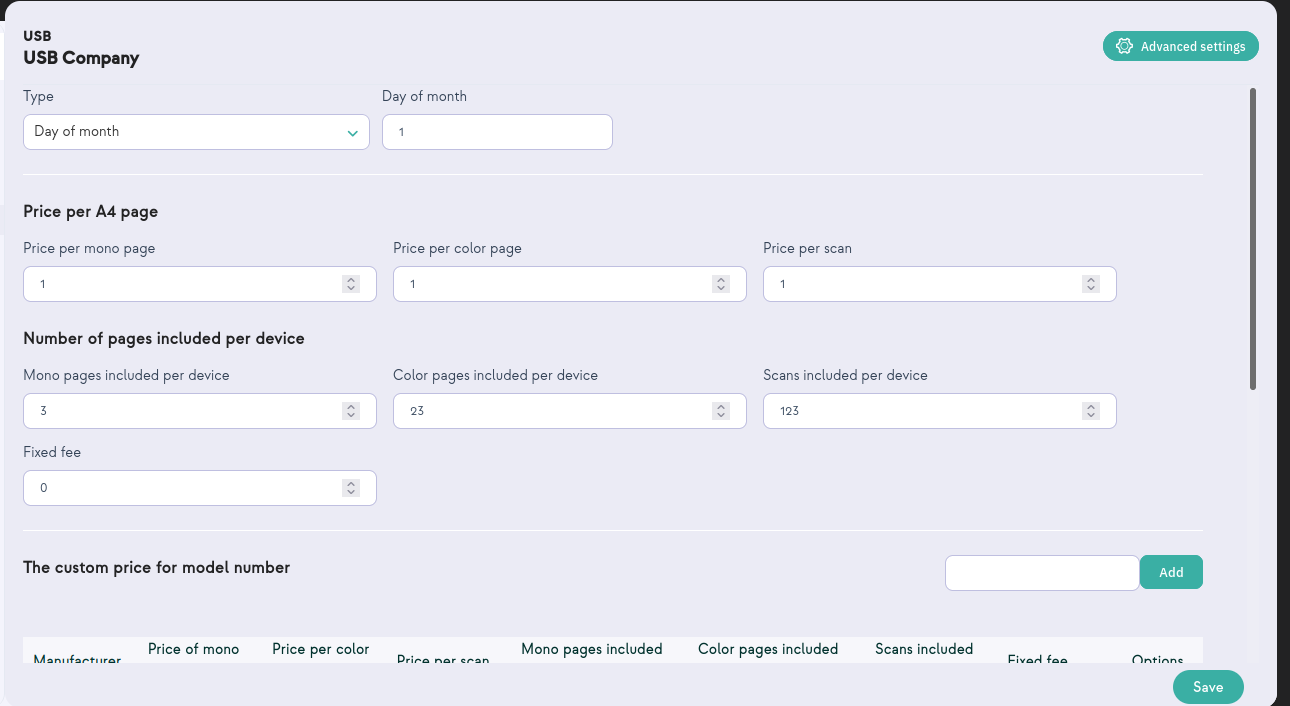
Use a simple billing method
In the default settings of the company, the application uses a simple billing model, visible in the 'Prices' tab, which takes into account the prices quoted during the company registration for the monochrome, color, and scan. The user can change prices at any time during the company's operation.
Note: it should be remembered that a change in these prices will apply from the beginning of the current accounting period. Previous billing periods will not be changed.
In addition, the user can define the number of pages available in the subscription for the device. This is an additional option (subscription system), which allows the client to determine what number of printed pages is settled in the general terms of the contract, and each page above the set threshold will be paid in accordance with the prices specified in the first section.
Be sure to click 'Save', as without this, changes will not be entered into the system. This applies to all billing types.
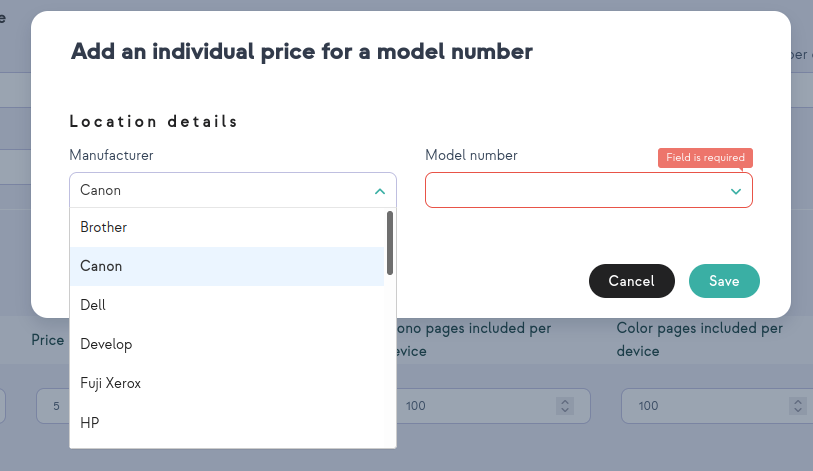
The custom price for the device model
Custom price for device model allows to set unique prices for a defined printer. In this model there are default set price thresholds as in previous one, but additionally we can define rates for a specific printer model or an actual connected printer.
By clicking on the '"Add" button window with "Manufacturer" and "Model number" lists will appear. You need to choose an option in each list and press save.
The administrator can define individual prices for several device models at the same time: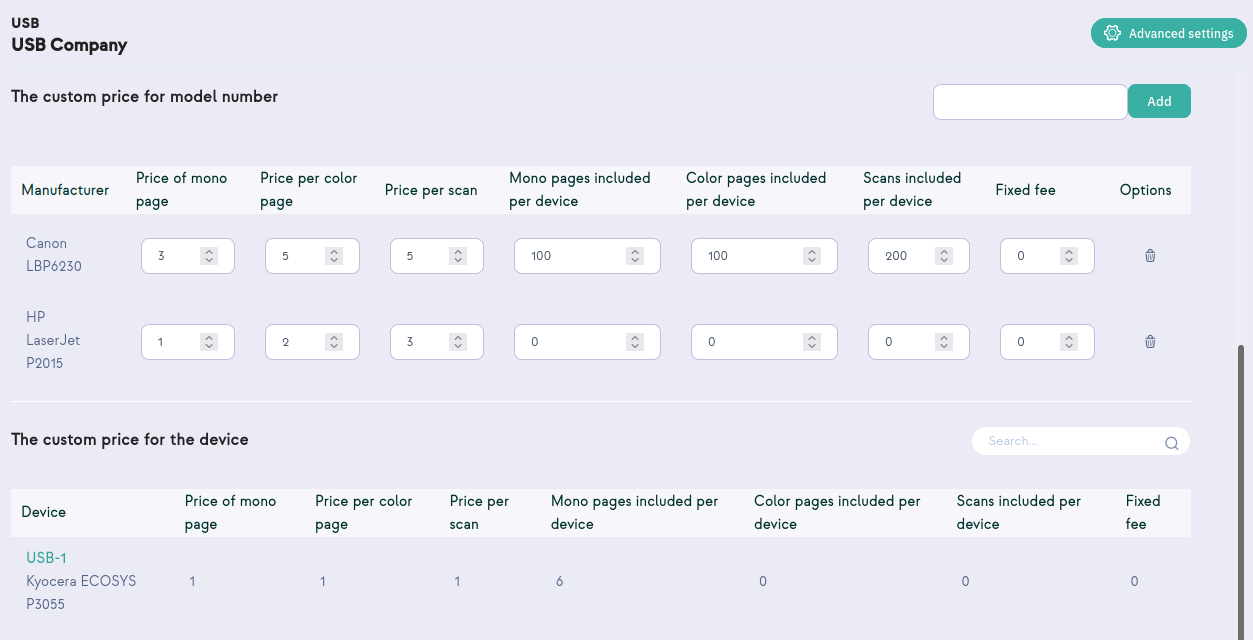
The custom price for the overall number of printed jobs
Model is based on multiple thresholds. This option allows you to set the price for printouts in specific quantitative thresholds, which are set individually by the customer. The system calculates the settlement of the contract according to the given prices, that is depending on the number of pages printed.
After exceeding the number of printed pages given in the first threshold, the system calculates the price for the page given in the second threshold. The number of price thresholds is arbitrary and depends on the client's needs
.
Note: It is necessary to use the 'Save' option when you have finished, otherwise the system will not remember the previously set price thresholds.
Example:
Customer printed 13,207 mono pages and 11,216
Monthly settlement will look like this:
MONO:
|
FROM |
TO |
QUANTITY |
PRICE |
FINAL PRICE |
|
1 |
100 |
100 |
10 |
1000 |
|
101 |
1000 |
900 |
8 |
7200 |
|
1001 |
10000 |
9000 |
6 |
54000 |
|
10001 |
∞ |
3207 |
4 |
12828 |
|
SUM |
|
75028 |
||
Color:
|
FROM |
TO |
QUANTITY |
PRICE |
FINAL PRICE |
|
1 |
100 |
100 |
12 |
1200 |
|
101 |
1000 |
900 |
10,5 |
9450 |
|
1001 |
10000 |
9000 |
7,75 |
69750 |
|
10001 |
∞ |
1,216 |
5,20 |
6323,2 |
|
SUM |
|
86723,2 |
||
Note: If the contract provides for the number of pages printed in a month for which you will not be charged, you should use the 'subscription system'.
Billing per toner
Initially, this model is empty. To use it, first of all, you need to add an agent and scan the network for a new device. After scanning the network you need to add a found device. Consumable parts will be detected and added there. If the agent did not find the device, you will not be able to set anything in this model. The application allows you to set a price for each consumable.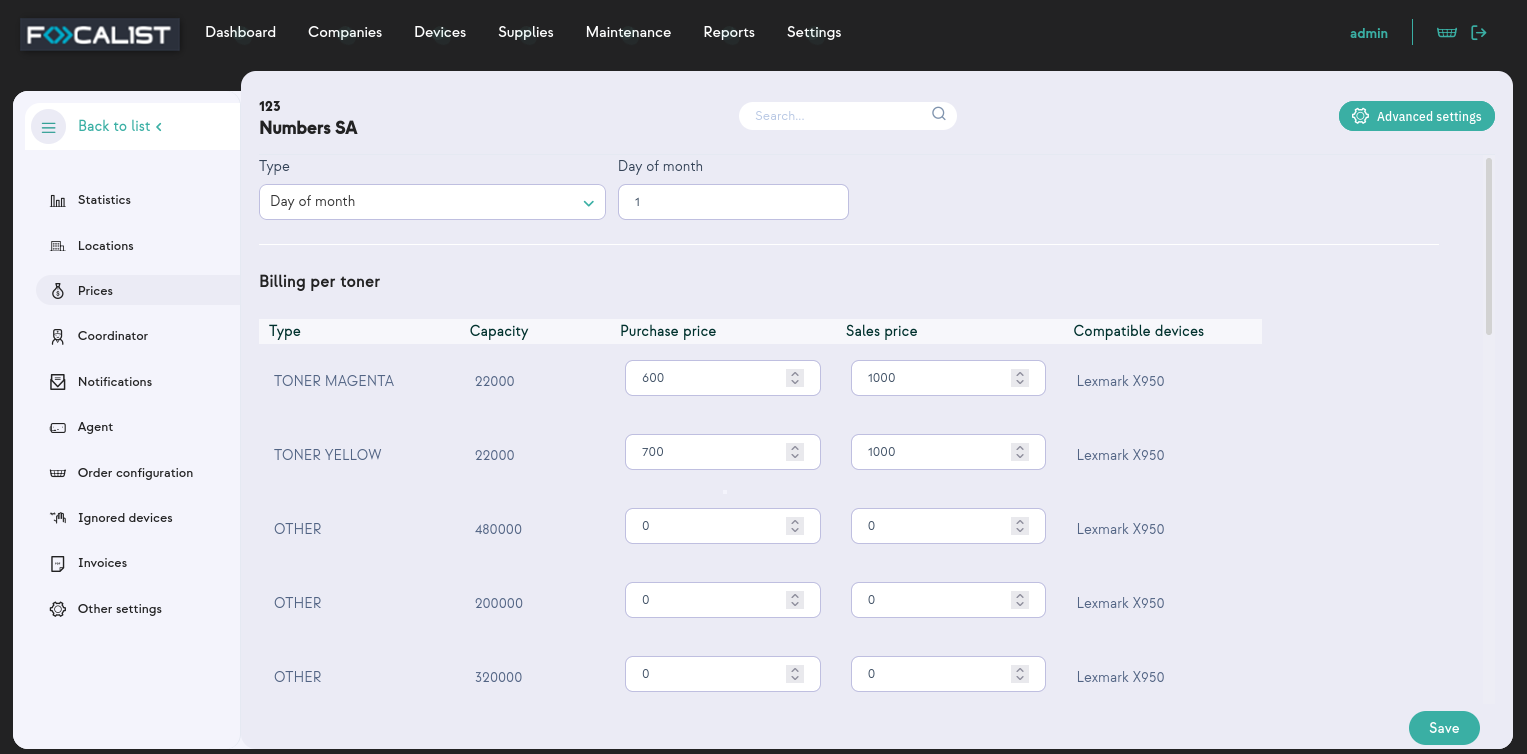
After entering them into the system it is necessary to use the 'Save' option, otherwise the system will not remember the changes.
Note: Sometimes it takes some time to load consumable parts. So if you are sure that you have already added devices, be patient and wait.
Coordinator
In the Coordinator tab, there is a list of coordinators defined in the company’s configuration. As previously mentioned, Coordinators are persons responsible for device maintenance in dedicated locations or the whole company. Each company has one main coordinator who can be chosen by default while adding new locations within the company. The company's main coordinator is marked on the list of all coordinators.
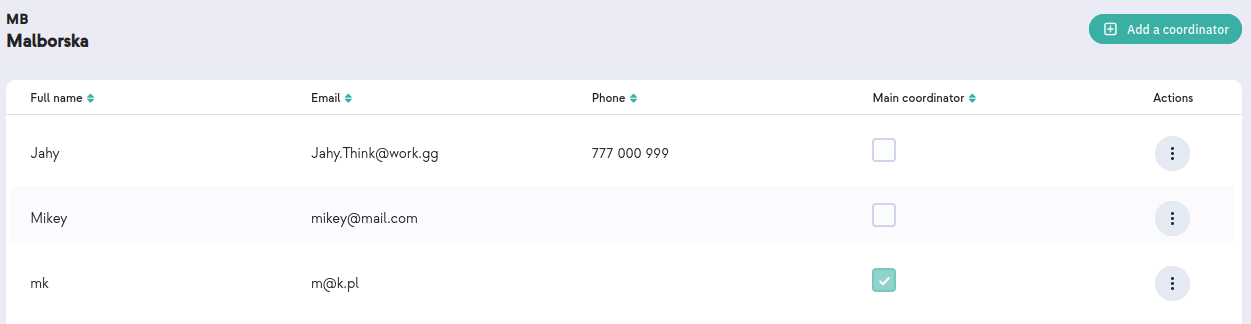
The administrator has the option to add a new coordinator using the 'Add coordinator' option.
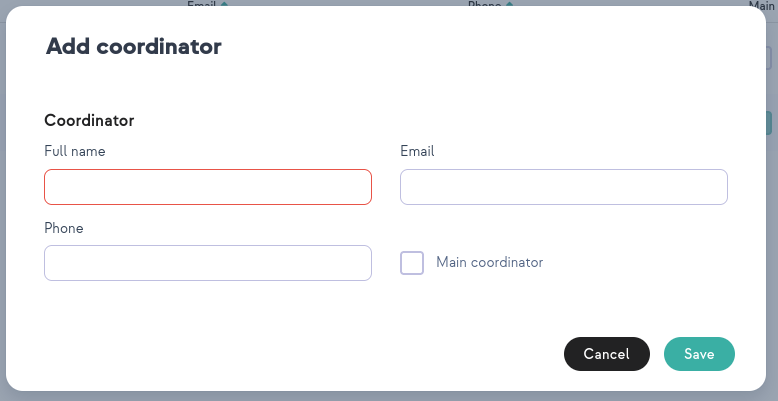
When you add a new coordinator, you can mark it as your company's main coordinator or do it later if you need to. In the editing level, the same option is available to identify a person as the main company's coordinator.
Notifications
In the notification tab, the application user can manage the information delivered directly to the email.
On preview, notification have been separated into category as follow:
-
Device notifications
-
Supply notifications
-
SNMP alert notification
-
Agent notification
-
Other notifications
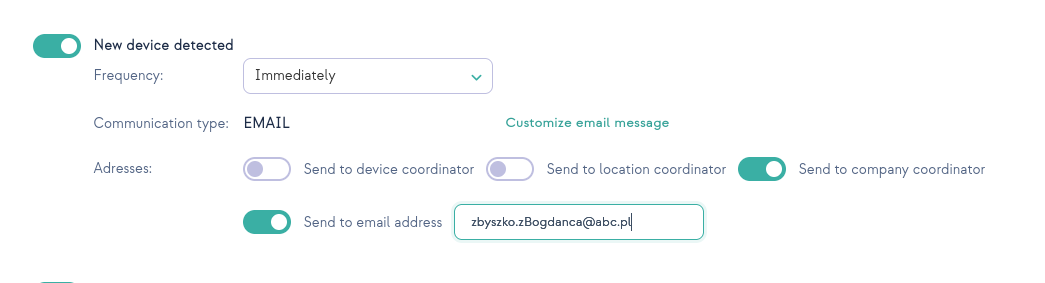
To enable chosen notification, you have to click on the ON/OFF button next to a given notification. After that you can write a custom email or select recipients from the list.
Additionally you can choose the frequency of the email.
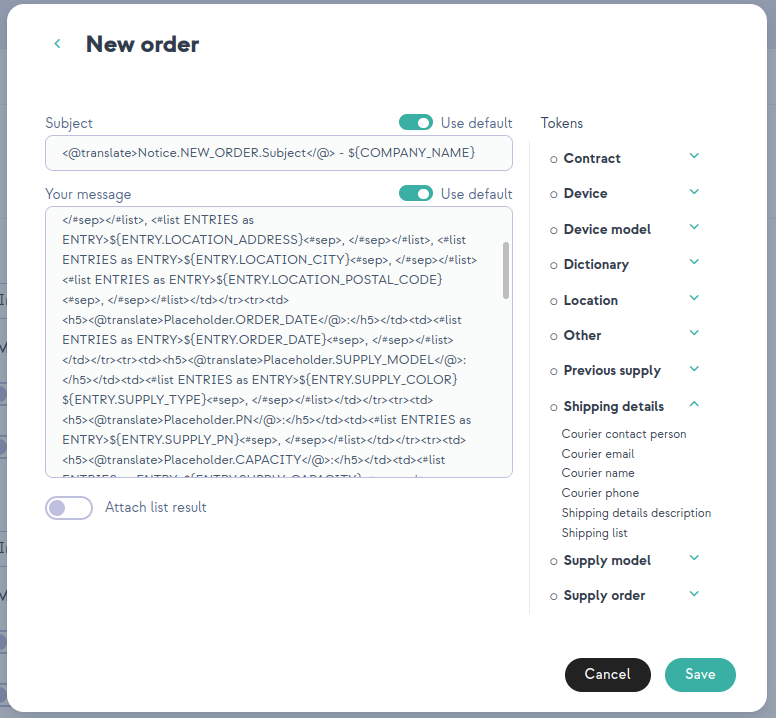
Customize email message
This feature allows you to customize email that would be sent. You can add additional information depending on preferences.
Note: Each company has separate settings, so your setting will apply only for the company that you are currently editing.
Agent
Agent tab provides us with features to manage agents. After entering a tab you can see a table with agents in the company. There is displayed information such as agent name, current agent status, there are also actions which are edit/delete agents. In case that selected company has only one agent you will be automatically moved to that agent's setting.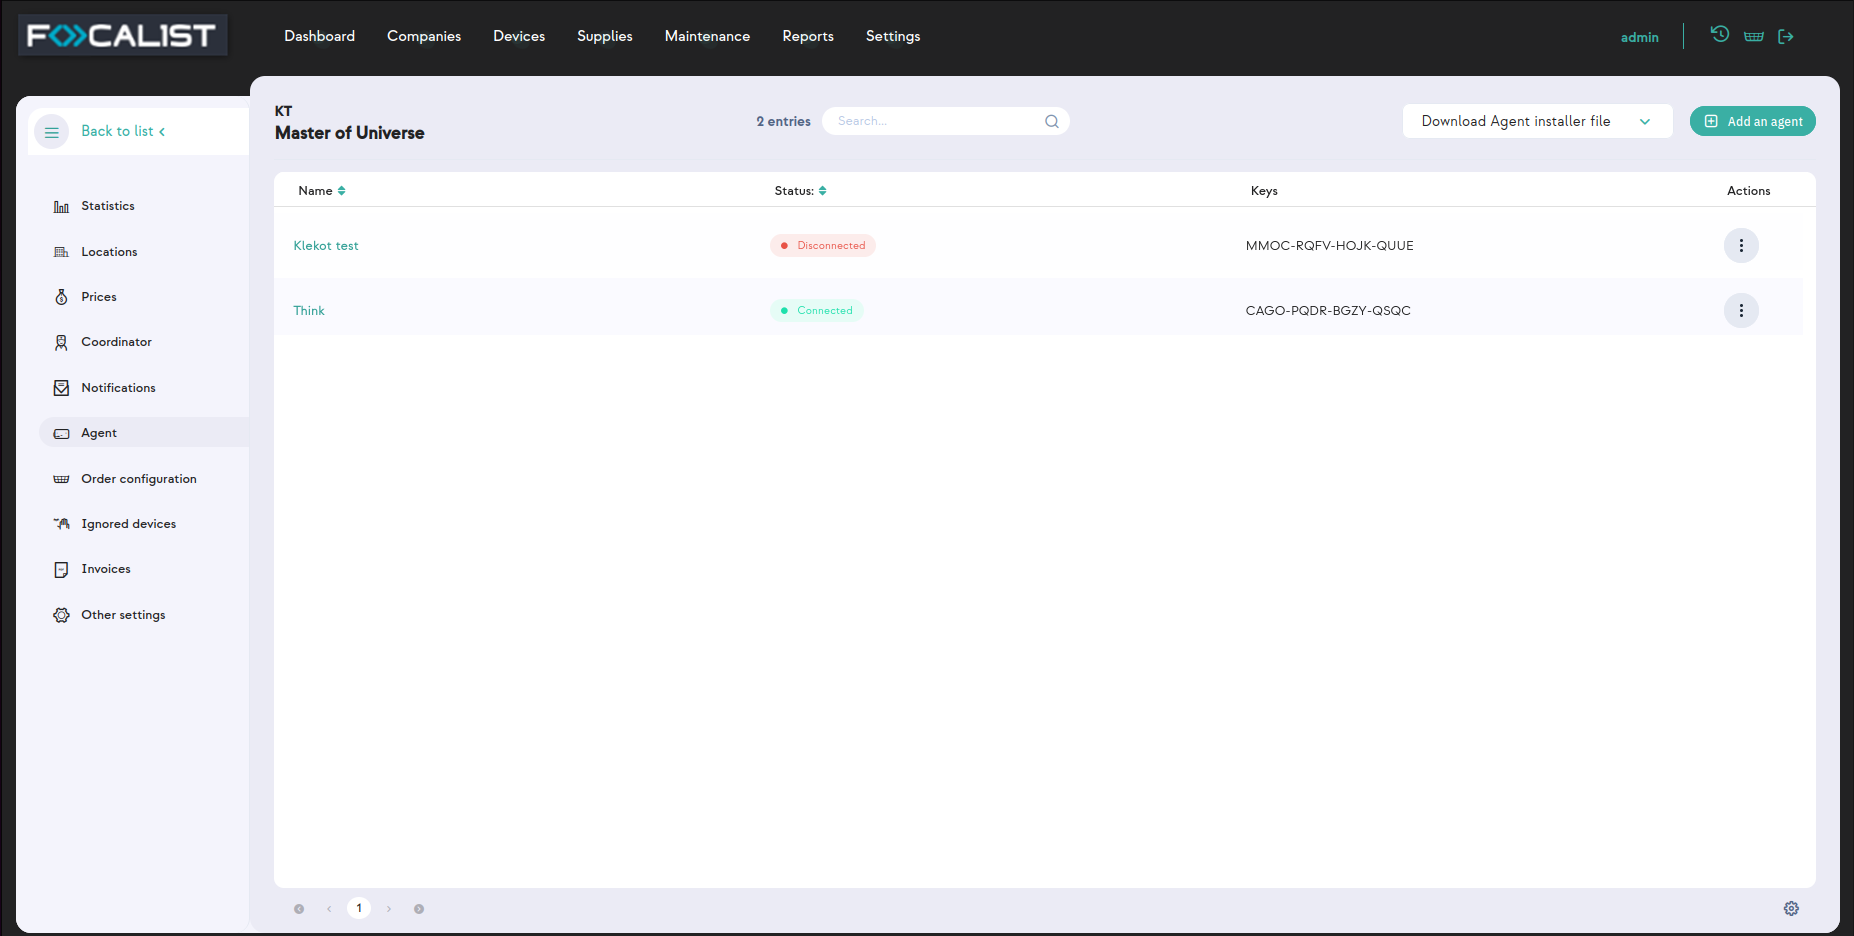
Status:
-
New - added in server application but not connected to any agents on devices.
-
Connected - properly working connection
-
Ambiguous - multiple agents have different status
-
Disconnected - can't connect to agent
What is an Agent? Why do I need to install it?
-
You can think of an agent as something like a proxy that allows our application to gain access to printers.
-
Each network with printers needs an agent installed on one of the PC’s in the network. We call them Network Agents, and each one needs to have a different logical agent in the Company->Agent tab.
-
In the case of a usb printer You have to install a USB Agent. To work properly the printer needs to be connected to Computer with a USB Agent.
-
For one logical agent in Company->Agent tab you can have multiple USB Agent connected. You can connect One Network agent and multiple USB agents to one logical Agent.
-
USB Agent is not available by default. To unlock it you have to contact support.
-
Agents allow remote access to the printer panel but it's not available by default. To unlock that you have to contact support.
Agent Settings
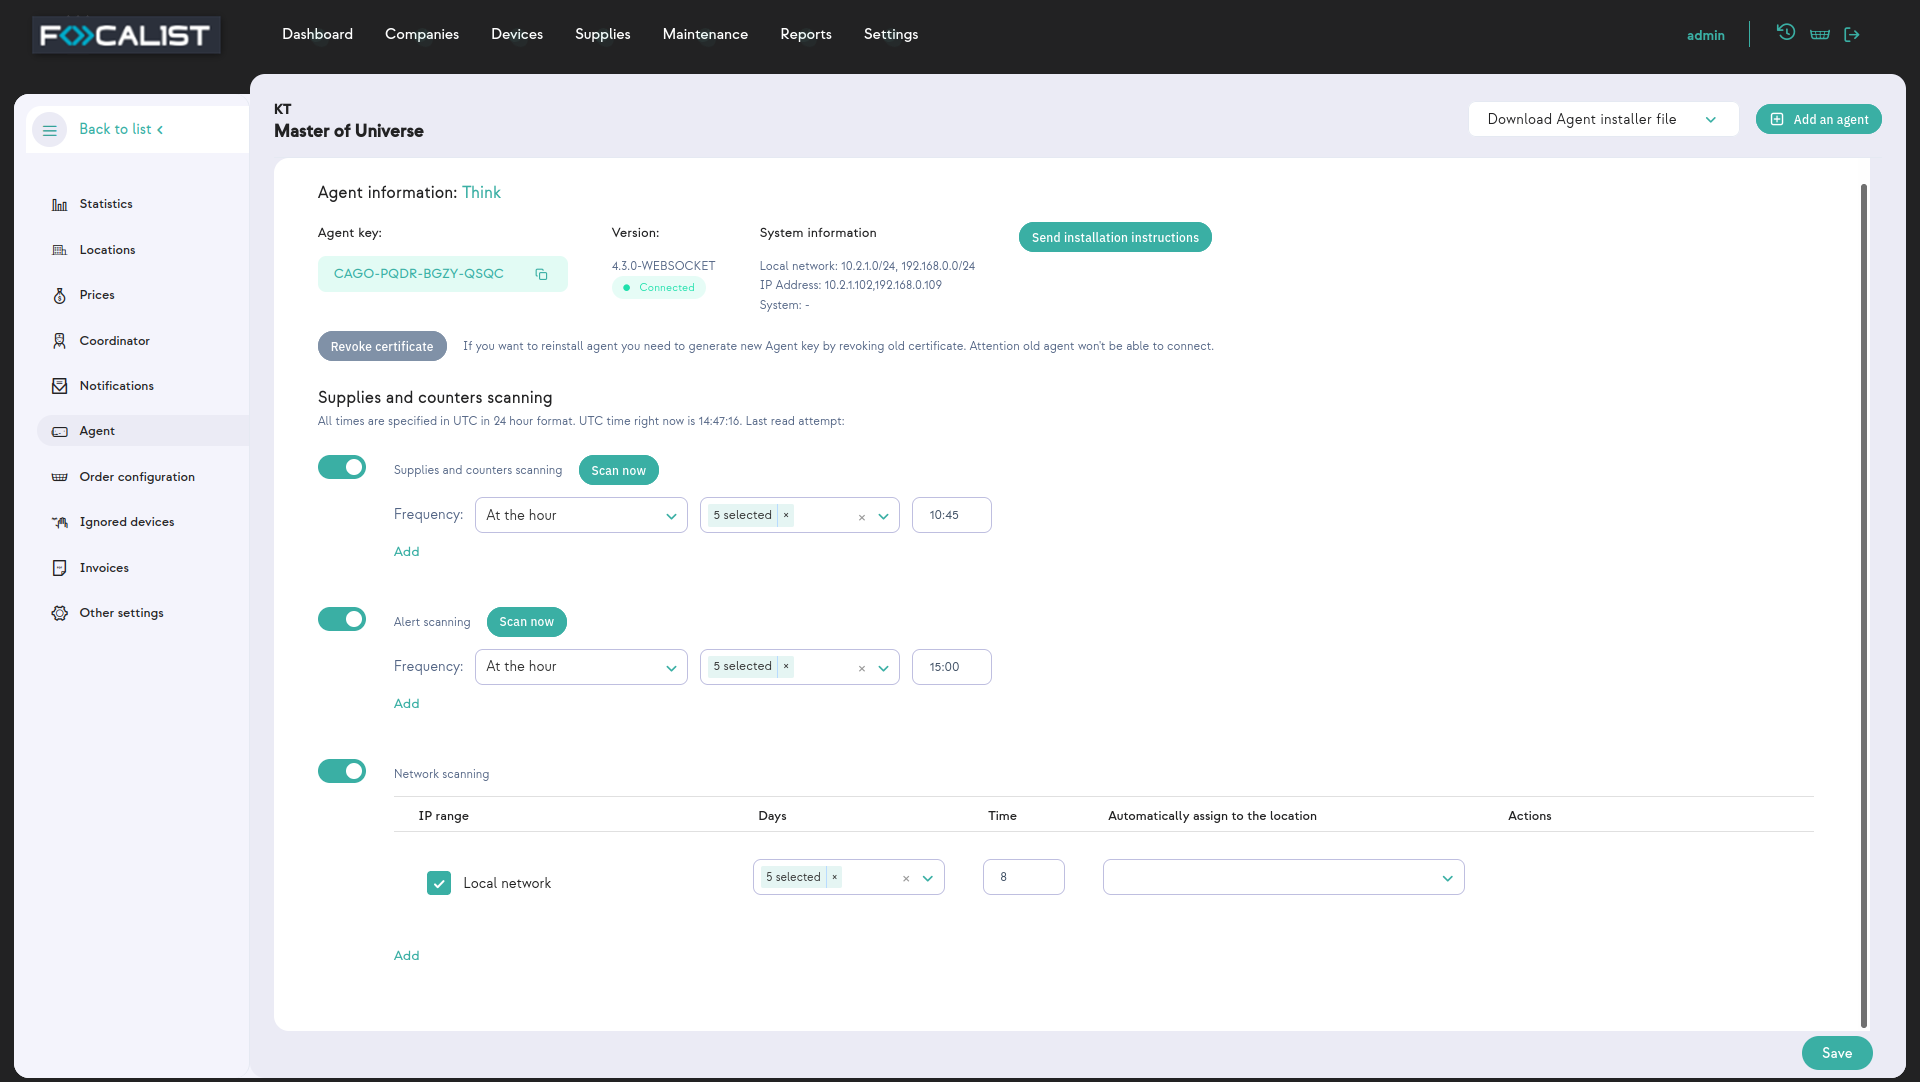
Agent Information
In this section there are basic information about selected agent, such as:
-
Agent name - given name to agent we recommend giving names that can be easily identified with the device where the Agent is Installed.
-
Agent key - used to connect Agents to the server, needed during Agent installation.
-
Version - information of currently used agent version
-
System information - IP address where network agent is installed.
Revoke Certificate
Each logical Agent in the server can have only one network Agent. If you want to reinstall an agent or install on a different device, you have to revoke the certificate from the old one. This button is responsible for it on the server side.
Supplies and counters scanning
In this part you can customize a scheduler for scanning which does Agent. Possible scanning option was separated into 3 different parts:
-
Supplies and counters scanning
-
Alert scanning
-
Network scanning
Beside setting the scheduler, you can also use the option “Scan now” to check the current state of devices. Additionally, the scheduler also can be excluded by the ON/OFF button placen on the left from the scheduler name.
Adding new agent
To add a new agent you have to press the “add an agent” button which is in the top right corner and write a new agent name. Installation and adding process is described in Installation of Agent.
Order configuration
Orders are information about low levels of supplies, it changes order status which is displayed in Supplies. In addition, if notification for orders are turned on, it sends an email to the coordinator.
Check if the toner has been properly installed
After changing the toner, the program checks if it has been installed correctly. If option is set, it changes status to “Toner replaced” on properly toner installation. In case of improper installation, applications don’t change order status. On the other hand if the option is not set, order status is always changed to “Toner replaced”, regardless of whether the exchange was made correctly.
Note: Proper installation process by status:
New(Not Shipped) -> Installation in progress -> To replaced -> Toner replaced
After sending a notification, mark orders for supplies as sent
If this option is set, the application changes order status to “Installation in progress” after sending the order. It’s useful in situations where the previous check mark is set. Without setting this option, supply order status will be set to “New(Not Shipped)”. With turned on checking proper installation it would be necessary to manually change status to “Installation in progress”.
After sending a notification, mark orders for parts as sent
Same as for supplies that were discussed above, but for parts.
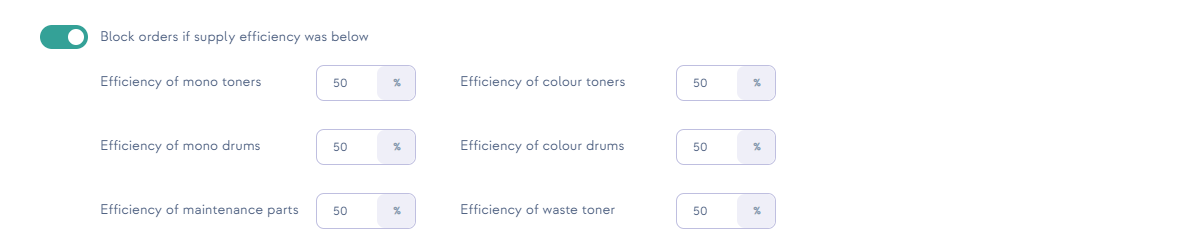
Block order for a toner, if its efficiency is lower than (%)
The materials have their efficiency, for example, if a given material has a capacity of 1000 sheets, but in reality it can only print 500 sheets, it means that its efficiency is 50%. The material yield count is proportionally scaled to the amount of material used and the pages for which the amount was sufficient.
To set up automatic orders, go to the details of a given company and then select the "Order Configuration" tab from the vertical menu.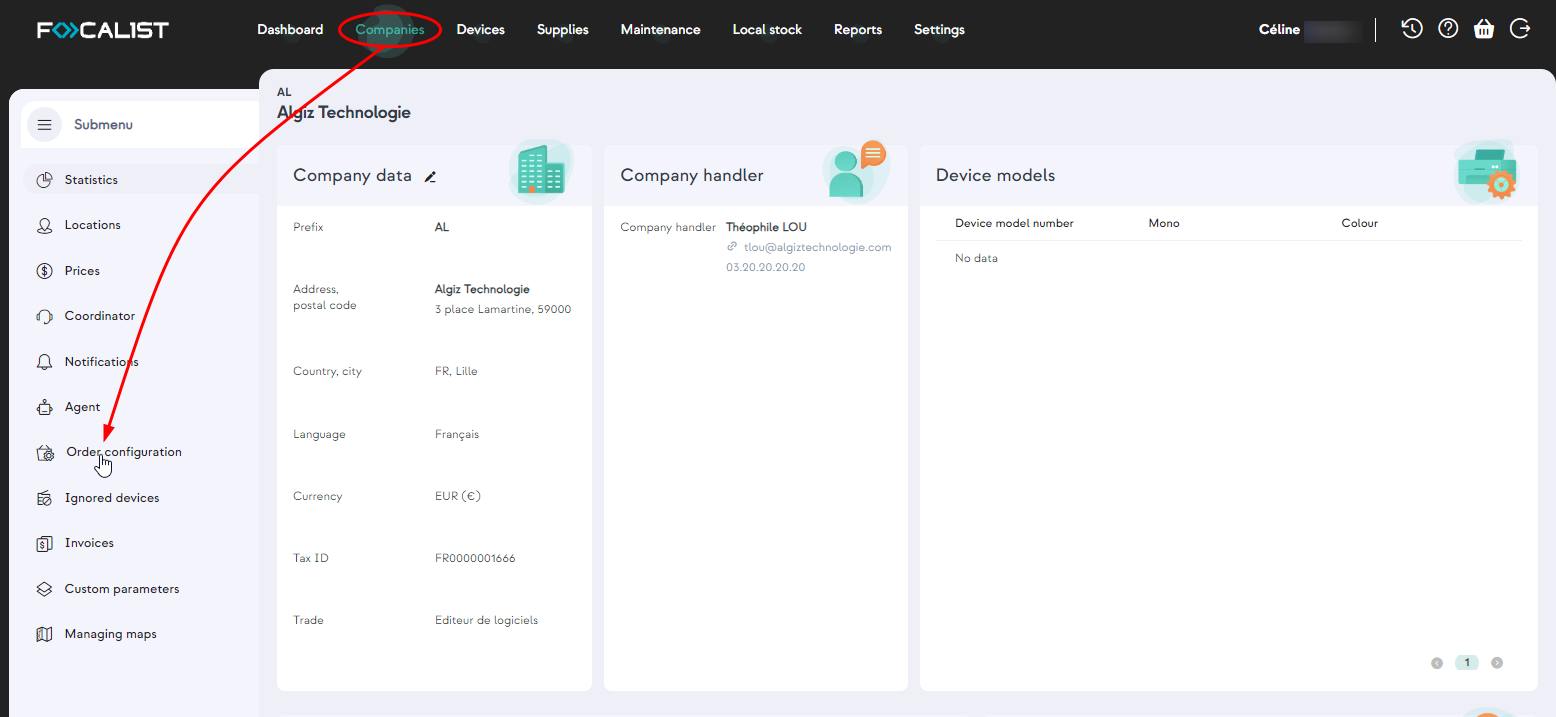
In our system, we offer two effective order configuration methods. The first is the "Proactive" option, which allows the user to specify the number of days expected until the material runs out. Once this estimated time is reached, the system automatically generates an order. Proactive methods can be implemented ONLY for printers that have more than one month of print history. If it is possible, in this method we use the history from 3 months ago, to make predictions.
The second option is "Level", which allows you to set the material inventory limit as a percentage. When it is achieved or exceeded, the system immediately generates an order, efficiently supporting the supply management process. . This flexibility allows you to adapt the ordering process to individual needs and changing business conditions, contributing to efficient supply management.
The order generation view for both configurations is identical and includes three described sections, which present:
-
Levels for toners, including:
-
mono toners (monochrome)
-
color toner
-
-
Levels for drums, including:
-
Mono drum (monochrome)
-
Color drum
-
-
Levels for the MK (Maintenance and Key Components) part, including:
-
Maintenance materials (among the articles and components that can be found here, we can mention things such as oils, filters, rollers, transfer tapes, etc.)
-
Waste toner
-
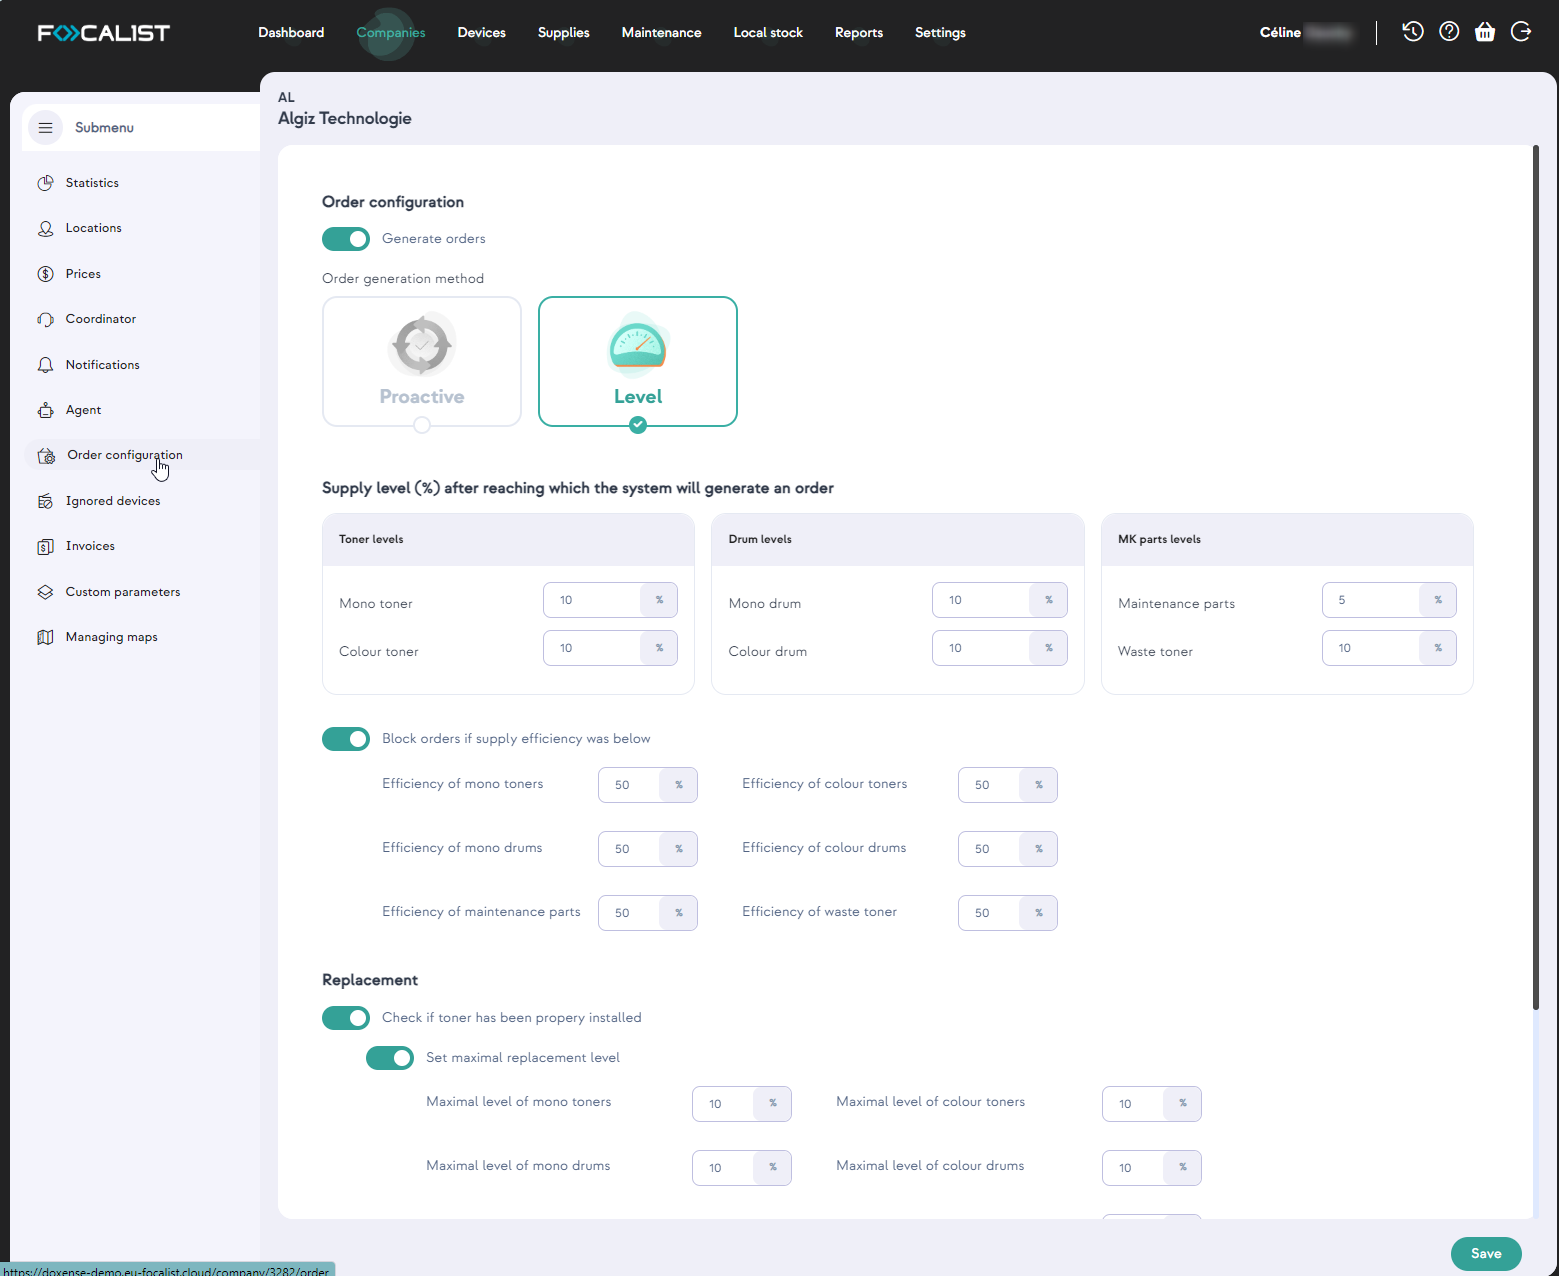
Another important function of the application is the ability to block orders for materials whose efficiency is below a certain percentage scale. The user can set the minimum acceptable performance. When a material's yield drops below this value, the system prevents you from placing an order for that material. It is an effective control tool that allows you to avoid ordering inefficient materials, positively affecting the efficiency and costs of resources.
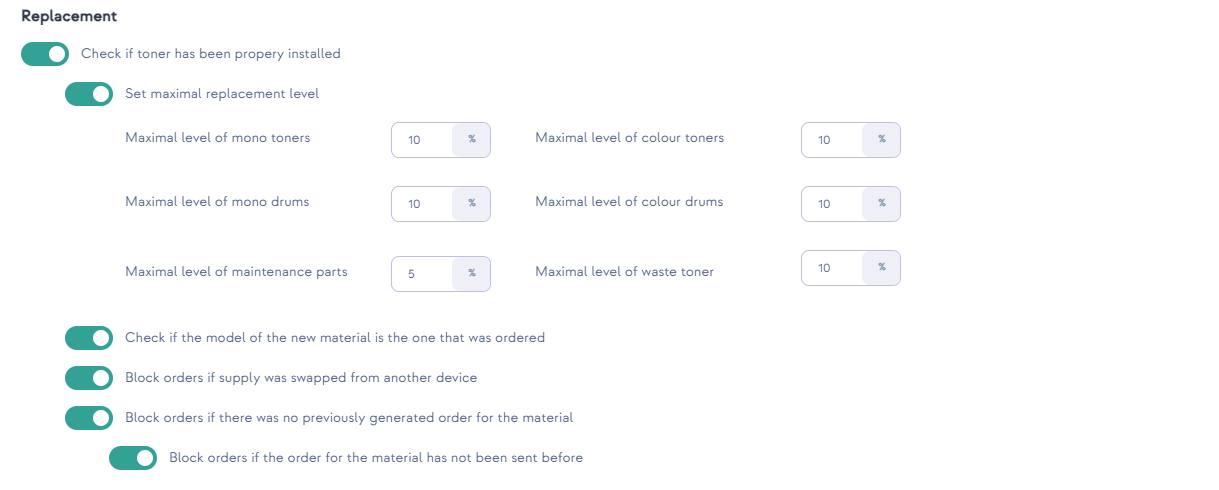
Going to the "Replacement" subtab in the application, an important option appears - activating the alarm in case of improper installation of the material.
With this feature, the user can configure the system so that if the material is not installed correctly, an alarm will be generated. This is an important safeguard that helps prevent potential problems related to incorrect installation of materials, which could negatively affect the quality of prints and the efficiency of the device.
The user also has the option of:
-
Maximum level settings as a percentage of when the material should be replaced:
-
Activation of the alarm if the new material model does not match the ordered one.
-
Activation of the alarm if the material has been replaced from another device.
-
We assume that the toner levels below 80% are not new, but have been previously used in another printer (except when a device is added to the system, then the material level can be any). Additionally, if a serial number is present, we check whether such a number is already in our database.
-
Activation of the alarm if there was no previously generated order for the material. Verify that an order exists for the material before attempting a replacement. If it does not exist, then the alarm is activated.
-
Activation of the alarm if the order for the material has not been previously sent.
Ignored devices
In this section are lists of devices marked as ignored which agents ignore during scanning the network. Devices in this list can be only added in the “adding device” window, when you decide to delete them there.
Invoices
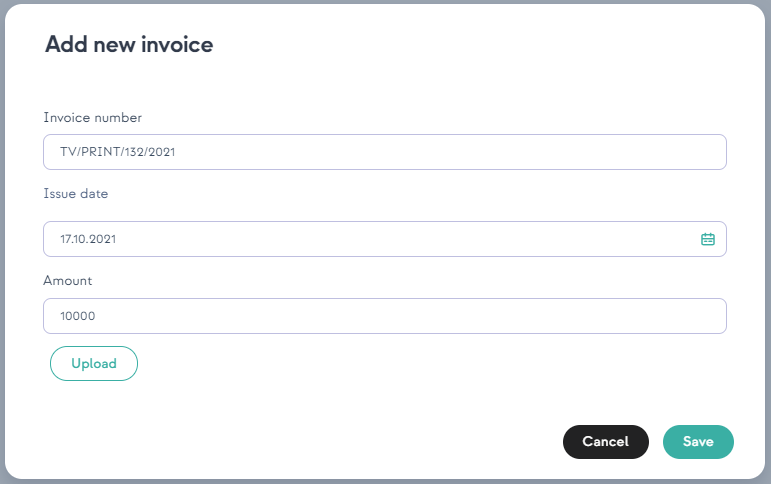
Invoices allow you to monitor customer payments. They are only information so beside displaying there then don't do anything, like sending messages to clients. After clicking the “Add an invoice”, you can write receivables to be paid by the client.
After adding invoices you have 4 potential actions:
-
Edit, allow you to edit invoices data and upload file
-
Add a payment, the total amount can be paid in installments, so for a better overview, each payment can be added separately
-
Payments, display list of payments for selected invoices
-
Delete, delete invoice from list, all data for this invoice would be lost
Invoices record example:

Other settings
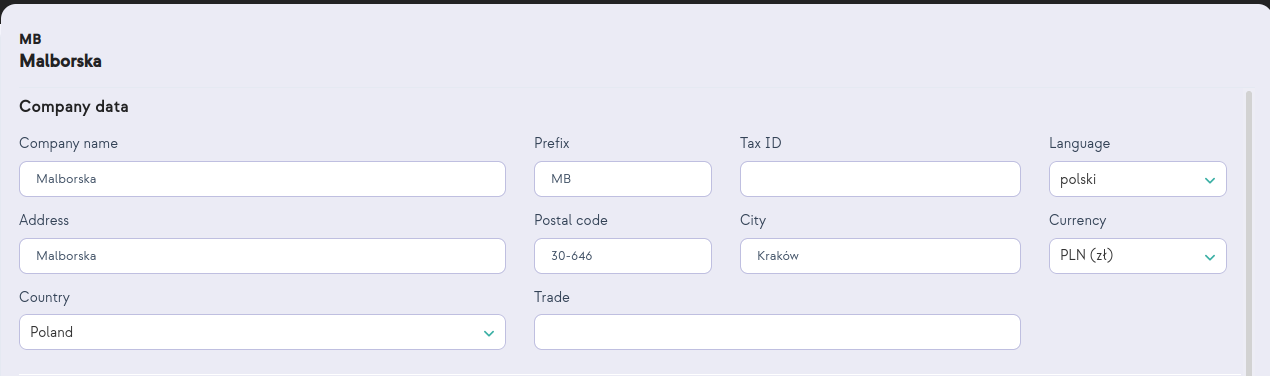
Company data
In this label it’s possible to change all company data which you enter during adding company. Such as: Company name, Prefix, Tax ID, Language, Address, Postal code, City, Currency, Country and Trade.
Additional settings
The period after the device is marked as not responding (days) - Is a global setting for all devices in a given company after which device would change its status from active to not responding. Not responding is treated like active but with the last record from more than days written in this scope.
Dictionaries
Dictionaries are additional information about devices that can be displayed in the tab of selected devices, under the label “Parameters” in the device “General information” tab. Additionally this information is concluded in all lists beside “Companies”.
There are 3 types of Dictionary:
-
Text, in this option you write static text for each device while setting the dictionary for the device.
-
List, on the other hand, defines a list of text at the moment of creating a dictionary, and you select one text from the list during the device setting.
-
OID is an identifier that is sent to the printer via SNMP to retrieve specific data