Principle
Watchdoc exchanges information with various devices (printers, MFPs, card readers) through interfaces such as WSC, WES, other APIs (including the Print API for WPC and Skyprint), and the “My Account” page. To secure these pages accessible via the Internet, Watchdoc uses the TLS/SSL protocol (via ports 5744, 5753, and 5754) based on self-signed certificates in .pfx![]() A PKCS#12 or .pfx file is a file that contains both the private key and the X.509 certificate. It is ready to be installed by the client on servers such as IIS, Tomkat, or Exchange. (Source: https://www.globalsign.com/fr/blog/fichier-pkcs12) (PKCS#12) format.
A PKCS#12 or .pfx file is a file that contains both the private key and the X.509 certificate. It is ready to be installed by the client on servers such as IIS, Tomkat, or Exchange. (Source: https://www.globalsign.com/fr/blog/fichier-pkcs12) (PKCS#12) format.
As an administrator, you can manage these certificates (or others, signed by a certificate authority) using the Watchdoc Certificate Manager (WCM) command-line tool, which is included by default in the Watchdoc installation package.
Starting with v. 6.1.0.5011, Watchdoc has a dedicated interface that is easier to use than the WCM tool (see Manage Certificates).
The following procedure allows you to secure Watchdoc and WSC using certificates provided by your certificate authority.
Prerequisites
To secure Watchdoc, there are two possible procedures, depending on how your organization’s IT department wishes to proceed:
-
You generate a CSR
 Advanced Encryption Standard (AES), also known as Rijndael, is a symmetric encryption algorithm approved by the National Security Agency (NSA) as part of its B1 suite of cryptographic algorithms, and is currently the most widely used and secure. (Source: Wikipedia) request using Watchdoc and ask your organization’s IT department to sign the resulting certificate. In this case, follow all the steps in the procedure described below;
 -
Your organization’s IT department provides you with a .pfx certificate to secure Watchdoc and its modules. In this case, follow the procedure starting with the step “Activate the .pfx certificate.
In addition, verify that you have the necessary access and usage rights for the following two tools:
-
Microsoft Active Directory Certificate Manager (Microsoft AD CS), a Windows server role that allows you to issue and manage digital certificates in an Active Directory environment. This permission is required if you need to generate a CSR request;
-
the Watchdoc Certificate Manager (WCM) command-line tool, available by default at (C:\Program Files\Doxense\Watchdoc\wcm.exe).
Generate a .pfx certificate with WCM and Microsoft AD CS
Generate a CSR using WCM
In this first step of creating a certificate, it’s important to consider the URL used to access your interfaces: do you want to use the server name or an alias?
To generate the CSR, use the WCM (Watchdoc Certificate Manager) command-line tool developed by Doxense.
To run it:
-
On the Watchdoc server, as an administrator, open the Windows Command Prompt;
-
navigate to the folder where Watchdoc is installed (C:\Program Files\Doxense\Watchdoc by default);
-
stop the Watchdoc service by entering the command net stop watchdoc;
-
Launch the wmc tool by entering the command wcm;
-
Create the HTTPS server certificate by entering the command create https-server (don't forget the “s” in “https”) and provide the following information:
-
Primary host Name?: Enter the FQDN of the server you are currently on;
-
More IP or DNS (use ‘;’ as a separator)? Enter the IP addresses of all the servers that will use this certificate, separating them with a semicolon (for example:
MASTERONE;127.0.0.1;localhost;watchdocadmin.domain.local;others Alias;…) -
RSA key Size: specify the size of the RSA encryption key used (for example, 2048);
-
Signature Algorithm: specify the hashing algorithm used (e.g., SHA256);
-
-
After reviewing the order summary, confirm the order using the command y
Please note that the expiration date cannot be later than the domain’s validation date.
Please also note that security authorities recommend renewing certificates annually.
-
Once the certificate has been signed, export it by entering the command export https-server :
è By default, the signed certificate (.cer) is exported to the C:\Program Files\Doxense\Watchdoc\ folder. You will need to know the location of this file to continue with the procedure.
Save the completed tasks by entering the command save :
-
Once the backup is complete, restart Watchdoc by entering the command net start watchdoc :
Validate the CSR with the domain using Microsoft AD CS
-
From a location where the previously generated .cer file is accessible, open a browser using a domain administrator account (an account with certificate management privileges);
-
in that browser, enter the address used to access the domain controller (for example: http://adresseDC/certsrv);
-
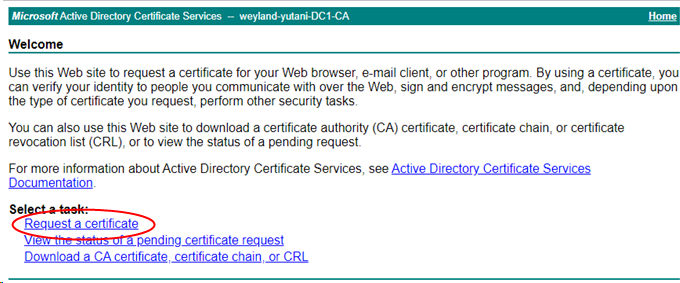
èMicrosoft Active Directory Certificate Services interface appears:
-
in the Select a task section, click Request a certificate:
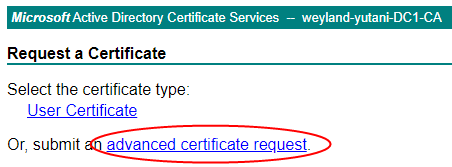
-
in the Request a Certificate interface, click on advanced certificate request :
-
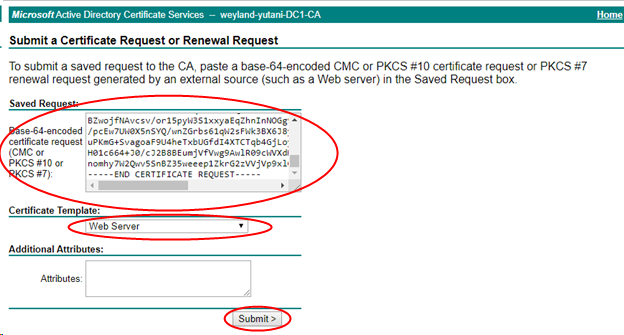
Open the .csr file in a text editor and copy its contents;
-
In the Submit a Certificate Request or Renewal Request interface, in the Saved Request text box, paste the contents of the .csr file in Base64 format;
-
In the Certificate Template section, select Web Server from the drop-down list;
-
Click Submit:
-
In the “Certificate Issued” interface, select the “Base 64 encoded” radio button;
-
then click “Download certificate”:
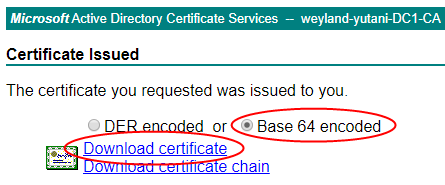
-
Save the downloaded signed certificate (with the .cer extension).
Complete and export the certificate
To complete the certificate, use WCM. To launch it:
-
run the Windows Command Prompt as an administrator;
-
navigate to the folder where Watchdoc is installed (C:\Program Files\Doxense\Watchdoc by default);
-
launch the WCM tool by entering the command wcm:
-
enter the command complete http-server <chemin vers votre certificat> by specifying the path to the folder to which the .cer file was exported in the previous step:
-
If the certificate is validated successfully, the message OK! Certificate is recognized OK! Certificate is recognized as valid by the current host (0,266 sec) appears;
-
Confirm by entering the command y :
-
Then export the certificate by entering the commandExport https-server –p12 c:\[chemind’export] (enter the path to the folder where you want to save the certificate);
-
Enter a password to secure the certificate:Check the backup folder to ensure that the certificate (.pfx files) is present. It can then be activated on WSC and Watchdoc.
-
Save using the command save :
then exit the WMC tool using the command quit ;
Enable the .pfx certificate on WSC
Edit the WSC configuration file
To complete the certificate, use WCM. To launch it:
-
run the Windows Command Prompt as an administrator;
-
navigate to the folder where WSC is installed (C:\Program Files\Doxense\Supervision by default);
-
stop the WSC service by entering the command net stop WatchdocTelemetryServer :
-
Launch the WMC tool by entering the command wcm :
-
enter the command –config then specify the location of the monitoring console configuration file (by default ‘c:\Program Files\Doxense\Supervision\data\wts_config.xml’) :
Import a certificate into WSC
-
enter the command import http-server <emplacement_certificat> -password specifying the location where the .pfx file was saved and the password entered when the certificate was completed (see Completing and exporting the certificate). (Please note: this is not https-server but http-server):
-
Enter the command Save To save the settings:
-
Restart the Monitoring Console service by entering the commande service net start WatchdocTelemetryServer :
Validater the certificate
-
From a workstation, using a web browser, enter the address of the Management Console (server name or alias, as specified in the CSR) via HTTPS on port 5756.
-
Check that a padlock appears next to the URL and that there are no warning messages. If this is the case, it means the site is secure.
Activate the PFX certificate on Watchdoc
Accéder au certificat dans
Watchdoc uses Microsoft IIS to manage its website. You must therefore use IIS Manager to activate the .pfx certificate on Watchdoc:
-
On the Watchdoc server, log in as an administrator and open IIS Manager from the menu (or run inetmgr from the Windows Search tool):
-
Select the Watchdoc server from the Connections list;
-
in the list of functions, select Server certificates:
-
In the Server Certificates interface, in the Actions list, click Import:
then browse your workspace to select the .pfx file saved there;
fill in the Password field by entering the password set for the certificate;
click OK to confirm the import:
èThe certificate will then appear in the list of certificates available for this web server.
-
In the Connection menu, select the website hosting Watchdoc (by default, Default Web Site):
-
in the list of options, click Edit Site > Bindings
-
if the https type does not appear in the list, click Add;
-
In the Add Site Binding interface, specify:
-
type: https
-
IP address: All unassigned
-
Port: 443
-
SSL Certificate: select the certificate you added earlier:
-
Validate the .pfx certificate on Watchdoc
-
From a workstation, using a web browser, enter the Watchdoc address (server name or alias, depending on what was specified in the CSR) using HTTPS.
-
Check that a padlock icon appears next to the URL and that no warning messages are displayed. If this is the case, it means the site is secure.
-
Once this check has been carried out, delete the .pfx file from where it is stored, as it contains the certificate’s secret.