Creating a queue
-
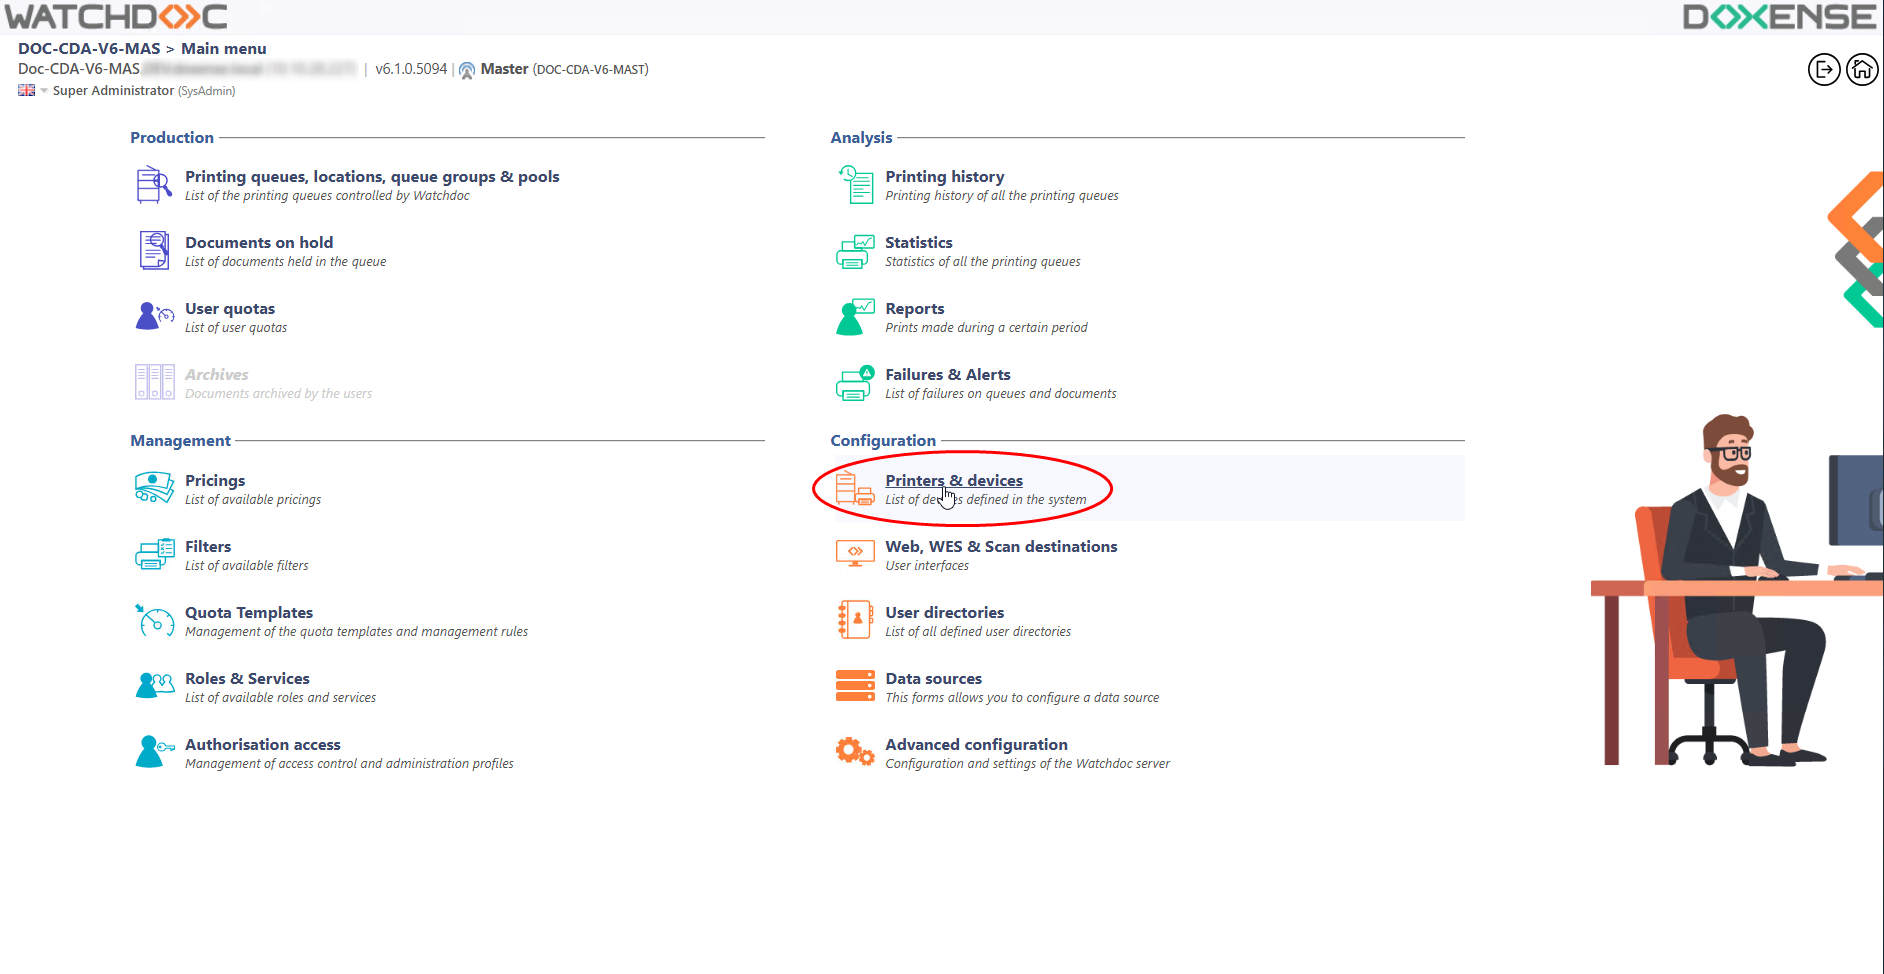
From the Main Menu in the administration interface,
-
From the Configuration section, click on Printers and devices;
-
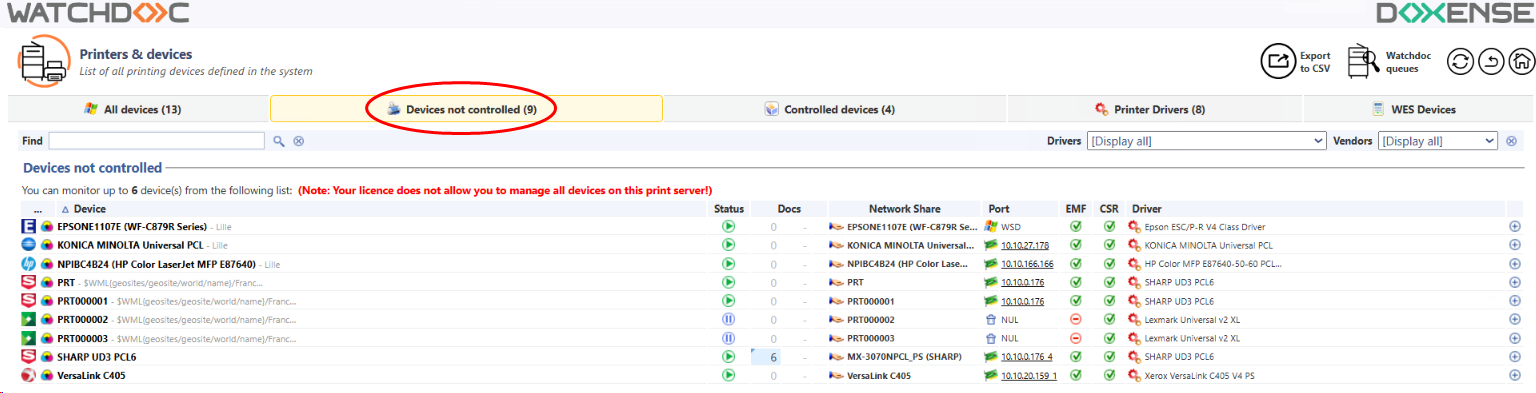
From the list of printers and devices declared on the print servers, click-on the Devices not contolled button:
-
From the list of devices not controlled, click-on the Control this device
 button at the end of the line:
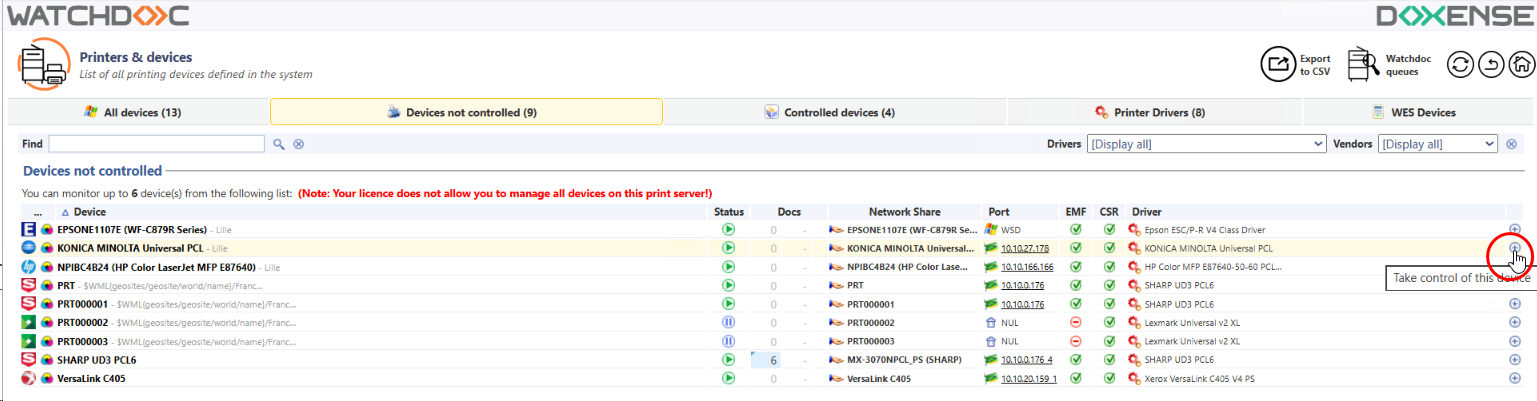
èYou will access the Create a new print queue interface comprising a number of sections. The device section displays information assigned to the device when it was declared on the print server. Fill-in the other sections.
Configuring a queue
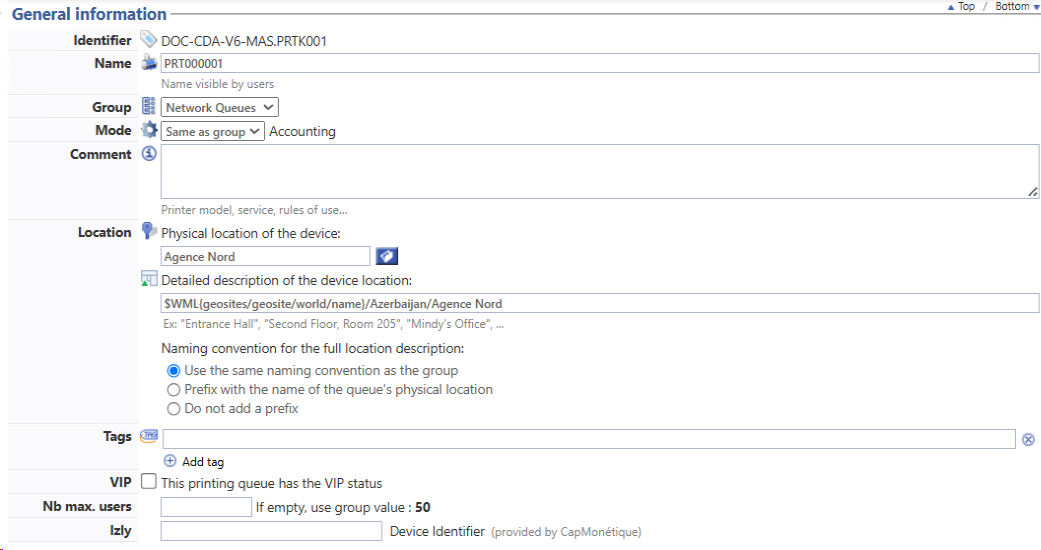
General Information section
-
Fill-in the following fields:
-
Identifier: By default, an identifier is automatically generated by the system. You can change it to assign your own identifier to the queue. Your identifier can have up to 64 alphabetical and numerical characters as well as the underscore (_) as a separator.
-
Name: Assign a name to your print queue. This name is displayed in the release interface or in the notification emails and it must contain information detailing its model and location.
-
Group : Assign the device to a previously created and defined group.
The Group of queues is a logical entity used to bring together a number of print queues. The group of queues serves primarily to facilitate and homogenise how queues with common characteristics are managed (e.g. of the same brand, at the same geographic location, belonging to the same department or meeting identical demands). In addition to the default queues, you are free to create as many groups of queues as necessary. This grouping also makes it easier to analyse printing activities based on a common criteria (brand, location, department of ownership, etc.).
-
a virtual queue is a queue that is not assigned to a device but which is tasked with retaining the print-job ready for sending it to the network device when requested by the user. This type of queue takes effect into play when using the "Print-on-demand" activation allowing a user to send their print-jobs without designating a specific printer and retrieving their print-jobs from the printer of their choice once they have authenticated themselves to it.
Since the virtual queue sends print jobs to various devices with very different capabilities, we recommend that you configure this queue with maximum capabilities (see the Devices section below: color printing, double-sided printing, and large format) in order to optimize its efficiency.
-
Like the group: This parameter assumes that the queue will inherit the configuration applied to the group. Configuring all of the queues just like the group guarantees consistent settings,
Print-on-demand mode : in this configuration, the print job is held securely until the user releases it by signing in or badging on a device and selecting the print job to release. The user can release the print jobs from a web interface (WES, WXS ou web) or a terminal like CopiCode-IP
Terminal (sold by Cartadis) connected to a print device and allowing to enter a PUK code or a badge reader in order to release the on hold print job. (previous NetPOD /DSP)
Accounting mode : in this default mode, the job is ready to be printed immediately, without any validation of the user.
-
Tags: Where necessary, enter the internal keywords used to qualify the queue. Use the spacebar to enter a space between two key words and the underscore (_) as as the space will separate the key word if it comprises of a number of words. These key words will serve primarily to create filters and are used to refine custom reports thereby facilitating the use of these queues.
Some tags are used by WPC for Windows to trigger a particular queue behavior:
-
remote: allows the print queue to be set up with the WPC PortMonitor to print in RAW format on the print device's port 9100, rather than sending the print request to the server (enables direct printing with WPC for Windows);
-
tcpip: allows you to install the print queue with its TCPIP print port, so that MS Windows can manage the printing process without requiring Watchdoc (enables direct printing by Windows);
-
forceinstall : allows to install a physical print queue automatically.
When a print queue is installed without these tags, the device is installed with the WPC PortMonitor, so that the print request is sent to Watchdoc via the PrintAPI.
Location: State the precise location of the device assigned to the queue. This information facilitates the use of the queue.
-
-
Geocode: State the geocode for the device assigned to the queue taking care to use the following sequence and syntax: Country/Region/City. This information makes it easier to use the queue by precisely locating it in a treetype list that is specific to Watchdoc and that is visible in the site based display.
-
Comment: Use this field to enter any additional information that may be useful for using the print queue.
-
VIP: check this box to give a specific status to the configured print-queue. The print-queue is therefore distinguish from another by the
 specific icon which is a selection filter (for example, for a ptrint-queue used by the management service members);
Devices section
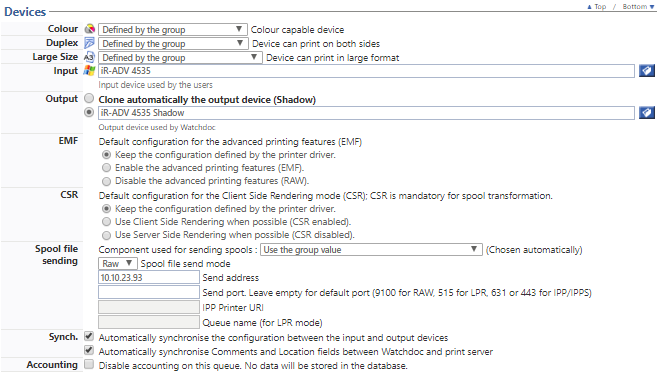
Use this section to specify the true characteristics of the device assigned to the queue.
-
Colour: Select the colour printing mode allowed for the device from the list:
-
Defined by the group: Opt for this choice where the colour parameter (colour, black and white or determined by the driver) is the one applied to the Group of queues. The queue will therefore inherit the generic configuration.
-
Determine from the driver: Opt for this choice if the colour parameter is the one defined by the driver on installation,
-
black and white device: Opt for this choice if the device only supports black and white printing.
-
Colour device: Opt for this choice if the device supports colour printing.
-
-
Duplex: Select this from the print options allowed by the queue:
-
Defined by the group: Opt for this choice where the print mode (one-side (simplex) or double-sided (duplex) is the one applied to the Group of queues. The queue will therefore inherit the generic configuration.
-
Determined by the driver: Opt for this choice if the print mode to apply is the one defined by the driver on installation,
-
Device can only print on one side: Opt for this choice if the device only supports single sided printing.
-
Device can print on boths sides: Opt for this choice if the device supports printing on both sides.
-
-
Large size: Select the sizes supported by the device from the list:
-
Defined by the group: Opt for this choice if the format to apply is the one defined for the queue group. The queue will therefore inherit the generic configuration for its group.
-
Determined by the driver: Opt for this choice if the print mode to apply was defined by the driver on installation,
-
Device can only print in small format: Opt for this choice if the device only supports printing on sizes of A4 x 1.4 or less,
-
Device can print in large format: Opt for this choice if the device allows printing on sizes larger than A4 x 1.4.
-
-
Input: By default, the name of the shared queue is shown in the data entry field. In most cases, this parameter does not give rise to any change.
-
Output: By default, the name of the shadow file is shown in the data entry field. In most cases, this parameter does not give rise to any change.
-
EMF
Enhanced Metafile (or EMF) is a digital image format for Microsoft Windows systems and some printer drivers. It is an improvement of the WMF (Windows Metafile) image file with data encoded in 32 bits for improved quality.: Warning: enabling this type on a virtual queue may limit its functionality (particularly on XPS XML Paper Specification (XPS) is a page description language developed by Microsoft to compete with PDF for the description of fixed documents intended for archiving and printing.
The format allows the integration of 2D vector data and fonts, as well as information for document protection using DRM.
(Source: Wikipedia) spools for which spool transformation is disabled, for example).-
Keep the configuration defined by the printer driver: Opt for this choice to retain the configuration defined by the driver on installation,
-
Enable the advanced printing features (EMF): Opt for this choice to apply the EMF format to print-jobs,
-
Disable the advanced printing features (RAW
"Raw", in printing applications, refers to a file format used for digital images. This is not a standard format, but a type of file created by devices like cameras or scanners, characterised by the fact that they have received very little computer processing and are therefore close to their native format.): Opt for this choice to apply the RAW format to print-jobs.
-
-
CSR :
-
Keep the configuration defined by the printer driver: Opt for this choice to retain the configuration defined by the driver on installation,
-
Use Client Side Rendering when possible (CSR enabled): Opt for this mode to apply the DSR format to print-job,
-
Use Server Side Rendering when possible (CSR disabled):: Opt for this mode to apply the SSR format to print-job,
-
Disable accounting: the box is unticked as Watchdoc works in counting mode by default. Untick this box to disable this mode. In this case, the data relating to the print job is not saved in the database for statistical reasons.
Spool file sending
By default, the sending of spools is managed automatically by Watchdoc. It is only necessary to change the following parameters in specific configurations. Make sure that is really necessary.
-
Component : this setting is used to define how Watchdoc sends spools to print devices.
-
Use the group value: select this setting to use the sending spool setting defined for the group in which is included the print-queue:
-
Chosen automatically: select this setting to let Watchdoc choose automatically how to send spools;
-
Force the use of the Doxense spooler for all the jobs: select this setting to oblige the tool to spend the spools according to the parameters defined by the Watchdoc spooler;
-
-
Status synching: from the list, select the way in which the print device status is to be synchronised:
-
use group value: allows you to use the same synchronisation mode as that defined for the group to which the queue belongs;
-
sync status: (recommended setting) used to synchronise the status of the print device with Watchdoc: the latter then takes the device status into account when processing print requests.
-
do not use sync status: allows you not to synchronise the status of the print device with Watchdoc.This setting can be useful if status fluctuations disrupt the operation of Watchdoc.
-
-
Slow down spool send: indicate whether you wish to affect the speed at which spools are sent (parameter only displayed in ‘debug’ mode)
-
Use the group value: choose this value to apply the configuration of the gropue to which the queue belongs;
-
Slow down spool sending: if it is necessary to slow down the sending of spools, specify the parameters to be applied below:
-
Delay between jobs: specify the delay between 2 jobs being sent.
-
Delay during sending: specifity the delay between 2 packets during sending
-
Buffer size: indicate, in KB, the size of the device's buffer memory (256 Ko by default).
-
-
Address: enter the address of the server used to send the spool files (if it isn't displayed automatically).
-
Timeouts :
-
Connection: specify, in seconds, the time allowed for Watchdoc to establish a connection to the device. After this time, the request is restarted;
-
Send: specify, in seconds, the time allowed for spools to be sent. After this time, the spool is ???.
-
-
Default protocol: select the protocol to be used by default from the list and set the parameters for this protocol:
-
RAW settings: tick the box if you allow RAW transmission and specify the dedicated port or leave blank to use the default port 9100 ;
-
IPPS settings: tick the box if you authorise IPPS sending and enter the IPPS address of the device in the Uri field;
-
IPP settings: tick the box if you want to allow IPP (non-secure) sending and enter the IPP address of the device in the Uri field; LPR settings: tick the box if you want to allow LPR sending and enter the IPP address of the device in the Uri field;
-
LPR parameters: tick the box if you authorise LPR sending, specify the name of the queue corresponding to the device and the access port.
-
-
PDF format support: specify if the device supports the PDF format (useless if you use the WPC for Android or for Chrome).
-
Automatic detection: specify if known or let Watchdoc detect automatically ;
-
Minimal version: if the PDF format is supported,indicate what the minimal version is.
-
Maximum version: if the PDF format is supported, indicate what the maximal version is.

-
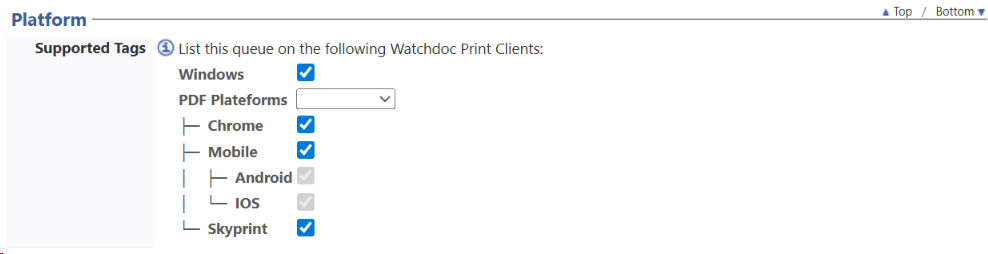
Platform section
This section allows you to specify the WPC platforms from which the queue can be used: WPC for Android, for Chrome, for iOS, for Windows, and/or Skyprint.
Check the box(es) corresponding to the platforms on which the queue is available:
-
Windows: the queue is available on WPC for Windows;
-
PDF platforms: includes all WPCs that process .pdf files: for Chrome, for Android, for iOS, and Skyprint.
-
Enabled: the queue is available on all PDF platforms;
-
Disabled: the queue is not available on PDF platforms (no PDF WPC can be selected);
-
Auto-detect: Watchdoc examines the device's capabilities to offer or not offer the queue based on the printing criteria chosen by the user;
-
-
Mobile: the queue is available on mobile WPCs: for Android and iOS;
-
Android: the queue is offered on WPC for Android;
-
iOS: the queue is offered on WPC for iOS;
-
-
Skyprint: the queue is offered on Skyprint.
N.B.: note that if the queue is not associated with any print driver, it is not offered to the user.
For a Universal queue, if If the Windows tag is checked, complete the associated settings:
-
Driver: select the driver (previously installed on WSC) that you want to associate with this queue. Note: you cannot create a universal queue without an associated driver.
-
Template: the template (print queue configuration model) previously associated with the driver in WSC:

Restrictions section
Expiration: this parameter works in conjunction with the following Lifetime parameter.
It is used to define the processing to be applied to print jobs beyond the default lifetime:
-
Use the group's default settings: Opt for this choice if the processing to apply is the one defined for the queue group. The queue will therefore inherit the generic configuration for its group.
-
Automatically delete the document: Opt for this choice to delete the document once the set life has expired,
-
Automatically archive the document: Opt for this choice to automatically archive the document once its life has expired. Once the document is archived, it is no longer awaiting printing but remains accessible via the user's web interface.
Archival may be useful if a problem arises as it offers the option of analysing a document that caused a problem. It may also be useful to archive print jobs when they come from business specific applications where generating documents for printing is difficult. Note however that allowing archival assumes that there is storage space on the server that hosts the Watchdoc kernel. -
Automatically release the document: Opt for this choice to print the document once its period has expired.
Automatically releasing a document is only used in a Print-on-demand This is a Watchdoc operating mode for releasing print jobs after validation by the user from a dedicated interface (a terminal connected to the device or website). The other mode is the Accounting mode. mode. In cases for automatic release, the confidentiality of the print outs and their contents are not guaranteed as the user does not have to confirm their request. -
Renew the expiration time: Opt for this choice to renew the expiration time once the set life has expired.
-
Lifetime (retention time): indicate in seconds, minutes, hours and days, the time during which a job remains in the queue until it is released by the user. If you do not specify this parameter, the default lifetime is 8 hours. After this time, the print job is deleted.
N.B.: if the queue belongs to a group, the duration defined in the group is applied. This is to avoid errors caused by the coexistence of two different lifetimes for the same queue.
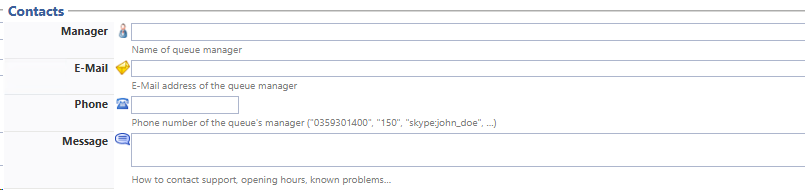
Contacts section
This data entered in this section is displayed by the administration interface and the tool's web user interface. They are used to direct the user towards the Watchdoc person able to troubleshoot a problem or answer a question on the device controlled by Watchdoc:
-
Manager: Enter their surname (and first name for greater precision),
-
E-mail: Enter their e-mail address,
-
Telephone: Enter their telephone number (in numerical format),
-
Message: Provide any additional information that may help a user to contact the person in charge (availability times, closure days, information on the physical location of the office of the person in charge, any specific procedure to follow, etc.).
Redirections section
If a physical file is unavailable, the jobs can not be printed. To prevent users from having to wait for device overhaul, Watchdocoffers a redirection function to contact other devices.
Redirecting jobs from one queue to another queue is only possible between compatible queues.
In versions prior to Watchdoc 5.2, "target" queues were associated with the physical queues to be solicited in case of unavailability of this physical file.
Version 5.2 introduces the concept of "Pool" on which the redirection is based: virtual queues are associated with a pool called Job ticket pool. Similarly, the physical queues are associated with a pool which then constitutes a source of work that these queues are likely to print. Thus, when a device is unavailable, all other devices associated with the same pool can be solicited.
To allow redirection from one file to the other, it is therefore necessary to have previously indicated to Watchdoc the compatibilities between files (especially in terms of drivers when the printing devices are of different brands).
Watchdoc V5.2 has two default pools that can handle most use cases:
-
#global
-
#local
In addition to these default pools, you can create as many pools as you need.
-
Sources: by default, the print queues inherit the configuration of the group to which they belong;
-
Do not use: tick the box to apply the configuration of one or more specific redirection sources;
-
Source(s): in the folder where you checked the previous folder, indicate it in the source file or the source files that might work on the configured file;
-
-
Fallback devices:
-
Force redirection to another print queue: Tick this box to allow Watchdoc to send the print job to another queue. In this case, set Fallback devices as the queue that the print job should be forwarded to.
-
Automatic redirection if device not available: Tick this box to allow Watchdoc to send the print-job to another shared queue when the device does not work. Complete this by setting Fallback devicesas the queue that the print-job should be forwarded to.
-
Fallback devices: If you ticked possible redirection, then state the devices where the print jobs may be sent. Click on the button
 located at the end of the data entry field to access the list of queues controlled by Watchdoc.
-
-
Job Pool: select in the list the pool in which are grouped the other print queues compatibles with the print queue you are configuring. By default, when the redirection is note activated, No pool selected is displayed. In this list are displayed the two default pools (#local ; #global) and the pools you might have created ;
If Watchdoc is used in Accounting Mode![]() Watchdoc operating mode for automatically releasing print work. This mode is used to count printing for statistical purposes without requiring user validation. This mode may be combined with quotas setting the number of print outs allowed per user., the redirection can't use the pools because the user doesn't release his print jobs from a device he would have choosen. It's nonetheless usefull to indicate the device to which the print-jobs may be sent in case of failure of the usual device.
Watchdoc operating mode for automatically releasing print work. This mode is used to count printing for statistical purposes without requiring user validation. This mode may be combined with quotas setting the number of print outs allowed per user., the redirection can't use the pools because the user doesn't release his print jobs from a device he would have choosen. It's nonetheless usefull to indicate the device to which the print-jobs may be sent in case of failure of the usual device.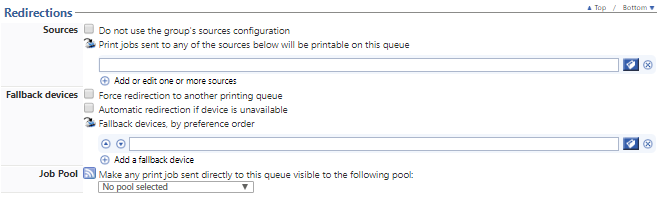
Monitoring section
-
SNMP
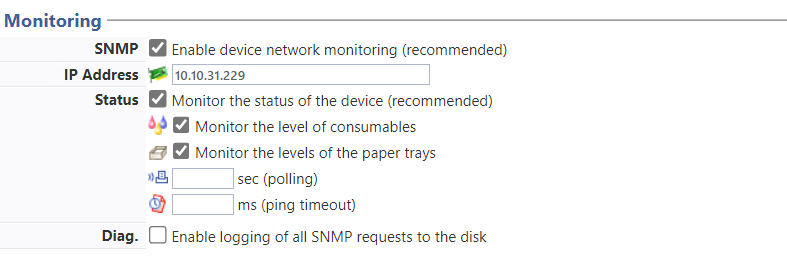
Simple Network Management Protocol (SNMP) is an Internet-standard protocol for collecting and organising information about managed devices on IP networks and for modifying that information to change device behaviour. Devices that typically support SNMP include routers, switches, servers, workstations, printers, modem racks and more. SNMP is widely used in network management for network monitoring. SNMP exposes management data in the form of variables on the managed systems organised in a management information base which describes the system status and configuration.: Enable device network monitoring (recommended). Tick this box to allow Watchdoc to monitor the network device using the SNMP protocol, to determine its status in real time as well as the level of the consumables. We strongly recommend enabling this option for all network printing devices. So that monitoring can work, enable SNMP on the device.
-
IP address: If you enable SNMP monitoring, specify the IP address of the monitored network device. Only SNMP (UDP 161) and HTTP (TCP 80) packets are sent.
-
Status: If you enable SNMP monitoring, tick this box to monitor the status of the device and detail the elements to monitor:
-
Level of consumables: Tick this box to monitor the ink level,
-
Paper tray levels: Tick this box to monitor the amount of paper in the trays,
-
Sec (polling): Specify, in seconds, the polling period to use.
-
ms (ping timeout): This setting sets the time, in milliseconds, after which Watchdoc considers the device as out of service and sends an alert.
-
-
Diag.: When monitoring is enabled, tick the following boxes if you wish to see the requests recorded in the Watchdoc log. Stored in the SQL Counters and Incidents database, these records are used to establish diagnostics in case of failure.
SNMP Configuration section
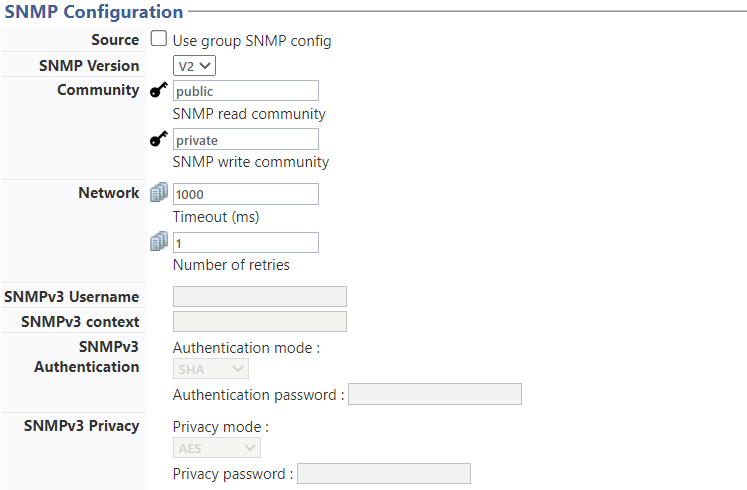
If you have enabled SNMP monitoring, complete the SNMP configuration: (available since v6.1.4898)
-
Source: tick the box if the queue belongs to a group of queues and the configuration of the group should apply to the queue. In this case, it is not necessary to configure the SNMP for the queue.
-
SNMP version: select the version of the SNMP protocol used.
-
For v2, enter :
-
Community: Specify the password for the reading Community and the writing Community for the SNMP protocol enabled on the devices. By default, the community value is public or private. For security reasons, we recommend that you change these values.
-
-
For v3, enter all the values required to guarantee the security of exchanges between the device and Watchdoc. These values must match those used to configure SNMP v3 on the device.
-
User name: enter the user name configured on the device
-
Context: enter the SNMP context configured on the device
-
Authentication: select the algorithm used (MD5 or SHA), then enter the authentication password;
-
Privacy: select the algorithm used, then enter the authentication password. For sensitive server administration tasks via SNMP (reboot, etc.), it is recommended to use AES.
-
-
-
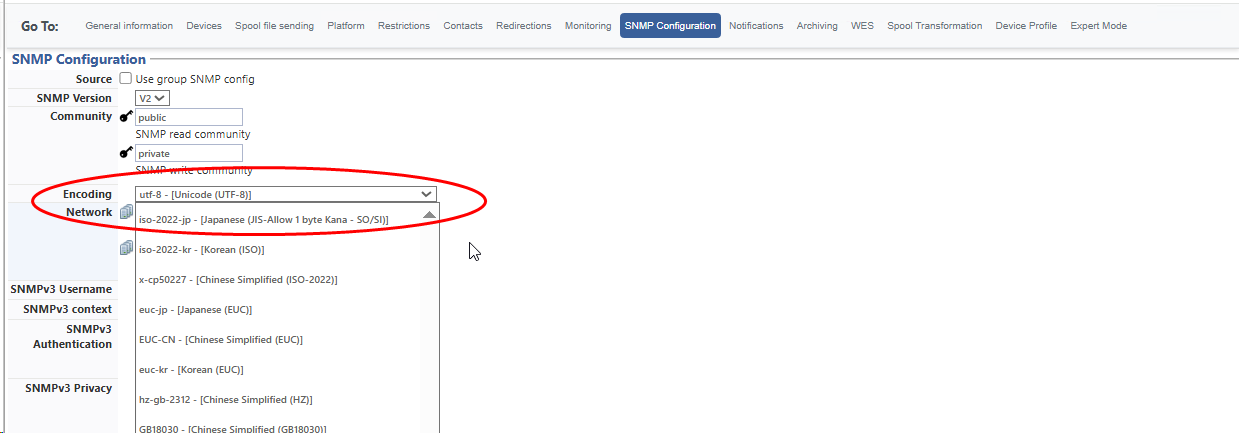
Encoding: in the list, select the character encoding format, if the alphabet used is not the Latin alphabet. This parameter is only visible in debug mode (see Enable debug mode):
Notifications section
-
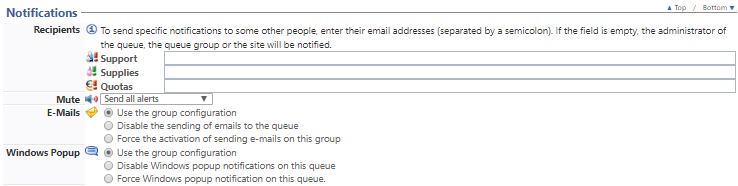
Recipients: Enter the e-mail addresses of the persons who are authorised to intervene in case of technical issues detected by the system, such as a device shutdown or an alert triggered when low consumables are detected, for example.
-
Support: Use this field to enter the e-mail address of the person tasked with the technical management of the devices and who can therefore take action should a failure or problem arise,
-
Supplies: Use this field to enter the e-mail address of the person tasked with managing consumables for the devices and who can therefore take action as soon as it is necessary to resupply the devices with toner cartridges or paper, for example,
-
Quotas: Use this e-mail address field to enter the address of the person tasked with managing the print quotas (or Virtual Wallets).
-
-
Mute: This setting allows you to manage alerts sent by the print queues :
send all alerts: Select this setting (by default) to send all alerts about the print queues;
only send critical alerts: Select this setting to limit the number of alerts sent. Only the alerts considered as critical (unavailable device ) are sent;
do not send any alert: Select this setting to disable the alerts sending from the print queue;
-
E-mails: This setting allows you to detail how e-mail notifications are handled for the configured device.
-
Use the group configuration: Opt for this choice if the format to apply is the one defined for the queue group. The queue will therefore inherit the generic configuration for its group.
-
Disable sending e-mails for this queue: Opt for this choice if you do not wish to use e-mail notifications,
-
Force the activation of sending e-mails on this group: Opt for this choice if you wish to use e-mail notifications for this queue when it belongs to a group for which this option is not enabled.
-
-
Windows Popup: The Windows Pop up is a function for informing users with alert messages via a pop up box that appears on the user's screen.
-
Use the group configuration: Opt for this choice if the format to apply is the one defined for the queue group. The queue will therefore inherit the generic configuration for its group.
-
Disable Windows pop-up notifications for this queue: Opt for this choice if you do not wish to use the Windows Popup notifications,
-
For Windows pop-up notification activation for this queue: Opt for this choice if you wish to use the notifier for this queue when it belongs to a group for which this option is not enabled.
-
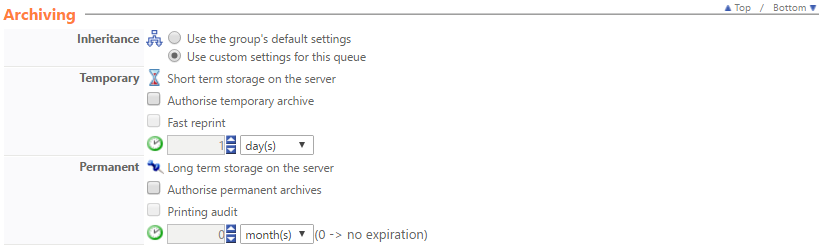
Archiving section
This setting gives the user the ability to archive a print-job from the user interface.
-
Inheritance
-
Use the group's default settings: Opt for this choice to use the archival mode applied to the queue group. The queue will therefore inherit the generic configuration for its group.
-
Use custom settings for this queue: Opt for this choice to precisely define the archival parameters. In this case, new parameters must be set.
-
Temporary: This setting is used to define how a print-job is temporarily archived on the server.
-
Authorise temporary archives:
-
Fast reprint:
-
-
Permanent: This setting is used to define how a print-job is permanently archived on the server.
-
Authorise permanent archives: Tick this box to enable unlimited archival of print outs on the server. This way, the user may reprint or manage and delete their archives as necessary.
-
Print audit: Tick this box to enable archival on the disk without letting users delete them.
-
-
-
WES section
WES (WatchdocEmbedded Solution) designates the Watchdoc interface that is embedded in the print devices. This is the interface that lets users access Watchdoc functions directly on the device in addition to the interface that is accessible via a web browser.
WES is developed by Doxense® to be specific to each make and model of device made by manufactuers that Doxense® has signed technology partnerships with.
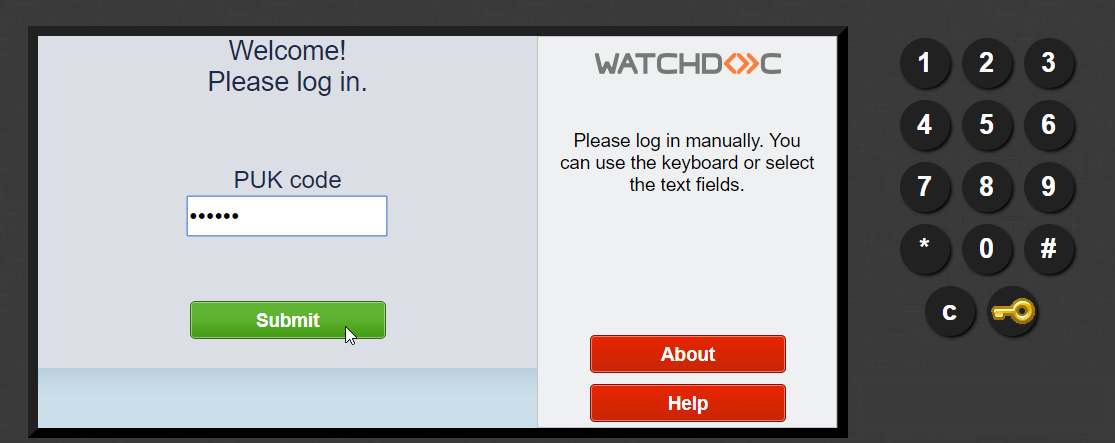
Watchdoc WES interface example - displayed on a printing device
-
Device: Enable the embedded interface: Tick this box to implement WES,
-
Profile: From the drop down list, choose the right WES for your device,
-
Identifier: enter the serial number of the printing device associated with the queue. This identifier must be unique (and Watchdoc will refuse to validate the settings if the identifier is not unique). If the value $AUTOSERIAL$ appears by default in the field, it is advisable to keep this value which allows the server to automatically indicate to Watchdoc the identifier of the device.
-
WES Settings: If the line is equipped with a WES, complete this section by following the procedure for configuring the WES on the line, as described in the relevant WES documentation:
-
Diagnostics:
-
Enable logs: This setting lets you enable logs where all of the exchanges between the device and Watchdoc via WES will be listed. This type of file is analysed if any problem arises with the WES operation. Then you can specify the log level required.
-
Log level: Choose the requests that you wish to see reported in your log file from the list available.
-
File location: Use this field to enter the path to the folder (on the print server) where the log files will be stored. If you don't specify a path, the files will be saved by default to the Watchdoc>Logs folder on the print server.
-
-
Logs options: If logs options are defined in the WES profile, you can ignore them here and define logging options specific to the print queue:
- Destination: Specify where the application should collect the information:
-
file: Tick this box so that the information is saved in a file accessible by Watchdoc;
-
device: Tick this box so that the information is saved on the device;
-
all : Check this box to have the information saved in a file accessible by Watchdoc and on the device.
-
-
Log options - Level: indicate the level of detail of the information recorded:
-
debug: Option to keep track of WES malfunctions;
-
verbose: All detailed traces left by the WES;
-
info: Traces left by the WES;
-
warning: Traces left by the WES when there is a default;
-
error: Traces left when an error is detected at the WES.
-
fatal: Traces of faults detected on the WES
-
none: No trace
-
- Destination: Specify where the application should collect the information:

Spool Transformation section
This setting allows Watchdoc to analyze print spools to provide the user with the ability to change their print choices to make printing more economical and environmentally friendly.
-
Spool transformation mode: specify with this parameter whether or not the spool transform is enabled on the queue and specify its characteristics:
-
Use group value: by default, if the print queue belongs to a print queue's group, it's the parameter set for the group that applies on the print queue;
-
Enabled: choose this setting to activate the spool transformation from this print-queue;
-
Disabled: choose this setting to disable the spools transformation from this print queue.
-
-
Diagnostics: Tick the box if you would like the spools to be retained and set the trace conditions:
-
Level: From the list, select the trace level that you wish to retain (none, errors, edited spools and all);
-
Enable for: From the, select the duration for activating spool tracing (one hour, one day, one week or one month).
-
![]()
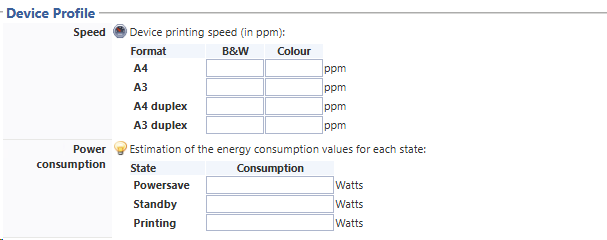
Device Profile section
The device print rate and its power consumption is provided to the user via WES for information purposes only. This information is also displayed by the Queue status tab in the Watchdoc administration interface.
Before configuring the device profile, check that you have the required information. This information is generally provided by the manufacturers in the descriptions that come with the devices.
-
Speed: Enter, in pages per minute (ppm), the number of A4 or A3 pages, simplex or duplex, printed out in black and white or in colour.
-
Power consumption: Enter, for the various device states, its estimated power consumption in Watts.
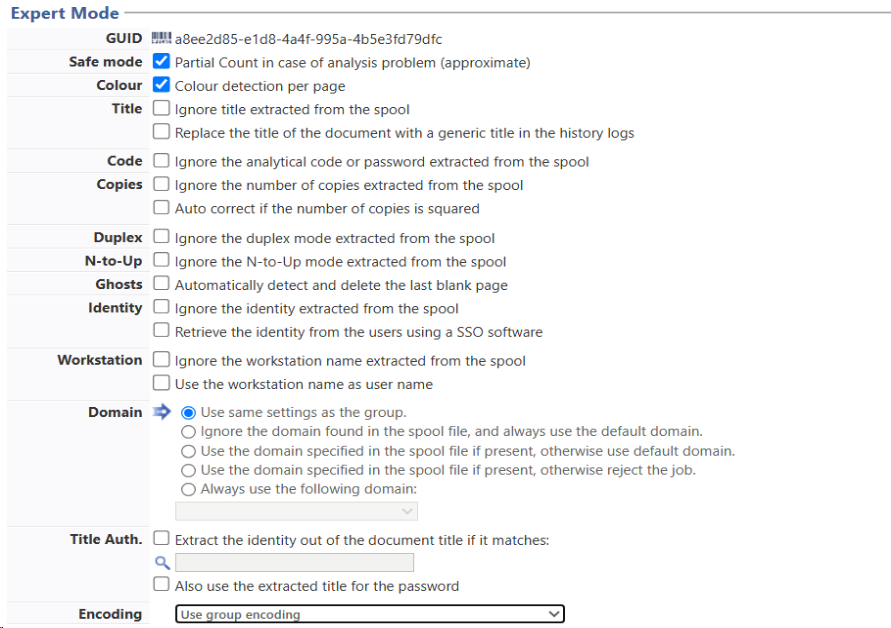
Expert Mode
-
Safe mode: partial count in case of analysis problem (approximate)
-
Colour: color detection on page
-
Title: By default, Watchdoc assigns to the print job the title it retrieves from the title tag (<title>) of the header (<header>) of the spool file (.shd?). In some cases, it may be necessary to change this default operation and apply another one.
-
ignore the title extracted from the spool: check this box to ignore the title of the document saved in the spool file. Unchecking this box is useful if you notice inconsistencies between the document title and the title displayed in Watchdoc because some drivers may send Watchdoc a wrong title. In this case, specify which title is assigned to the document.
-
Replace document title with generic text in print history: Check this box to have Watchdoc replace the document title with a generic title in the print history display. How does WD replace the generic title?
-
Encrypt document title in shared queue:natively managed by MS Windows, this function disappears after version 6.1.0.5178.
-
-
Copies:
-
Ignore the number of copies extracted from the spool: check this box in which case should it be
-
Automatically correct if number of copies squared: check this box if you are confronted with a malfunction generated by a driver that multiplies the number of copies exponentially.
-
-
Duplex: Ignore duplex mode from the spool. Check this box to disable duplex mode and force duplex mode on a device.
-
N-to-Up: Ignore N-to-Up mode extracted from the spooler: check this box in case the driver handles N-to-Up mode incorrectly (e.g. 2 pages in 1, 4 pages in 1), so as to ignore this mode of operation;
-
Ghosts: automatically detect and delete the last empty page. Check this box if you want Watchdoc to detect and not print empty pages in print jobs (page with no characters).
-
Identity:
-
Ignore identity retrieved from spool: Check this box to ignore the identity of the user returned by the driver in case the identity is wrong
-
Retrieve the identity from the users using a SSO software
-
-
Workstation:
-
Ignore workstation name from spool: check this box to ignore if you want the name of the station (workstation) from which the print jobs are launched to be ignored by Watchdoc.
-
Use workstation name as user name: check this box if you want the name of the workstation (client computer) to be used as the user identity.
-
-
Domain: Force domain for users in this queue: check this box if you want to designate a specific directory or a proxy directory as the domain, which you choose from the drop-down list below the check box. Where do the entries in the list come from? Are they predefined, do they vary depending on another parameter?
-
Auth. Title
-
Extract the identity of the document title if it corresponds to : check this box if the identity of the user appears in the title of the spool file and you want to exploit it. You must then complete the configuration by entering in the following field a regular expression indicating how to extract the string corresponding to the user's identity, for example: "^GenericApp - User:([A-Za-z0-9_]+)$"
-
Also use the extracted title for the password: check this box if the title of the document must be use as a password to access the document.
-
-
Encoding: select the desired character encoding format for the configured queue (or group of queues) from the list, to enable Watchdoc to apply a format other than the server format (default).This setting allows documents written using alphabets other than the Latin alphabet (default) to be taken into account.Once the Guest database has been configured, you can add guest accounts to it.
Validating the configuration
-
Click-on the
 button to Validate the configuration