Notifications - Configure notifications
Accessing the configuration interface
-
From the Main menu in the administration interface, Configuration section, click on Advanced configuration;
-
From the Advanced configurationinterface, click on Notifications;
-
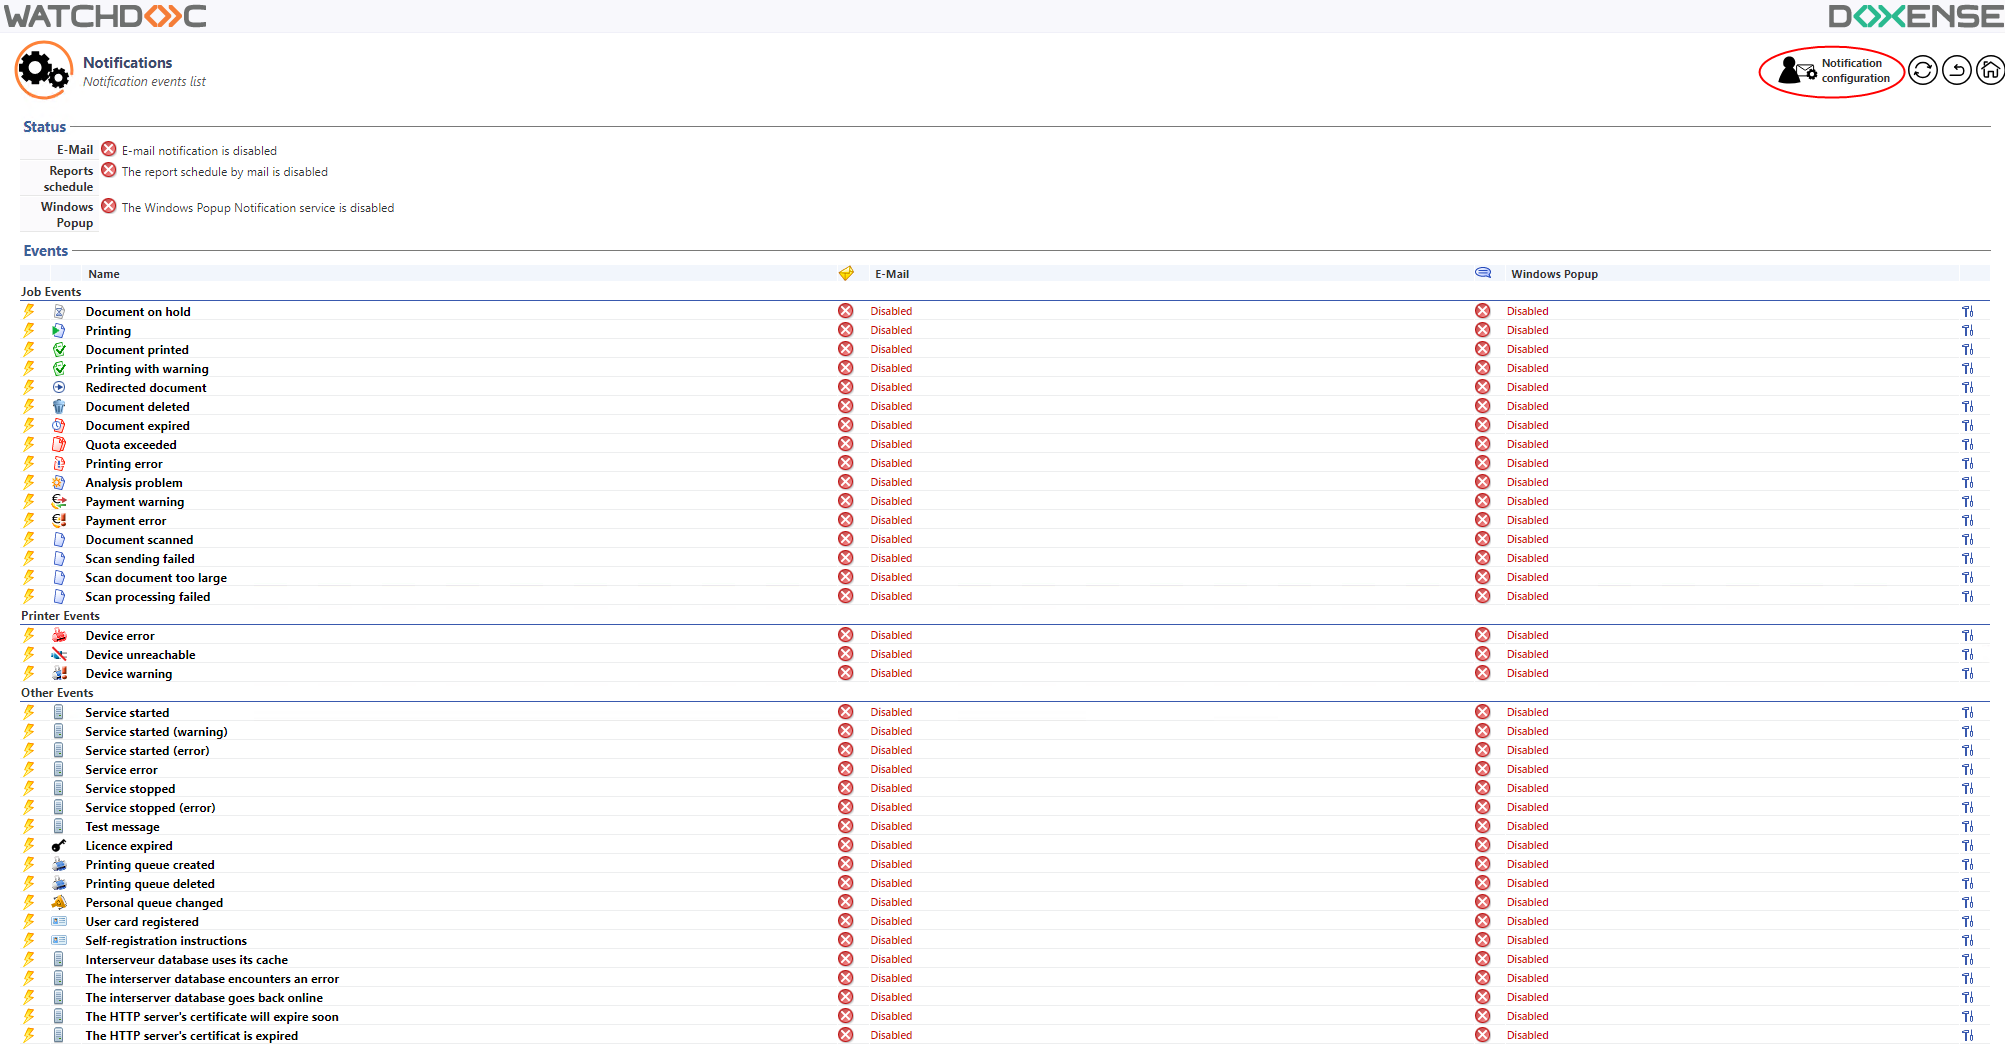
In the interface Notifications, click on Notification configuration:
-
You access the Notifications configuration interface.
Configuring Replication section
When servers are organised into Domains (master/slaves configuration), a Global checkbox allows the rights defined for the master server to be replicated on the other servers that depend on it (slaves). This feature saves time and improves consistency during initial configuration.
N.B.: if there are configurations specific to the slave servers, ticking this box on the master server will cause the configuration of the slave servers to be replaced by the configuration of the master server.
Configuring section Contact
In this section, you can configure the contact information for the person who will send notifications to users. This information is optional:
-
Name: enter the name (or title) of the person responsible for notifications;
-
Email: enter the email address of the person responsible for notifications if you want users to be able to reply to notifications if necessary;
-
Phone: enter the phone number of the person responsible for notifications;
-
Message: enter the message that accompanies the sending of notifications:

Note: If there are specific configurations for slave servers, checking this box on the master server will cause the slave server configurations to be replaced by the master server configuration.
Configuring E-mails notifications
In this section, you configure information relating to email notification settings. This feature allows you to send messages to Watchdoc users or administrators via an SMTP![]() The Simple Mail Transfer Protocol (SMTP) is an Internet standard communication protocol for electronic mail transmission. Mail servers and other message transfer agents use SMTP to send and receive mail message server.
The Simple Mail Transfer Protocol (SMTP) is an Internet standard communication protocol for electronic mail transmission. Mail servers and other message transfer agents use SMTP to send and receive mail message server.
If the mail server is Exchange Online, you must first configure the application in Microsoft Entra (cf. Configure Notifications app. in Microsoft Entra).
-
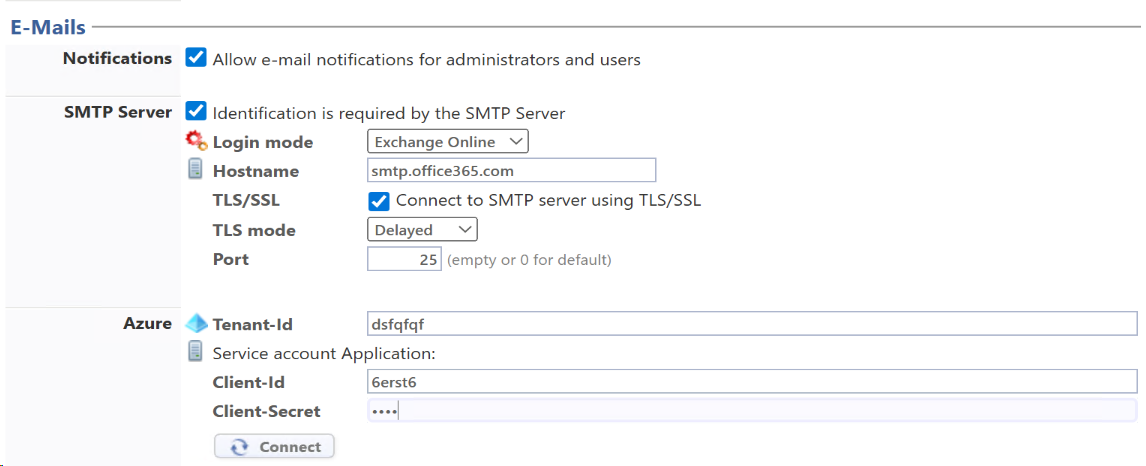
Notifications - Allow e-mail notifications: Check the box if you want Watchdoc to notify administrators and users by email. If you enable this feature, complete the following sections:
-
SMTP Server: specify at least the following parameters:
-
Server name: Enter the IP address of the SMTP server used by Watchdoc to send emails to users in this field.
-
TLS
 Transport Layer Security security protocol. Protocol for securing exchanges over the Internet. It replaced the SSL protocol in 2001. SSL and TLS are encryption protocols that fully guarantee communication security for all of the e-mails exchanged. These systems are widely used to guarantee communication security over the internet./SSL Secure Sockets Layer. A protocol for securing exchanges over the Internet that became Transport
Layer Security (TLS) in 2001.: Check the box if the SMTP server requires the Transport Layer Security (TLS) or Secure Sockets Layer (SSL) security protocol.
Transport Layer Security security protocol. Protocol for securing exchanges over the Internet. It replaced the SSL protocol in 2001. SSL and TLS are encryption protocols that fully guarantee communication security for all of the e-mails exchanged. These systems are widely used to guarantee communication security over the internet./SSL Secure Sockets Layer. A protocol for securing exchanges over the Internet that became Transport
Layer Security (TLS) in 2001.: Check the box if the SMTP server requires the Transport Layer Security (TLS) or Secure Sockets Layer (SSL) security protocol.
Note that this setting is mandatory with the Exchange Online connection mode. -
TLS connection mode: Choose whether to use immediate or delayed connection. The immediate mode is required if the mail server does not support the StartTls command (server configured in mandatory TLS mode).
-
Port: Specify the port for accessing the SMTP server.
If necessary, specify the following parameters:
-
Identication required: check this box if the SMTP server requires authentication. Specify the authentication method:
-
Login mode: select:
-
Login & password: if it is the identification mode, then enter the Login and Password of a user authorized to access the SMTP server;
-
-
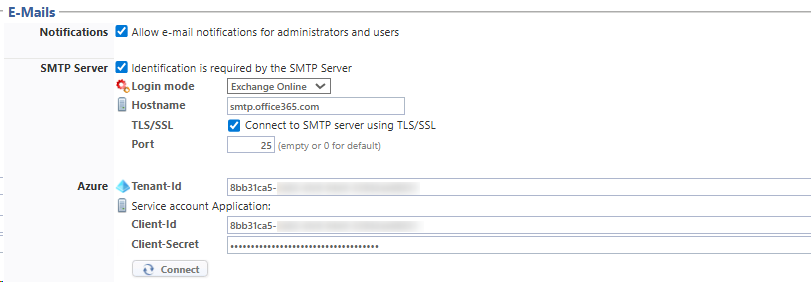
Exchange Online: In September 2025, MS Exchange changed its authentication method. SMTP Auth was replaced by OAUTH identification. To communicate with an Exchange SMTP server, you must therefore complete the MS Azure section. You must therefore have the settings specific to the Microsoft® Azure Exchange Online application :
-
Tenant-Id : Enter the tenant ID (from the MS Azure Exchange Online application);
-
Client-Id : enter the application ID;
-
Client-Secret : enter the application password.
Click on the button Connect to send a test email to the address entered as the Service Address in the following section:
-
-
-
E-mails sub-section:
-
Prefix: in this field, enter a prefix that will be displayed in the email subject line. The prefix allows the user to quickly identify the origin of the email and then apply filters to emails of this type.
-
Service Address: enter the email address of a service or contact person responsible for print management in this field. This address must be valid. It is used to receive automatic return messages such as acknowledgments of receipt and error messages (Mailer Daemon) or user responses.
-
Reply Address:if necessary, enter the email address to which user replies are sent in this field. If you want user-generated replies to be distinguishable from automatic error messages, we recommend that you specify a Reply Address, which is optional.
-
-
Recipients subsection: Enter the email addresses of authorized contacts who can intervene in the event of technical problems detected by the system, such as a device shutdown or an alert when low consumable levels are detected, for example.
-
Support: enter the email address of the person responsible for technical management of the devices and who can therefore intervene in the event of a breakdown or problem.
-
Supplies: enter the email address of the person responsible for managing device consumables and who can therefore intervene when it is necessary to replenish devices with ink cartridges or paper, for example;
-
Quotas: enter the email address of the person responsible for managing print quotas in this field:

-
Configure the Watchdoc Print Client section
This section (v. 6.1.1.5417) allows you to schedule notifications sent to WPC users for events related to the use of this module :
-
Notifications - Enable sending emails to users in Watchdoc Print Client: tick the box if you want Watchdoc to notify users in the WPC interface:
-
Interval: specify, in seconds, the interval before which WPC queries Watchdoc after sending the print job to find out its status:
-
Duration: specify, in seconds, the duration during which WPC queries Watchdoc after sending the print job to find out its status:

Configuring Reports Schedule
This section allows you to schedule reports managed by the Report Communicator (see Reports Schedule).

Windows Popup Notifier
In this section, you configure information related to notifications managed by the MS Window MSG.exe service.
-
Notifications box: check the box to enable the sending of alert messages using the Remote Desktop Services (RDS) protocol, via the MSG.exe command tool in MS Windows. If you check the box, complete the following field:
-
Proxy server: address of the server where the Watchdoc Notification Server service is enabled (usually installed on the IIS web server).
-
Default target: enter the name of the workstation to which “Administrator” notifications will be sent in this field;
-
Name of service: enter the name that will be displayed as the sender of the message sent to the client workstation in this field. This could be, for example, “Watchdoc, print management,” allowing the message to be easily identified:
 .
.
Validate the configuration
-
Click the button
 to Validate the notification configuration.
èOnce the notification feature has been configured, you can return to the event list by clicking the Back button. In this list, you can configure the events that trigger a notification.
Check the notification configuration
Once the notification settings have been configured,
-
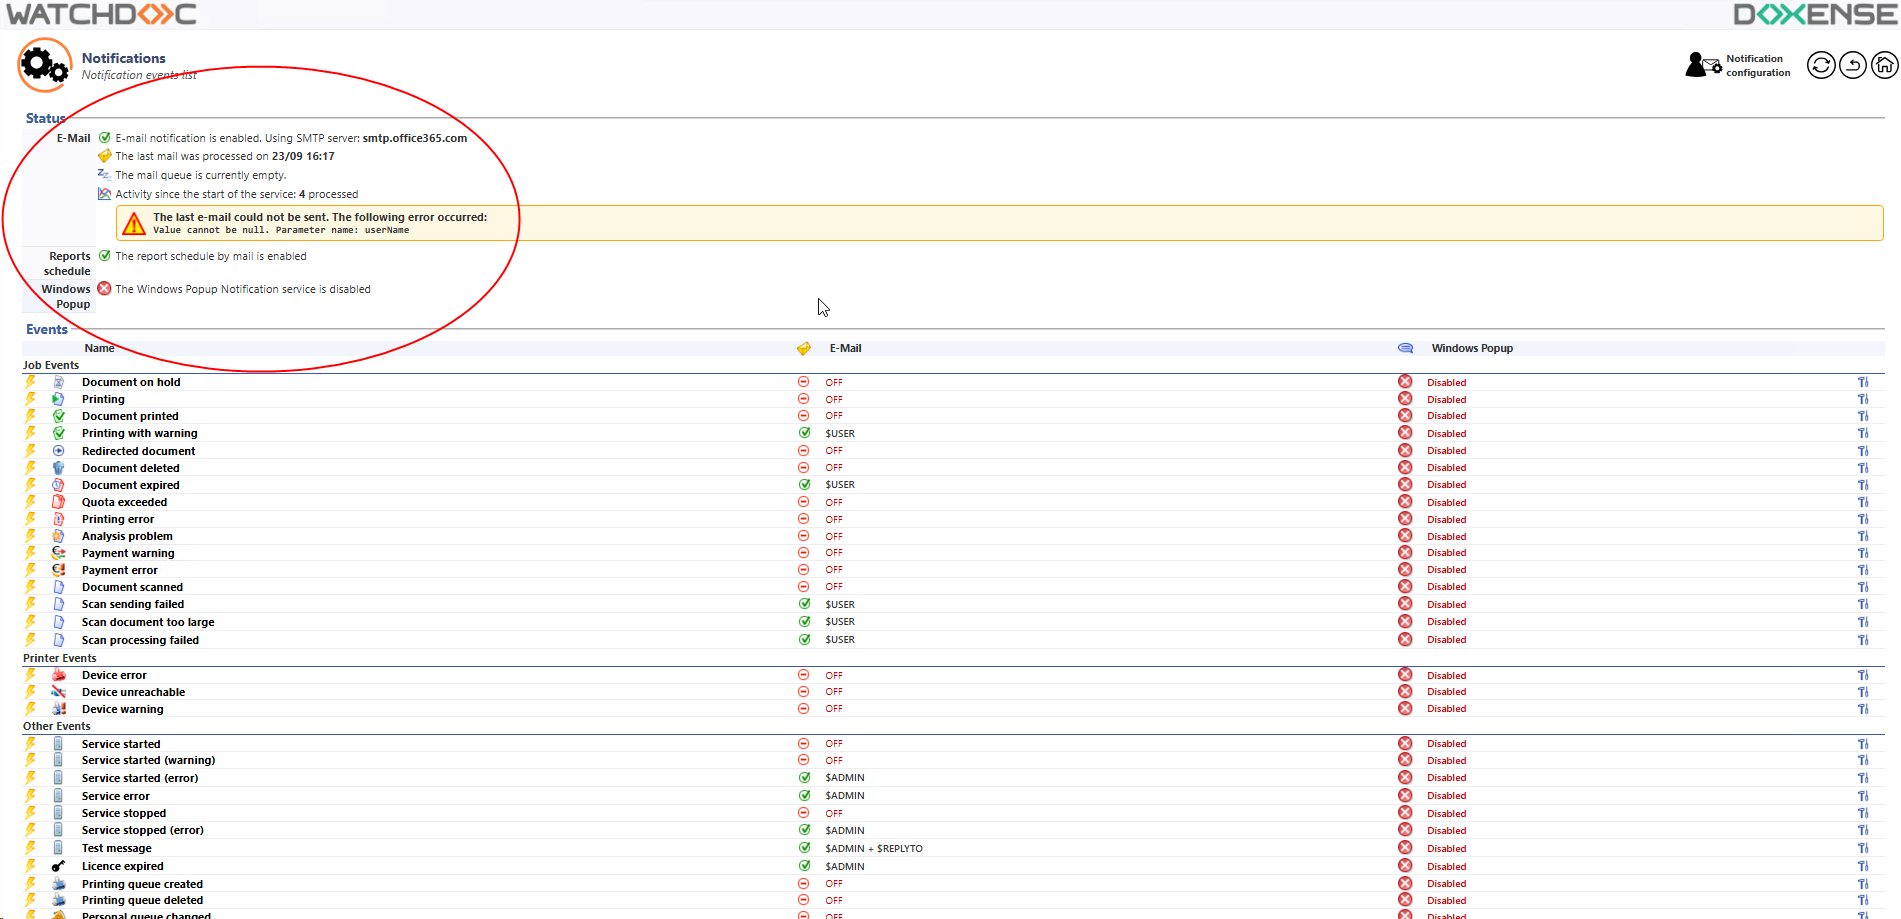
check in the Status section that the notification is enabled:
-
In addition, go to the email account configured in the Contact section.
-
In this account, check that you have received an email entitled ‘Email notification test’: ‘If you receive this message, it means that Watchdoc is correctly configured to send notification emails’:

è If both of these elements are verified, it means that the email notification is configured correctly.