Principle
Appeared in version 6.1.0.5262, this section brings together the parameters relating to the Watchdoc web server and the certificates that secure access to it.
In previous versions, the DSP section is located in the Configuration System interface (Main menu > Configuration section, Advanced configuration > System configuration > DSP section).
This section contains the settings that apply to the Watchdoc web server, which manages the administration interface, the ‘My Account’ page, and the Wes, among other things.
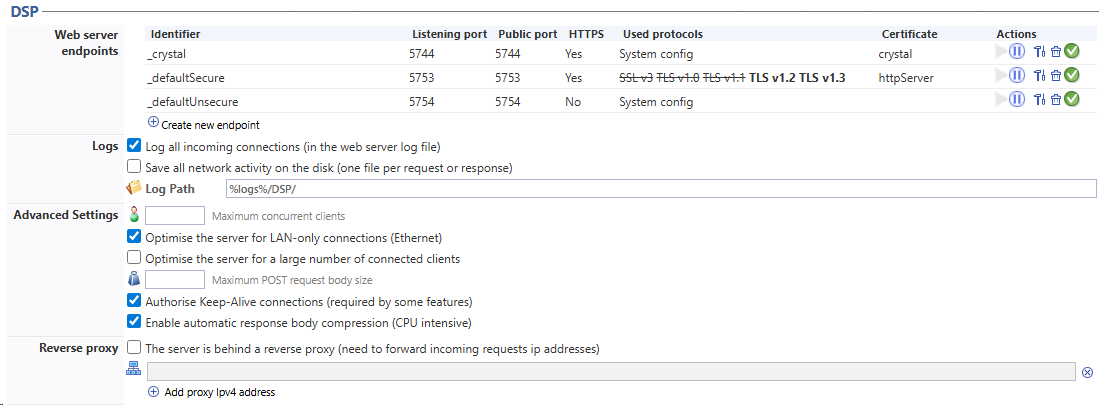
When Watchdoc is installed, the following three endpoints are created by default:
-
_crystal (port 5744 HTTPS with the crystal certificate): this is the default endpoint for securing the web server using a self-signed certificate provided by Doxense. This endpoint can be secured by another certificate signed by a certification authority but must not be disabled under any circumstances, as this would render Watchdoc inoperable;
-
_default Secure (port 5753, HTTPS, with the httpServer certificate): this endpoint provides access to WSC, secure WES, the Print API and Skyprint, as well as other APIs from third parties such as certain badge readers, for example;
-
_defaultIUnsecure (port 5754, not secured by a certificate): allows access to certain unsecured WES.
These endpoints are sufficient for standard Watchdoc operation, but you can add other endpoints, particularly to accommodate printing devices that have specific configurations with different versions of TLS, for example.
You can also apply other certificates (signed by a certification authority) to existing or newly created endpoint (see Manage certificates in Watchdoc).
Access the configuration interface
To access the Watchdoc Web Server management interface.
-
From the Main Menu of the administration interface, Configuration section, click Advanced Configuration;
-
in the [Server_name] > Advanced Configuration interface, click Certificates (before v. 6.1.0.5262) or Web Server (after v.6.1.0.5262):

è This takes you to the Watchdoc Web Server management interface.
Configure the DSP section
-
Configure the settings in the DSP section:
-
Web server endpoint: for WES, if you want to use an SSL port other than the default port (particularly to associate it with a specific certificate), click on Create new endpoint:
-
ID: the ID is generated by default. Rename it if necessary.
-
Listening port: specify the port number responsible for establishing communication.
-
Public port: specify the public port number if it is different from the listening port. This setting is necessary if a proxy secures access to the Watchdoc server. Please note that this information is for declarative purposes only: if the public port is different from the listening port, the correspondence is configured in the proxy.
-
HTTPS: tick the box if the entry point is secured using this protocol (since v. 6.1.1.5360, the _crystal 5744 entry point is in HTTPS and must not be unticked in a default configuration).
-
Certificate: select the certificate associated with the entry point from the list (see Generating certificates).
-
Security protocols: select the security protocol associated with the entry point from the list.
-
Use protocols authorised by the Administration System: select this option to allow the administration system to use its own SSL and TLS settings rather than those that are configured.
-
Use the following settings: select this option to use the settings listed below, then tick the boxes for the protocols you wish to use (SSL or TLS v. 1.0, v1.1, v1.2):
-
-
- Logs
Log all incoming connections (in the web server log file): tick the box if you wish to log network activity (each packet request and response) on the DSP server. By default, each web request processed by the server (W3C Log compatible syntax) is logged in a log file on the disk.
Save all network activity on the disk (one file per request or response): tick the box if you wish to save the logs on one server folder and enter in the Log Path field the path of this folder.
Note: as trace files require space on the server, we recommend that you temporarily enable logging in order to diagnose network activity on the DSP server, and then disable it once the traces have been collected.
-
Advanced Settings
-
Maximum concurrent clients: Enter the maximum number of clients authorised to connect to the server in this field.
-
Optimise the server for LAN-only connections (Ethernet): tick the box to enable optimisation.
-
Optimise the server for a large number of connected clients: tick the boc to enable optimisation when te service is heavily used
-
Maximum POST request body size: Specify, in GB (MB?), the size of POST requests accepted by the server.
-
Authorise Keep-Alive connections (required by some features): tick the box to allow the keep-alive connections
-
Enable automatic response body compression (CPU intensive): tick this box to compress the responses provided by the server to requests sent to it by third-party applications.
-
Reverse Proxy : tick this box if the network has a reverse proxy and specify the IP address of this proxy.
-
Click on Validate to save the settings in the DSP section:
Manage certificates
(See Manage certificates).