Toshiba WES - Troubleshoot the WES
General troubleshooting rules
In order to enable the Doxense Support team to establish a fast and reliable default diagnosis, please communicate as much information as possible during the declaration of the inciden
-
What? What procedure can be used to reproduce the incident?
-
When? What date and time did the incident occur?
-
Where? On which printer did the incident occur?
-
Who? On which user account did the incident occur?
-
Watchdoc.log: thank you for providing the Watchdoc.log file;
-
config.xml file: thank you for providing the Watchdoc.log file;
-
server/device communication logs: please activate the trace files on each file.
Once this information has been gathered, you can send a resolution request from the Connect portal, the incident management tool dedicated to partners.
To obtain the best possible record of the data required for diagnosis, use the Watchdoc DiagTool® supplied with the Watchdoc installation program (cf. Creating a log report with DiagTool ).
Scan, fax and photocopying are not in Watchdoc
If the scan, fax and photocopy jobs are not counted by Watchdoc, verify that the address (host name or IP) of the Watchdoc server configured in the device is correct:
-
Iin the configuration interface of the queue, in the WES section, click on the button Application status (displayed when the WES is properly installed);
-
Click the Download button to download the log files and WES configuration;
-
In the downloaded .zip file, open the Config.json file using a text editor and check the information corresponding to the address of the server (Address) and ports;
-
If the configuration of the address and / or ports is not correct, click on the Configure button on the queue configuration interface.
-
Verify that the procedure has resolved the problem.
Unable to authenticate from WES with card - Error message : "?common/error/couldnotsetcookie?"
Context
With Watchdoc 6.1.0.4940, when WES Toshiba is correctly installed on devices, when a user attempts to authenticate with a badge, authentication does not occur and an error message appears on the device screen: ?common/error/couldnotsetcookie?
Cause
In the traces, it seems that the “session id” is not taken into account.
Resolution
Prerequisites: Verify that the device has firmware higher than TS20SD0W1816.
-
Uninstall WES from the device.
-
In the device's web administration interface, go to Administration > Setup > ODCA.
-
In the Notification Events section, click Delete All.
-
Restart the device.
-
From the Watchdoc administration interface, reinstall the WES.
-
Verify that cards authentication is working.
Unable to access the list of pending jobs after authentication - March 2026
Context
When a user initiated a print job, he logs in to the WES to view the list of pending jobs to approve them. Howeve, he is unable to access the jobs page because, after logging in, Watchdoc displays the login screen again.
Resolution
The WES profile must be modified:
-
as an administrator,go to the WES profile of the devices experiencing this issue;
-
in the WES profile, go to the Pull Print section;
-
for the Redirection parameter, select Hom.
Unable to authenticate from WES - Slow performance observed on the device - November 2025
Context
After updating to Watchdoc v. 6.1.1., users are unable to authenticate themselves from the WES: after entering the code or presenting the badge, the device appears to process the information for about 40 seconds, but then returns to the home interface. The issue is resolved after restarting the device, but it reappears very quickly. The log shows that the response to the <deviceRecord:getLog> command is abnormally long. It is impossible to display the job log from the device's web page (infinite loading).
Cause
This issue is related to the job log, which can slow down the device when it becomes too large.
Resolution
The value of the ‘Job log’ parameter configured in the WES profile associated with the device must be modified (see Configuring the WES profile). We recommend using the value 0, which allows automatic purging, or limiting the number of days of retention to avoid these slowdowns. Please note: even a value slightly higher than 0 can cause malfunctions.
After changing the setting, restart the device before checking that authentication is working.
Activating WES traces
To diagnose a problem with the WES, you need to activate the log files specific to WES communications.
To activate the traces
-
in the Watchdoc web administration interface, from the Main Menu, Production section, click Printing queues, queues groups & pools;
-
In the list of queues, click on the name of the queue with the WES for which you want to activate the trace files;
-
in the queue management interface, click on Properties ;
-
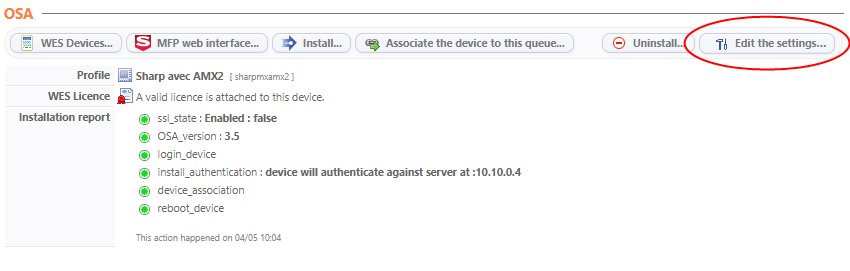
in the OSA section, click on the Edit the settings button:
-
in the WES>Diagnostics section, tick the Enable traces box ;
-
in the Trace level list, select :
-
Auto: retains standard traces ;
-
Include binary content: retains detailed traces.
-
-
In the Path field, enter the path of the folder in which the trace files should be saved. If you leave the field blank, the trace files will be saved by default in the Watchdoc_install_dir/Logs/Wes_Traces/QueueId installation folder:
Message in TopAccess administration interface: Job Logs deleted
June 2025
Context
In the administration interface of a Toshiba TopAccess device, under the Logs > View logs tab, the administrator wants to view the job logs. However, he finds that the log has been deleted: message ‘Job Logs deleted’.
Cause
This is an automatic function of the WES which systematically deletes the job logs.
Resolution
This automatic operation has been modified. To resolve this problem, please update Watchdoc to v. 6.1.0.5290 min.
Error Message - The remote SOAP service failed while processing request '<unknown>': User is operating the panel
Context
When uninstalling WES Toshiba Open Platform, the operation runs smoothly until the Set MDS settings line of the Installation report, which displays the following error message: The remote SOAP service failed while processing request '<unknown>': User is operating the panel.
In fact, the WES is still displayed on the device screen (authentication screen).
Resolution
To solve the problem, press the device's screen button  twice to make the WES disappear and display the device's original home page again:
Error while starting a newformat breakdown
Context
While quotas were configured on the Toshiba WES, when a print job was validated, the user saw the ‘Internal Server error’ message displayed on the WES.
During analysis, the message ‘Error while starting a newformat breakdown: Invalid object name “dbo.formatbreakdown”’ appears in the log files.
Message "Internal Server Error" on the WES.
Cause
This problem may be due to the quota configuration.
Resolution
To solve this problem, it is necessary to complete the installation of WES after the installation steps:
-
connect to SQL server as administrator;
-
Open the mssql_formatbreakdown46.sql file so that you can copy its contents later;
-
open SQL Server Management Studio ;
-
in the Connect to Server interface, enter the following information:
-
server name :
-
the authentication type, plus Login / Password if necessary.
-
-
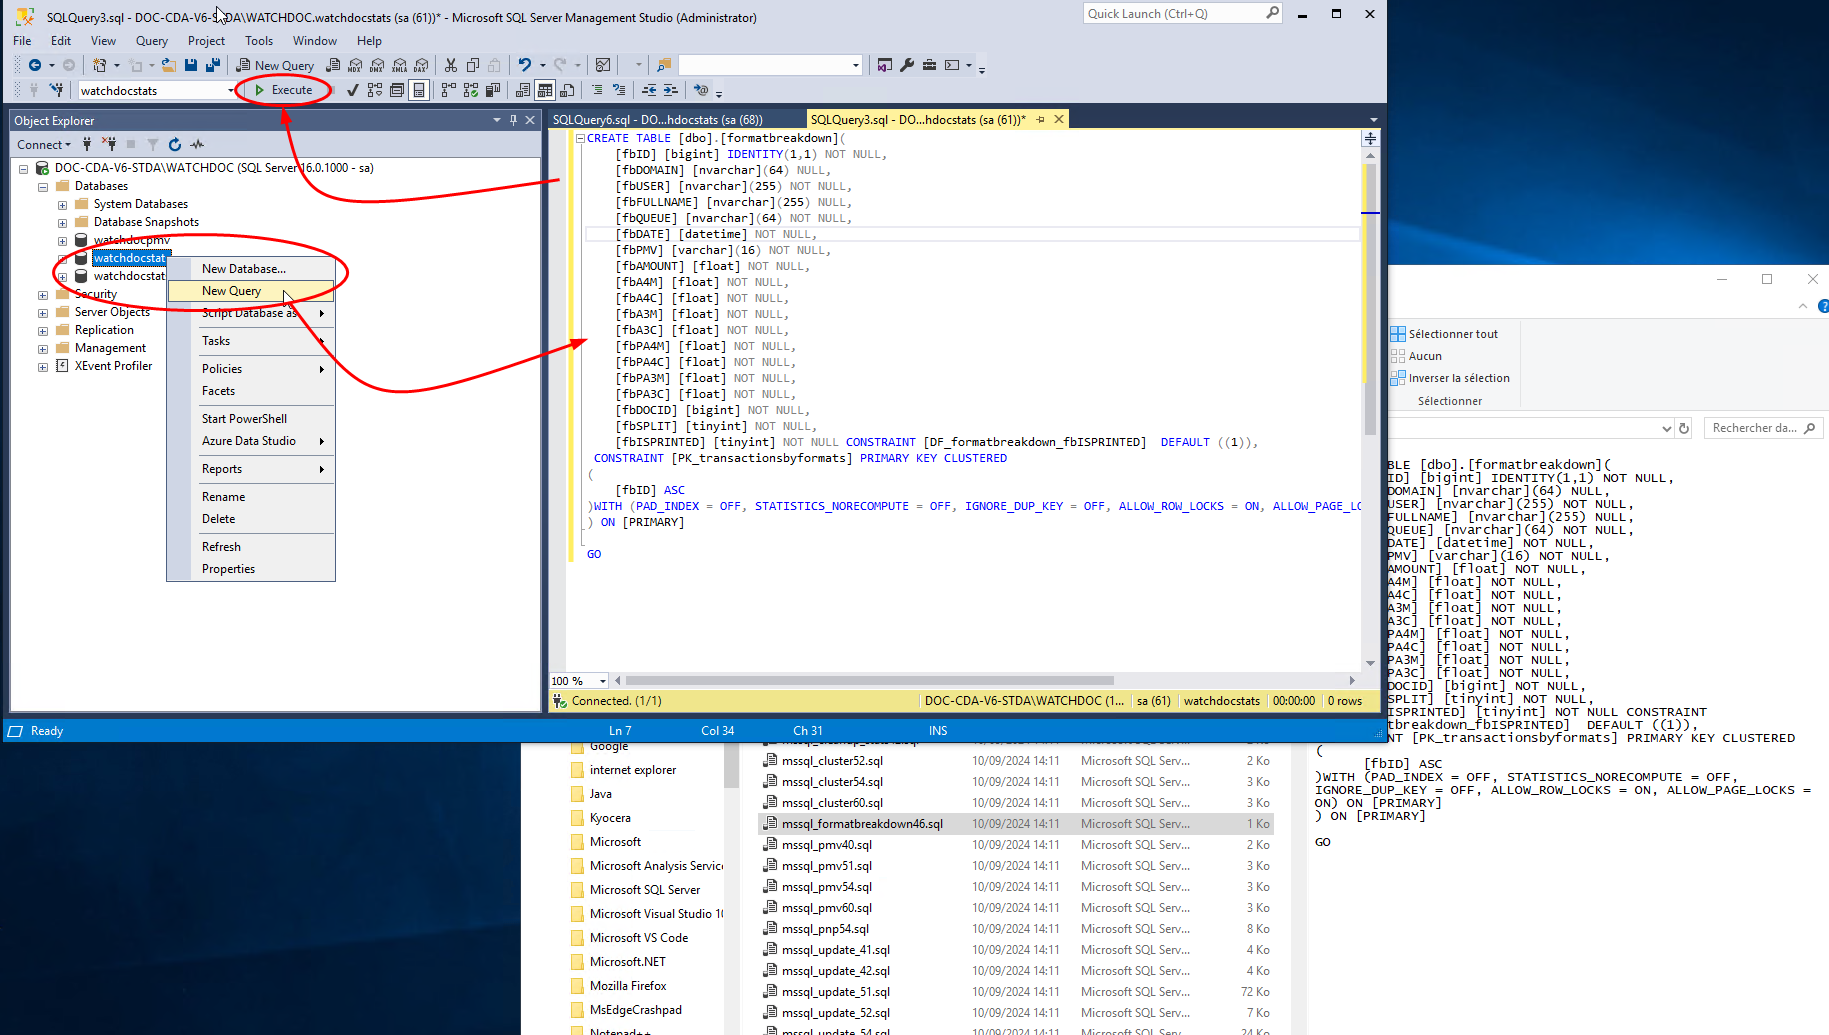
in the left-hand tree, expand the Databases level
-
locate watchdocstats and right-click;
-
select New Query;
-
on the right-hand page, paste the contents of the script mssql_formatbreakdown46.sql;
-
then click on the Execute button;
-
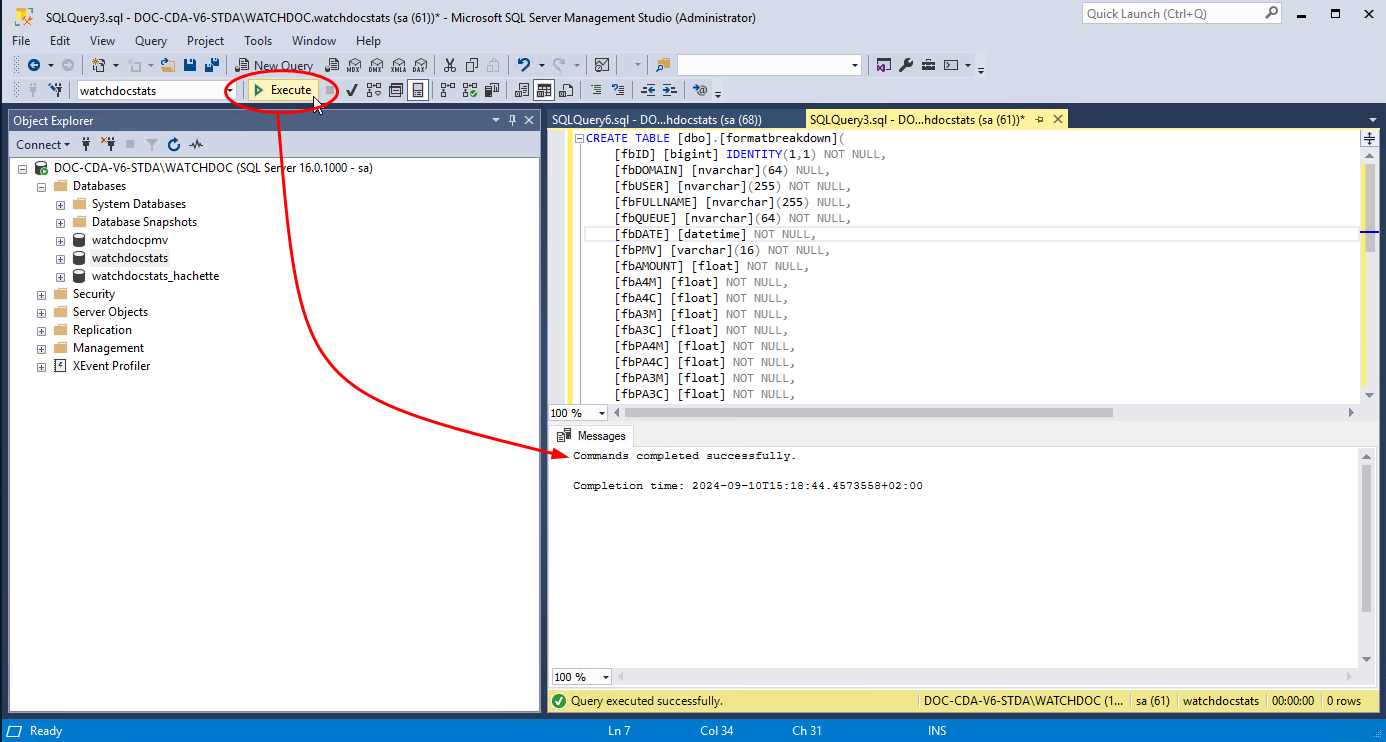
A message will inform you that the script has been executed successfully:
-
Access the Watchdoc server as administrator;
-
Open the config.xml file (by default: C:\Program Files\Doxense\Watchdoc\config.xml) with a text editor;
-
in the /config/checkout section, add the line <use-formatbreakdowntable>true</useformatbreakdowntable>;
-
quit SQL Server Management Studio and restart the Watchdoc service;
èCheck that printing is running correctly on the WES, and that quotas are taken into account.
InternalServerError. An Internal error occurred. JsonDbException
Context
This error message appears after the WES has been installed, even though everything seems to be configured correctly: Doxense.data.JsonDv.JsonDbException: Database must be initialized before any operation.
Cause
The interserver database is not configured when the Watchdoc server is started.
Resolution
In the Watchdoc administration interface, check the configuration of the interserver database (see Enable the interserver printing function).
Delay before printing
Context
When a user sends a document to a network printer targeting a print server, there is a delay of around twenty seconds before the document begins to be spooled and then sent to the server.
Cause
This anomaly is caused by the driver sending SNMP requests to the print server thinking it is a device. Each request causes a timeout.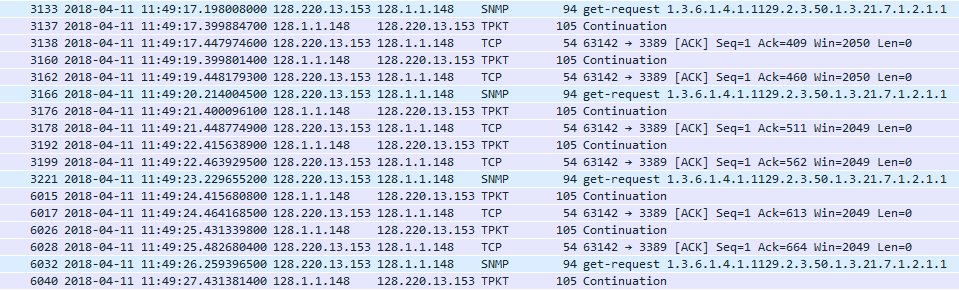
Resolution
To solve this problem, disable the bidirectionality in the print queue properties from its configuration interface:
-
in the list of devices installed on the server, select the Toshiba device:
-
right-click, then, in the list, select "Properties";
-
On the Ports tab, check that the box Activate the bidirectional mode management is disabled:
-
On the Device's settings tab, check that the box Self update is unchecked.
-
On the Advanced tab, click on By default printing button;
-
On the Others tab, check that the box SMNT Communication is unchecked.
WES Licences counting error - No valid licence.
Context
When Toshiba WES is associated with a print queue, a failure of the MS Windows server or spooler may result in the number of WES licenses not appearing in the queue's properties (Main Menu> File Print + queue selection> Properties).
In this case, a error message is displayed in the WES profile interface: "a malfunction has been detected, please consult the application log for more information. The on-board interface is not working properly. This device does not have a valid licence and will be rejected by this server".
Additionally, this problem is traced in the Watchdoc logs (which are stored by default in C: \ Program Files \ Doxense \ Watchdoc \ logs \ Watchdoc.txt), where a JSON error message appears during the service start-up phase.
Resolution
To resolve this issue, use the following procedure:
-
Verify that the server is up-to-date with the latest Watchdoc version;
-
Verify the JSON TOSHIBA error message is present when the service starts;
-
Inventory files that do not properly display licenses;
-
Go to the c: \ Program Files \ Doxense \ Watchdoc \ Data \ queues.jsdb folder;
-
In this folder, locate the problem girls' files and rename them "NOMSERVER.QUEUES_OLD";
-
Restart the Watchdoc service;
-
Check in the queue properties that the WES licenses are displayed correctly.
WES manual uninstall on Toshiba e-Bridge-N
Context
It can occur, especially after a test period onto the Toshiba e-Bridge-N device, that this one is not yet connected and can no longer interface with the Watchdoc print server.
In this case, it is no more possible to uninstall the WES from the device from the Watchdoc administration interface. To be able to reuse the device, it is then necessary to uninstall the WES from the Toshiba e-Bridge-N device administration interface.
Instructions
To uninstall manually the WES from the device:
-
thanks to a browser, access the device administration interface (TopAccess);
-
in the Administration tab, log on with an administrator account;
-
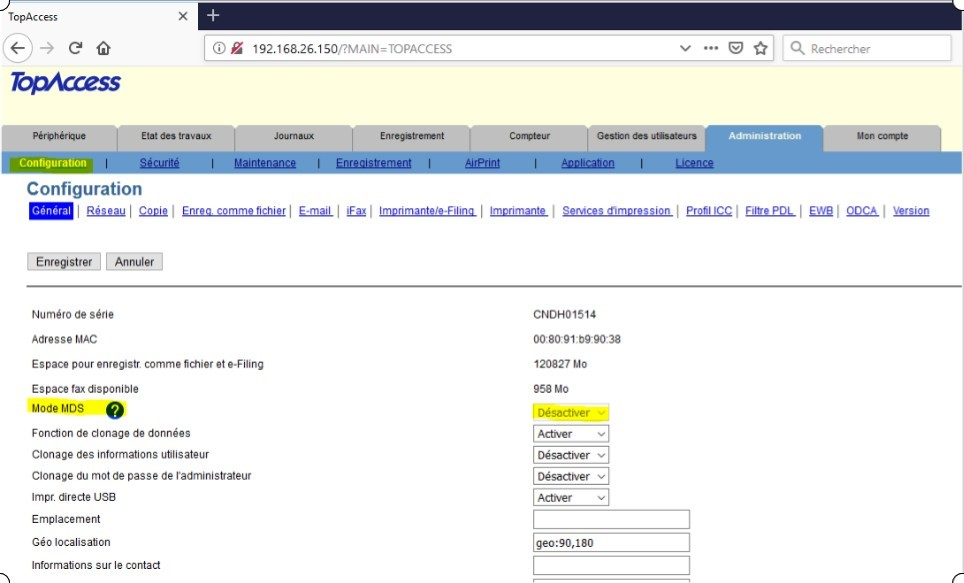
in the Configuration tab, click on General;
-
in the parameters list, disable the Mode MDS:
-
click on Save to validate the configuration modifications.
-
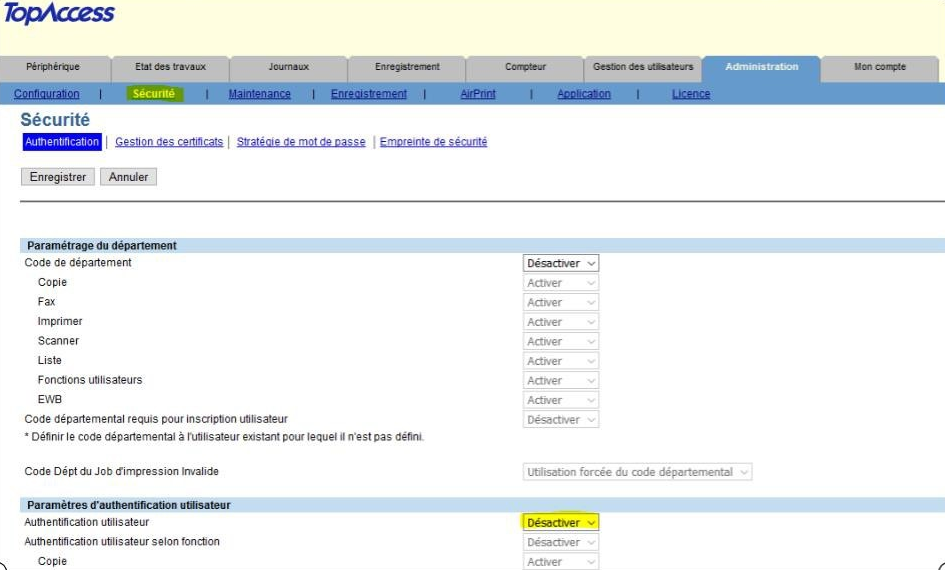
click then on the Security tab;
-
click on the Authentication entry;
-
in the User authentification parameter, disable the user authentication:
-
click on Save to validate the configuration modifications.
èWatchdoc is therefore uninstalled and the device is able to operate normally.
Configure the Confidentiality settings
To obtain precise information about users in the Watchdoc print history, you need to configure the confidentiality settings on the printing device.
Otherwise, user information will be hidden and replaced by stars: 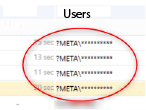
-
Access the device configuration interface as an administrator.
-
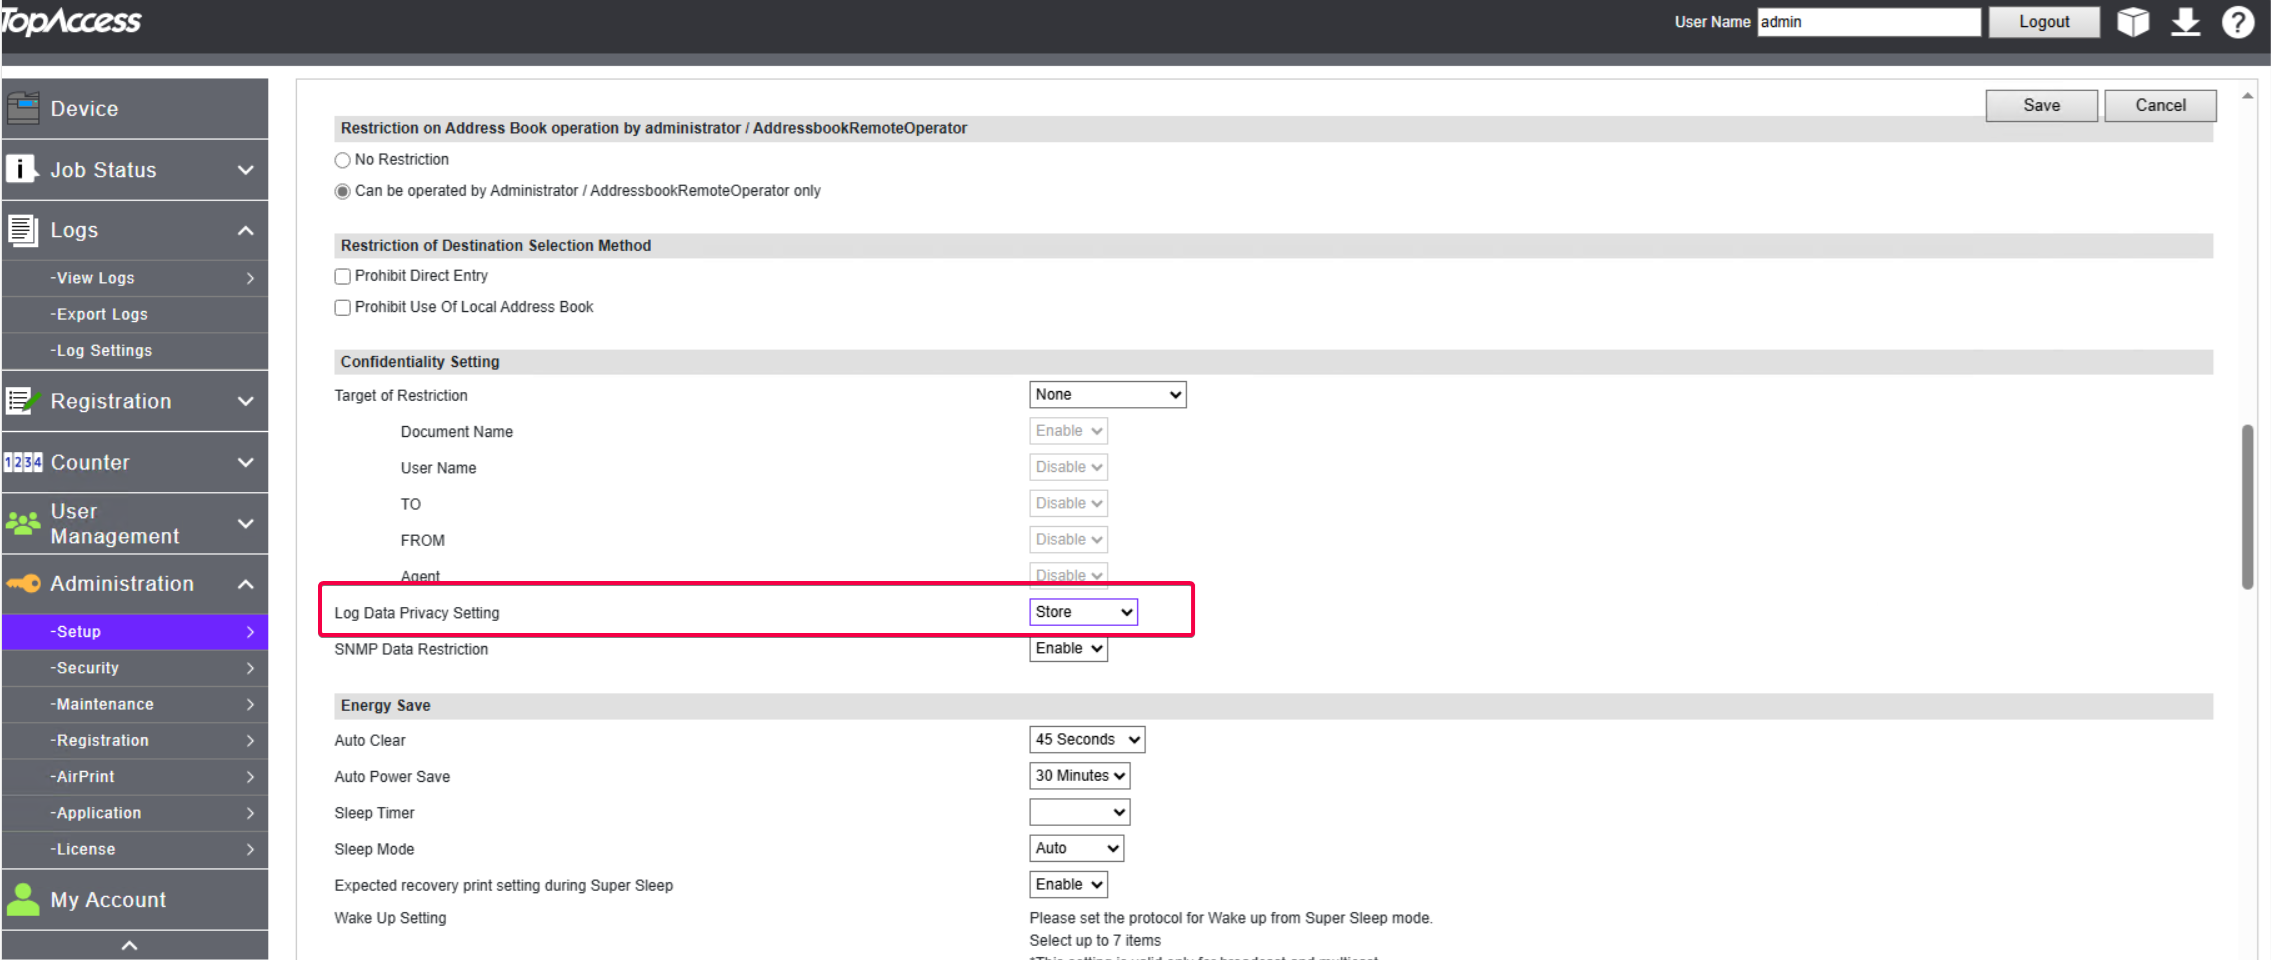
Click on Administration > General in the menu.
-
In the Confidentiality settings section, select ‘Store’ for the Log data privacy settingg:
-
Click on Save to validate this setting.