WES Xerox WES - Troubleshoot the WES
General troubleshooting rules
-
What? What procedure can be used to reproduce the incident?
-
When? What date and time did the incident occur?
-
Where? On which printer did the incident occur?
-
Who? On which user account did the incident occur?
-
Watchdoc.log: thank you for providing the Watchdoc.log file;a
-
config.xml file: thank you for providing the Watchdoc.log file;
-
server/device communication logs: please activate the trace files on each file.
Once this information has been gathered, you can send a resolution request from the Connect portal, the incident management tool dedicated to partners.
To obtain the best possible record of the data required for diagnosis, use the Watchdoc DiagTool® supplied with the Watchdoc installation program (cf. Creating a log report with DiagTool).
Scan, fax and photocopying are not in Watchdoc
If the scan, fax and photocopy jobs are not counted by Watchdoc, verify that the address (host name or IP) of the Watchdoc server configured in the device is correct:
-
Iin the configuration interface of the queue, in the WES section, click on the button Application status (displayed when the WES is properly installed);
-
Click the Download button to download the log files and WES configuration;
-
In the downloaded .zip file, open the Config.json file using a text editor and check the information corresponding to the address of the server (Address) and ports;
-
If the configuration of the address and / or ports is not correct, click on the Configure button on the queue configuration interface.
-
Verify that the procedure has resolved the problem.
Activating WES Traces
To diagnose a problem with WES applications, you need to activate the log files specific to WES communications :
-
in the Watchdoc web administration interface, from the Main Menu, Production section, click Printing queues, queues groups & pools;
-
In the list of queues, click on the name of the queue with the WES for which you want to activate the trace files;
-
in the queue management interface, click on Properties;
-
in the WES section, click on the Edit the settings button:
-
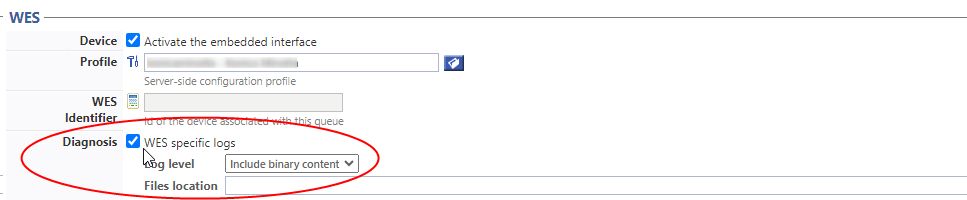
in the WES>Diagnostics section, tick the Enable traces box;
-
in the Trace level list, select:
-
Auto: retains standard traces;
-
Include binary content: retains detailed traces.
-
-
In the Path field, enter the path of the folder in which the trace files should be saved. If you leave the field blank, the trace files will be saved by default in the Watchdoc_install_dir/Logs/Wes_Traces/QueueId installation folder:
Installation message error - IPLockedOut
Context
When installing Xerox WES, it occurs that an error message is displayed when Watchdoc try to connect to the jba (Job Base Accounting) kit.
An error message alerts that the remote SOAP service rejected the request because it could not authenticate user.
Cause
The problem occurs especially after several installations and uninstallations of the WES: the administration service, considering these attempts as anomalies (IPLockedOut: Excessive Failure Attempts), locks the connection to the web services.
Resolution
To solve this problem, it's necessary to cancel the web services connection restriction. Follow this steps :
-
go to the device web administration site ;
-
click on the Properties tab ;
-
in the menu, click on Services > Printing > Printing Web Service ;
-
in the Web services IP locking section, click on the Unlock button :
-
re-install the WES in Watchdoc and check the installation was successful.
Xerox Secure Access Error message (Xerox 7855 model).
Context
When installing the WES onto the printing queue, after clicking on the Install button, to red spots are displayed and the following error message is displayed: "xsaws : implementation problem. Please do it manually".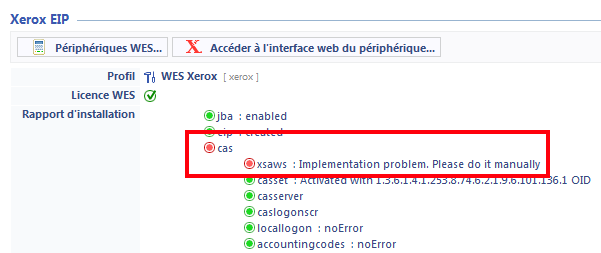
Cause
This error is due to the Xerox Secure Access Web Service (xsaws) is not activated.
Resolution
To resolve this issue, go to the Xerox 7855 device configuration interface and tick the Xerox Secure Access box if it's not ticked.
-
If the box is already ticked, reactiveate the Xerox Secure Access :
-
untick the Xerox Secure Access box;
-
click the Save button to validate;
-
tick one more time the Xerox Secure Access box;
-
click the Save button to validate;
-
reinstall the WES following the procedure.
Job assembly feature on Xerox WorkCenter 78xx models
Context
On the WorkCenter 78xx devices models, the Job Assembly feature allows the device to scan multiple documents to one.pdf.
Resolution
To configure this function:
-
access the device web management interface as an administrator;
-
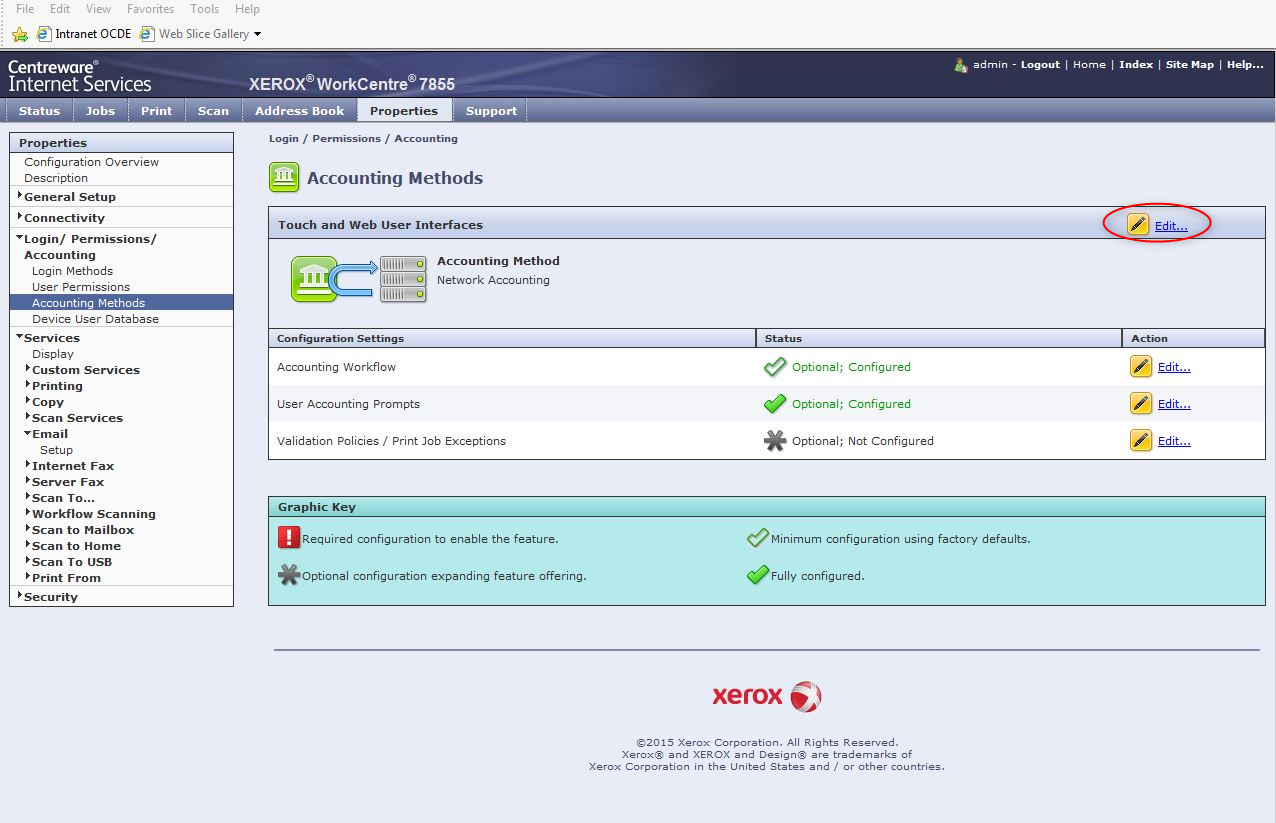
from the administration interface, in the menu, click on Login>Permissions>Accounting>Accounting Methods ;
-
from the interface Accounting Methods, in the Touch and Web User Interfaces section, click on Edit;
-
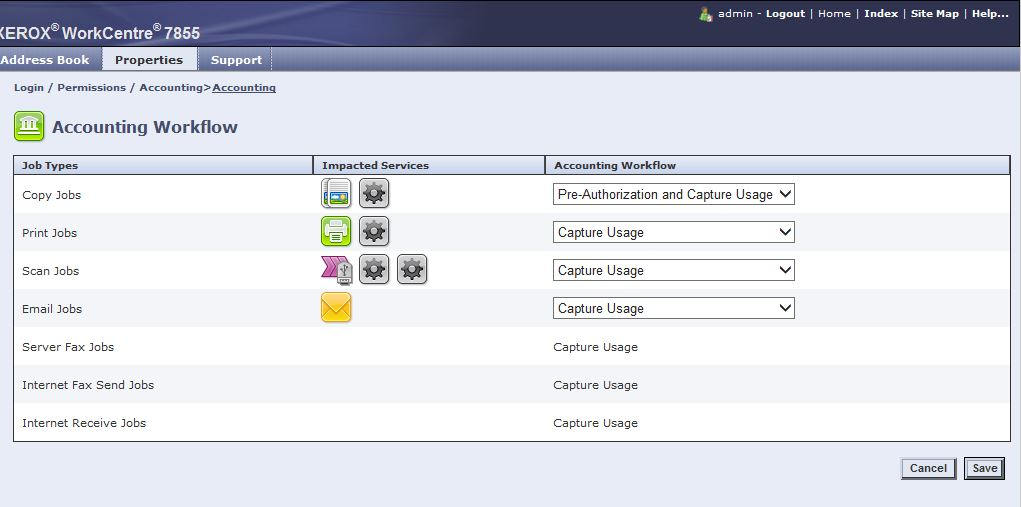
in the Job Types list, in the Accounting Workflow column, select the option Capture Usage;
-
click on Save to valider the feature's configuration:
Error when sending scans to mail from WorkCenter® 7845 models
Context
It occurs that scans launched from the Xerox® WES of WorkCenter® 7845 models are not sent to their recepients.
The scan is transmitted to the device, then deleted before being sent to the recipient and an error page is printed with the following message: "Deleted: one or more accounting limits are reached".
In the SMTP transfert report, the message relating to this jobs is the following: "Job status: failed, job deleted by the system".
When WES Watchdoc WES is uninstalled on the device, the ScanToMail feature works again.
Resolution
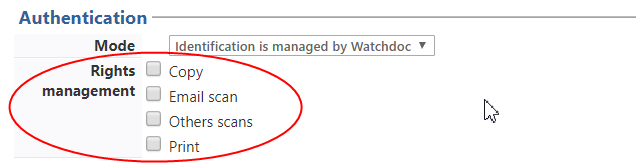
To solve this problem, you must deactivate the rights control on the device:
-
access the WES Xerox administration interface: Watchdoc>Main Menu> section Configuration, click on Web & WES templates;
-
in the WES list, select the Xerox WES which is activated on the devices that are affected by this issue;
-
access the WES configuration interface;
-
in the Authentication section, Rights management setting, unthick boxes that activate a control on the device's features (Copy, Email scan, Others scans and Print);
-
then validate the WES configuration:
-
Reinstall the WES on the affected devices;
-
check the ScanToMail feature.
Xerox Altalink - Multipage scanning from the glass is not possible
Contexte :
Context: from the exposure glass of an Altalink printing device, the user can only scan a single page and is unable to add an additional page.
Cause: the functionality is not activated on the print devices.
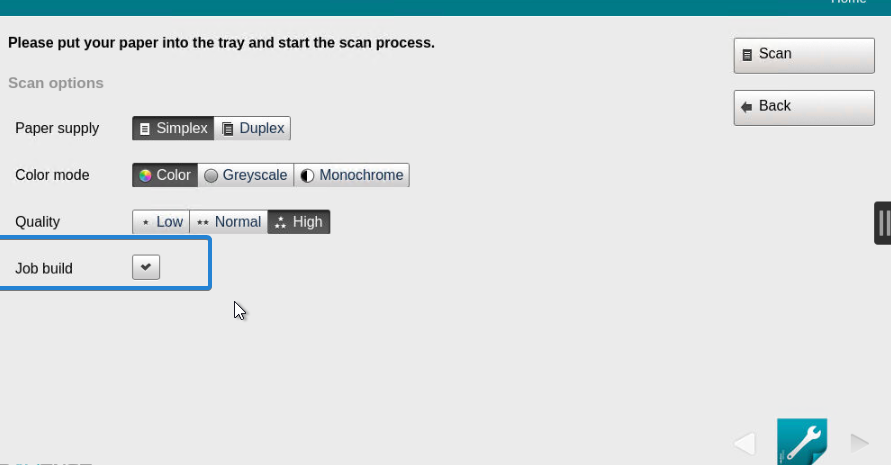
Resolution : the function must be authorised or activated on the print devices.
-
leave the choice to the user: in this case, the user must tick the ‘Job build’ box in the scanning interface :
-
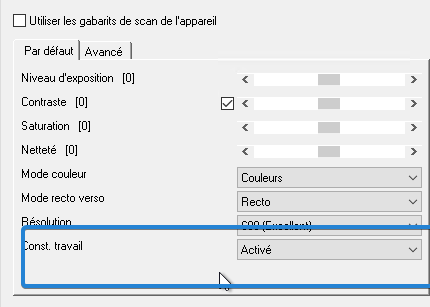
in the ScanCare profile, activate the Job Constr. parameter:
Error during scanning with the native scan function - Completed (error) 027-504. An error occurred while scanning to the SMTP server.
Context
Watchdoc is installed on a server managed by MS Office 365.
A user authenticated via the WES of a Versalink device uses the native scan function to perform a scan. The following error message appears: ‘Completed (error) 027-504. An error occurred while scanning to the SMTP server. Contact the system administrator.’
Cause
This error occurs when the email address of the printing device is different from the SMTP AUTH username, i.e. the Office 365 email address. (See Xerox Support https://www.support.xerox.com/en-us/article/KB0232358)
Resolution
-
Ensure that the Office 365 account used by the machine is able to send emails on behalf of any user;
-
configure a ‘sender’ email address in the WES profile and force the device to use this sender (‘de/from’) for all scans made from the device (see Configuring the Xerox WES profile).
Internal server error
Context
The Xerox WES is installed in interserver mode with a virtual queue. The user sends a print job to the virtual queue and wants to release it via the WES.
The document is displayed in the job list, but with the message InternalServeurError :
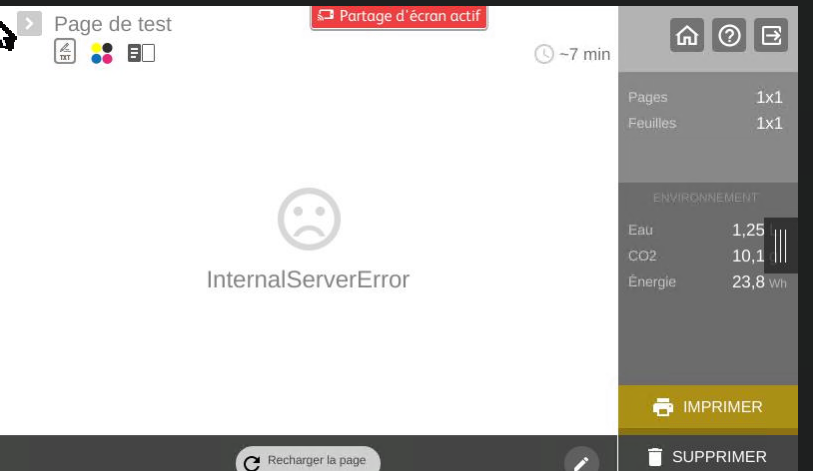
The following message appears in the trace files of the server on which the destination queue is installed:
PULLPRINT|PullPrintManager "Failed to send print command to remote Server"
Cause
There are two possible reasons for this error:
-
the EMF has been activated on the virtual queue, which the Doxense spooler handles incorrectly
-
the group to which the queue is assigned is not a group created on the master (Error: System.InvalidOperationException: Queue[RJ-002.IMP1] cannot compute ACL chain, group[ixi] is unknown...)
Resolution
Proceed as follows for all virtual queues.
-
From the Main Menu, Production section, click Printing queues, Locations, queue groups and pools;
-
In the Printing Queues list, click on the virtual queue;
-
then click on Edit properties;
-
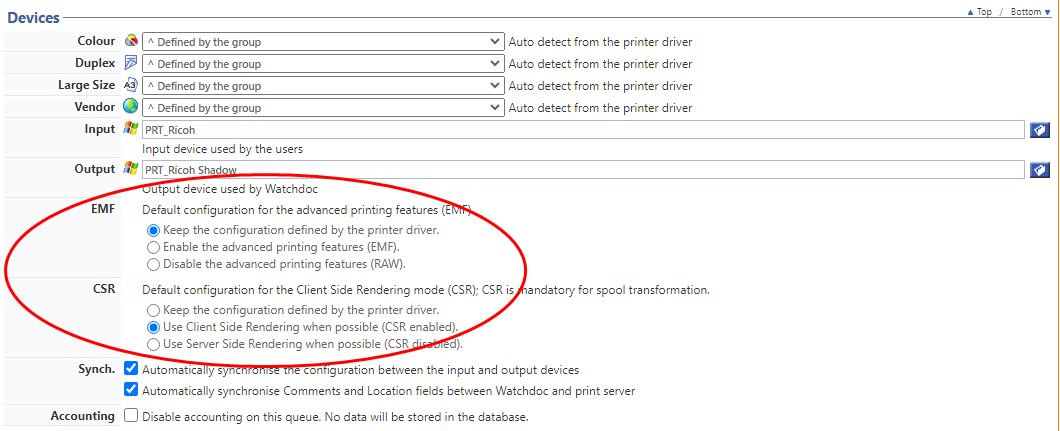
in the Devices section,
-
disable EMF on all virtual queues
-
Enable CSR mode on all virtual queues:
-
-
save the new settings;
-
restart the queue.
Message XSAServer : badValue when installing the WES
Context
During the installation of Xerox WES, the following error message appears in the installation report:
AuthenticationSystem (XSA) > XSAServer: badValue
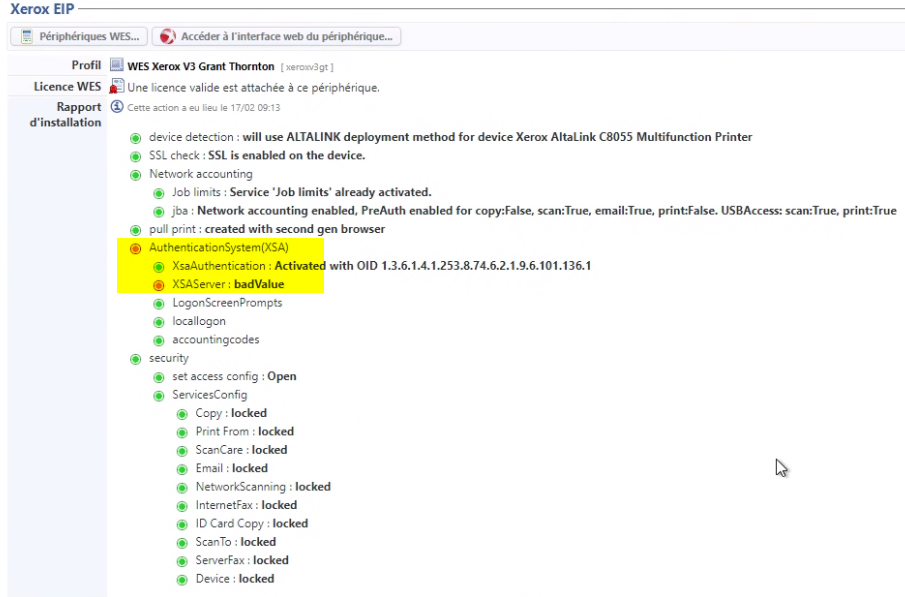
Cause
The connection cannot be established between the device and Watchdoc because the server address is not found. This problem often occurs when a DNS address was specified during the WES profile configuration.
Resolution
-
To solve this problem, the server address must be changed in the WES configuration interface:
-
go to the WES configuration interface (Main menu > Web section, WES & Scan destinations)
-
in the WES list, select the Xerox WES;
-
in the Xerox WES profile, section Device, for the parameter Server address type, select Server IP address (default address determined at the start of the service).
-
validate the WES profile and restart the installation of the WES on your print queue to check that the wes is correctly installed.
Xerox Altalink - Multipage scanning from the glass is not possible
Context
From the exposure glass of an Altalink printing device, the user can only scan a single page and is unable to add an additional page.
Causel
This feature is not activated on the print devices.
Resolution
The feature must be authorised or activated on the print devices.
-
leave the choice to the user: in this case, the user must tick the ‘Job build’ box in the scanning interface :
-
in the ScanCare profile, activate the Job Constr. parameter:
WES Licences counting error - No valid licence.
Context
When Toshiba WES is associated with a print queue, a failure of the MS Windows server or spooler may result in the number of WES licenses not appearing in the queue's properties (Main Menu> File Print + queue selection> Properties).
In this case, a error message is displayed in the WES profile interface: "a malfunction has been detected, please consult the application log for more information. The on-board interface is not working properly. This device does not have a valid licence and will be rejected by this server".
Additionally, this problem is traced in the Watchdoc logs (which are stored by default in C: \ Program Files \ Doxense \ Watchdoc \ logs \ Watchdoc.txt), where a JSON error message appears during the service start-up phase.
Resolution
To resolve this issue, use the following procedure:
-
Verify that the server is up-to-date with the latest Watchdoc version;
-
Verify the JSON TOSHIBA error message is present when the service starts;
-
Inventory files that do not properly display licenses;
-
Go to the c: \ Program Files \ Doxense \ Watchdoc \ Data \ queues.jsdb folder;
-
In this folder, locate the problem girls' files and rename them "NOMSERVER.QUEUES_OLD";
-
Restart the Watchdoc service;
-
Check in the queue properties that the WES licenses are displayed correctly.
Error Message "404 page not found" while installing the WES
Context
When installing Xerox WES on Altalink and Versalink models, the error message ‘404 - page not found’ is displayed.
Cause
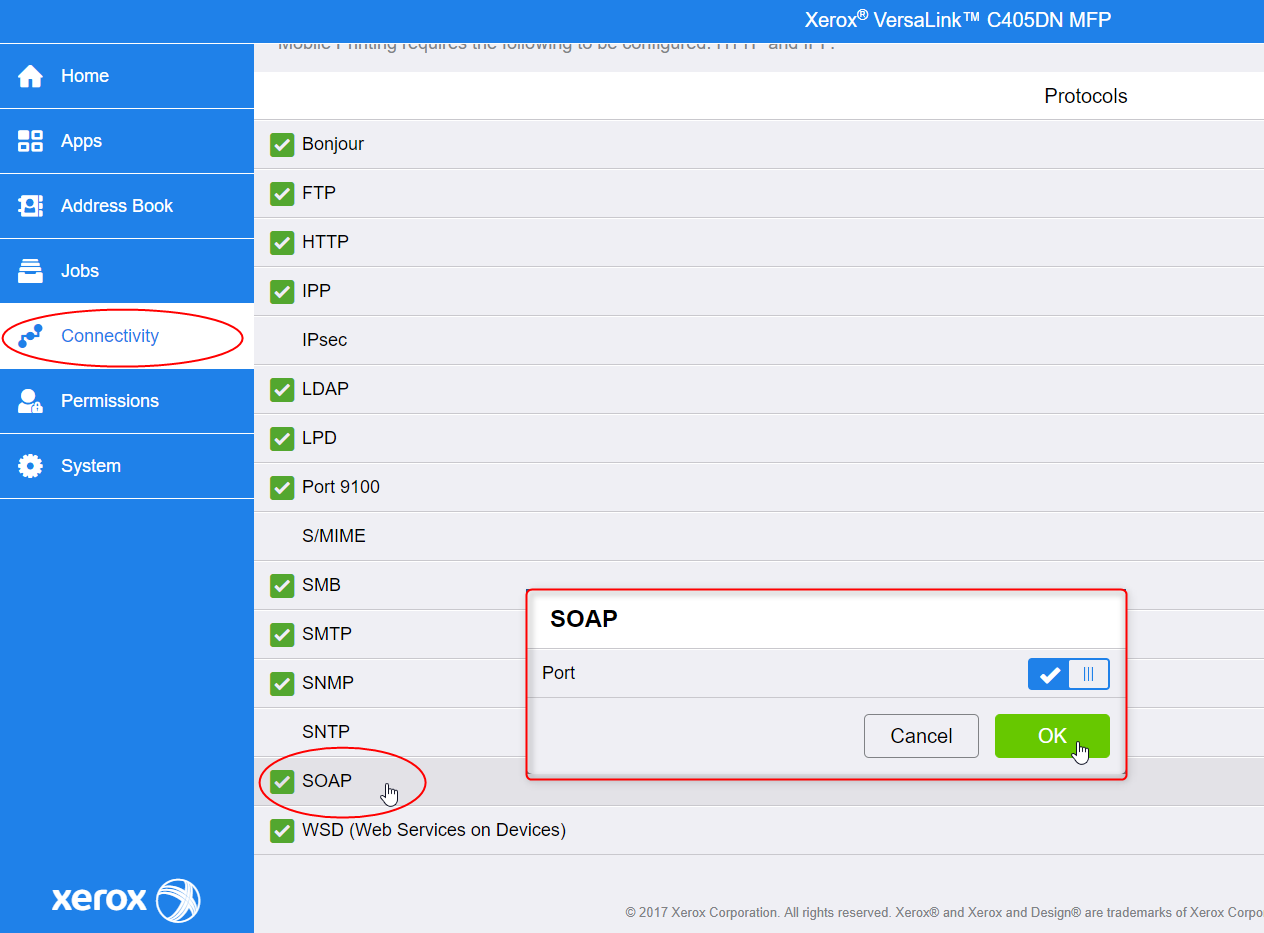
The error is due to the configuration of the device on which the SOAP protocol is not enabled. As a result, the device does not receive information sent by Watchdoc using this protocol.
Resolution
To solve this problem, you need to activate the SOAP protocol on the device. Proceed as follows:
-
Access the device's administration website and authenticate as administrator;
-
From the device administration website menu, click Connectivity>SOAP ;
-
In the dialog box, enable the SOAP protocol;
-
Then continue installing the WES.
Slow loading of the Printers & devices page or error message
Context
After installing Xerox devices, in the Watchdoc administration interface, when I click on Configuration > Printers & devices, the page sometimes takes a long time to appear.
It also sometimes displays the following error message 500:
"500 - Internal server error. There is a problem with the resource you are looking for and it cannot be displayed".
The following lines appear in the log file:
WINSPL|Win32Printer "Spooler Freeze: Windows Spooler took more than"
2,7 seconds to lookup capability COLORDEVICE of device 'XXXX' on port 'XXX.XXX.XXX.XX'
UPLEX of device
MAXEXTENT of device
Cause
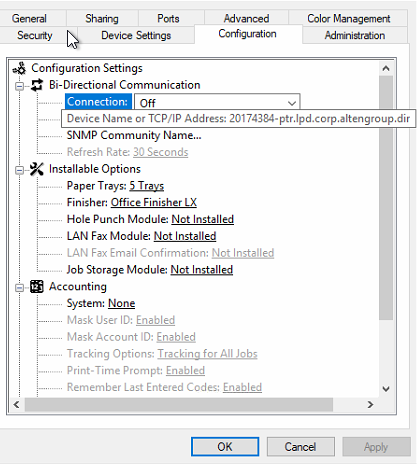
The problem is due to the bidirectionality function activated on the device.
Resolution
To solve this problem, disable bidirectionality and the SNMP port on the device port.
Disable bidirectionality:
-
go to the print device manager;
-
right-click on the Xerox device to open its properties;
-
under the Configuration tab > Configuration Settings > Bi-directional Communication menu,
-
disable the Connection parameter by selecting Off:
Disable SNMP on the port:
-
In the print device manager, locate the port used by the Xerox device;
-
right-click to open its settings;
-
uncheck the SNMP box;
-
Click OK to confirm:
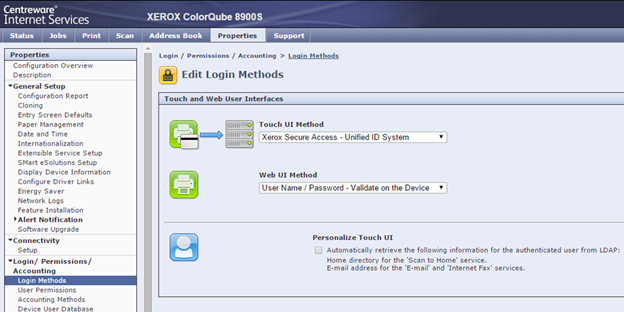
Check the LDAP settings
Procedure
-
From a web browser, log on as an administration in the print device administration web site (https://device_IP)
-
in the tab Properties > Login/Permissions/Accounting > Login Method, check that the "Automatically retrive information from LDAP" box is unticked :
Encoding problem in Cyrillic alphabet.
Context
On Xerox print devices installed in a country using the Cyrillic alphabet, it is observed that not all characters are correctly encoded on the WES.
Cause
This problem depends on the encoding defined in the SNMP Configuration section of the print queue.
Resolution
Check that the encoding set in the WES profile is UTF-8. Once this parameter has been checked and corrected if necessary, it may be necessary to switch the print device off and on again to take account of this change.
Translated with DeepL.com (free version)