Watchdoc - System configuration
Access the configuration interface
From the Main menu of the administration interface
-
in the Configuration section, click on Avanced configuration;
-
in the [Server_Name]>Advanced Configuration interface, click on System configuration:
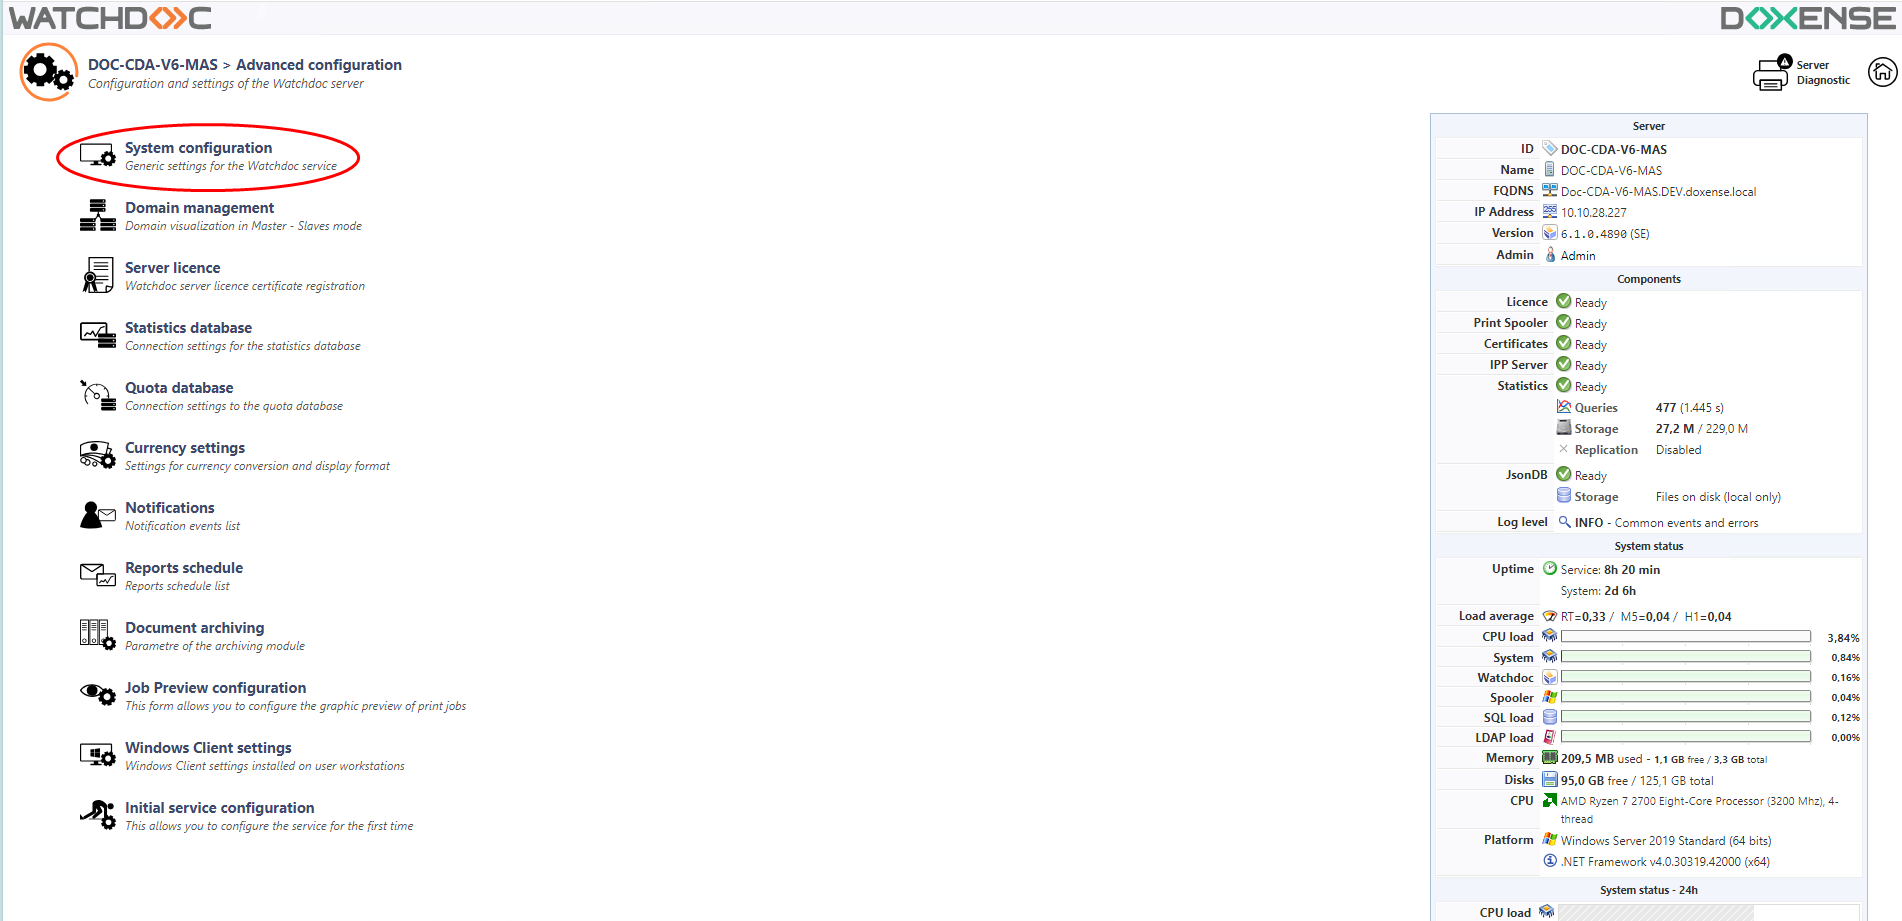
è you access the Watchdoc System Configuration interface.
Some of the information in it are the ones that were entered during the installation of Watchdoc (also in the Initial Service Configuration interface).
Since version 6.0.0.4772 , some of these infrequently used sections are presented in collapsible panels.
General configuration section
-
Server Id: Specify the DNS address or IP address of the server hosting the Watchdoc kernel;
-
Server Name: Enter the explicit name (in natural language) of the server. This name is displayed in the various interfaces and in the statistical reports, so it must be precise. For example: "Printing site of Lille 2nd floor"; "Server Printing Building B"; "Printing server of the commercial pole of Paris".
-
Description: if necessary, complete the name with a description of the server.
-
Location: select the geographical location of the server. This information can be useful in case of physical intervention on the server. For example: "Hosted in server room 2 - 3rd floor". This setting is mandatory to use the Watchdoc Print Clients (for Android, for iOS, for Windows and Skyprint).
-
Tags: enter keywords that can be used as search criteria to easily find the server
-
Regional options:
-
Language: in the list, select the language of the administration website;
-
Schedules: indicate in this field the usual hours of use of the printing devices. Enter the values "0-24" if the printing devices work continuously.
-
Weekend: select from the list the two days during which the printing devices are not used or select the value "No rest day" if the devices operate continuously.
The time and weekend information is mainly used to build the condition "During opening hours" when designing filters. It can also be used in activity reports.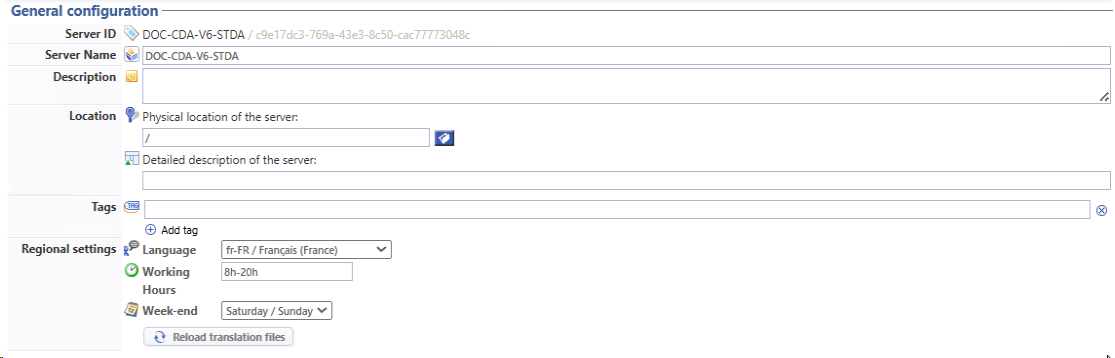
Security Section
-
The Super User is an administrator who has the right to access the administration interface in maintenance mode and is therefore entitled to modify the entire Watchdoc configuration:
-
Password: this is the password allowing access to the administration interface as a Super User. This account allows access to the administration site in maintenance mode. The default password is the one defined during the installation of Watchdoc. If you wish to change it, enter a new password in this field.
-
Prohibit super user access from the network: check the box if you wish, as a precautionary measure, to prevent access in "maintenance" mode in order to reserve access to the administration site exclusively from the print server, i.e. from the "http://localhost/Watchdoc/admin/" url.
-
Use Security Profiles to restrict administration rights by print queue groups: check this box if you want to enable hierarchical administration of queue groups. This way, assistants will be able to be entrusted with the administration of specific groups of queues (see How-to sheet: Enable the delegation of print queue administration).
-
-
Obfuscation: Passwords entered in the Watchdoc administration interface can be secured by enabling an encryption algorithm. When this feature is enabled, passwords no longer appear in the application's configuration file in clear text.
-
Replicate this configuration on all servers: if the configuration takes place on the master server of a domain (master/slave configuration), tick this box if you want to replicate the obfuscation on all the servers that depend on this master server;
-
Enable password obfuscation in the configuration file: the feature is enabled by default: unckeck the box if you want to disable the password obfuscation;
-
Algorithm used for encryption: the AES algorithm is used by default.

-
Network settings section
In this section, define the technical information related to Watchdoc:
-
Hostname
-
Use Default Name: check this box if you want to use the server id (specified in the General Setup section);
-
DNS Server: check this box and fill in the field if you want to use the DNS name assigned to the print server. This name is used in any emails sent to users of the service.
By default, Watchdoc uses the NetBios name of the server, but in case some workstations (connected to the server) cannot resolve the names correctly, as well as if the Server id is likely to change, it is advisable to specify a full DNS name, such as, for example, "server.domain.com" or the IP address (e.g.: 192.168.x.y)
-
-
Public IP:
-
Autodetect public IP address: check this option to let the system detect the public IP of the server itself.
-
IP Address IP: enter directly the IP address of the server if you want to set this address yourself.
-
-
Preferred address: in this section, specify the preferred communication mode with the server Hostname, Server DNS alias, Public IP:
-
Web Site. Indicate the parameters relating to the administration and usage website to which certain links (such as notification emails, for example) should point. In the event that the same Watchdoc server can be addressed by several IIS servers, please specify the "main" website, i.e. the one with the greatest visibility (DNS / firewall) for users.
-
DNS name: indicate the DNS name of the web site; It is strongly advised to use a FQDNS name (e.g. "server.foobar.com") instead of a simple host name ("FOOBAR") to avoid any DNS resolution problem
-
Security: check the box if you want to use the 'https' protocol for web links;
-
HTTP port: indicate the TCP port of the IIS server to access the server;
-
URL prefix: indicate the prefix of the url;
-
Id Server: indicate the server id if it exists.
-
-
Web Console : Allow users to access the unblocker website: check this box to make an unblocker website available to users. In case the unblocking website is authorized, it is necessary to configure it (Main Menu > Configuration section > Web & WES > Web Unblocking Profiles).
-
Stations DNS lookup: Workstation DNS resolution: Specify how Watchdoc can communicate with workstations. These options should only be enabled to troubleshoot issues related to DNS server failures
-
either by converting workstation DNS names to IP addresses;
-
or by converting workstation IP addresses to DNS names:

-
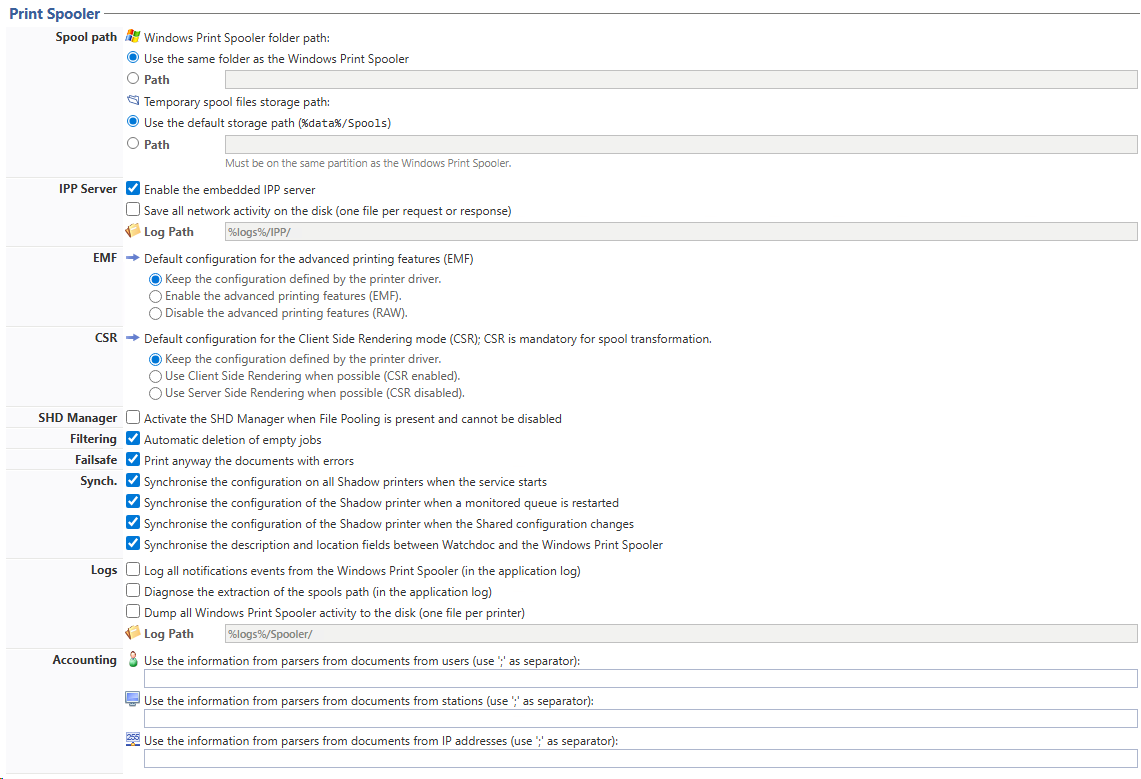
Configure the Print Spooler section
Spool path :
-
Windows Print Spooler folder path: In this section, specify the folder where Windows spooler spools (with the .shd and .spl extensions) are stored;
-
Use the same folder as the Windows Print Spooler: Select this option if you want to use the default folder (C:\Windows\System32\spool\PRINTERS);
-
Path: Select this option if you do not want to use the default folder, and specify the path to the folder where the spool files are stored.
In cluster mode, you must specify the path to the cluster's shared spool directory.
-
-
Temporary spool files storage path: In this section, specify the folder where the Doxense spooler (Custom spooler) spools (with the .shd and .spl extensions) are stored;
-
Use the default storage path: Select this option if you want to use the default folder(%data%/Spools) ;
-
Path: Select this option if you do not want to use the default folder, and specify the path to the folder where the spool files are stored.
Note: For temporary spool files, the folder must be located on the same partition as the Windows Spooler.
-
-
IPP
 The Internet Printing Protocol (IPP) is a specialized communication protocol for communication between client devices (computers, mobile phones, tablets, etc.) and printers (or print servers). It allows clients to submit one or more print jobs to the network-attached printer or print server, and perform tasks such as querying the status of a printer, obtaining the status of print jobs, or cancelling individual print jobs.
(Source: Wickpedia) Server: Check this box to enable printing from Mac® computers or computers running a Linux® environment.
The Internet Printing Protocol (IPP) is a specialized communication protocol for communication between client devices (computers, mobile phones, tablets, etc.) and printers (or print servers). It allows clients to submit one or more print jobs to the network-attached printer or print server, and perform tasks such as querying the status of a printer, obtaining the status of print jobs, or cancelling individual print jobs.
(Source: Wickpedia) Server: Check this box to enable printing from Mac® computers or computers running a Linux® environment.-
Save all network activity on the disk (one file per request or response: Check this box to save print logs, and enter the path to the folder where these files should be saved in the designated field.
-
-
EMF. You can enable or disable the advanced printing features (EMF
Enhanced Metafile (or EMF) is a digital image format for Microsoft Windows systems and some printer drivers. It is an improvement of the WMF (Windows Metafile) image file with data encoded in 32 bits for improved quality.) in Microsoft Windows. During initial setup, we recommend that you keep the default settings defined by the device driver and only change them for troubleshooting purposes. -
CSR
Cross-Site Request Forgery. The aim of this attack is to send an authenticated user a falsified HTTP request pointing to an action internal to the site, so that he executes it without being aware of it and using his own rights. (Source :https://fr.wikipedia.org/wiki/). In a client/server infrastructure, client-side rendering refers to the client workstation handling the spooling process rather than the server. The client workstation therefore sends a finalized spool file to the server. In the initial configuration, we recommend keeping the default settings. The spool transformation feature requires client-side rendering mode to be enabled. -
SHD Manager: This checkbox allows you to enable file pooling when it cannot be enabled or disabled in any other way (on older systems). This setting is disabled by default and should only be changed at the request of Doxense Support if you are having trouble locating spool files;
-
Filtering : some print drivers systematically send a blank document called a "Low Level Local Document" before each print. The filtering function offered by Watchdoc enables these unwanted print jobs to be detected and automatically deleted
-
Automatically delete empty print jobs: Check the box to allow Watchdoc to automatically delete print jobs that do not contain any data.
-
-
Failsafe - Print documents with errors anyway:checked by default, allows Watchdoc to print all print jobs, even if the spool files have errors that prevent metadata interpretation.
In order to avoid blocking a certain number of prints, it is advisable to keep this box checked by default.
- Synchro subsection. Keep the default checkboxes checked:
-
Synchronize shadow printers when the service starts
-
Synchronize Shadow printer when the print thread starts
-
Synchronise Shadow printer when shared configuration is changed
-
Synchronise the Location and Description fields between Watchdoc and the Windows Spooler.
- Logs subsection:
-
Log all notifications events from the Windows Print Spooler (in the application log): check the box to enable recording of notifications;
-
Diagnose spool file path extraction (in the application log):
-
Dump all Windows Print Spooler activity to the disk (one file per printer): check this box to keep a complete trace on a hard disk, then fill in the following field to indicate where the trace file will be saved;
-
Log Path: in this field, specify the path to the file where the complete Windows spooler activity is saved.
-
-
Accounting subsection:
-
Use the information from parsers from documents from users (use ';' as separator): list in this field the users for whom the accounting should use cursor information (separated by a semicolon):
-
Use the information from parsers from documents from stations (use ';' as separator): list in this field the users for whom the accounting should use the cursor information (separated by a semicolon);
-
Use the information from parsers from documents from IP addresses (use ';' as separator): list in this field the IP addresses for which the accounting should use parser information (separated by a semicolon).
-
Configure the DSP section
Since version 5262, the DSP section has been moved to the Web Server management interface (Main menu > configuration section Advanced configuration > Web Server > DSP).
Configure Telemetry section
WSC (Watchdoc Supervision Console) is an add-on to Watchdoc that collects and consolidates telemetry information from Watchdoc print servers by adding a Watchdoc Telemetry Module to each Watchdoc print server. To enable telemetry, WSC and a telemetry module must be installed on each print serve
-
Telemetry: check the box to enable the connection between Watchdoc and WSC, the Watchdoc supervisory console. If applicable, complete the settings for this console:
-
Host: specify the name of the server on which the WD telemetry console is installed (WSC?)
-
Port: Specify the port to access the telemetry server. The default is port 5756;
-
HTTPS: check the box if you want the connection to be secure. By default, the protocol used is HTTPS.
-
Queues: check the box if you want to send to WSC the virtual queues data:

Since version 6.0.0.4800, the activation of telemetry on the master server is automatically replicated on the domain's slaves servers.
-
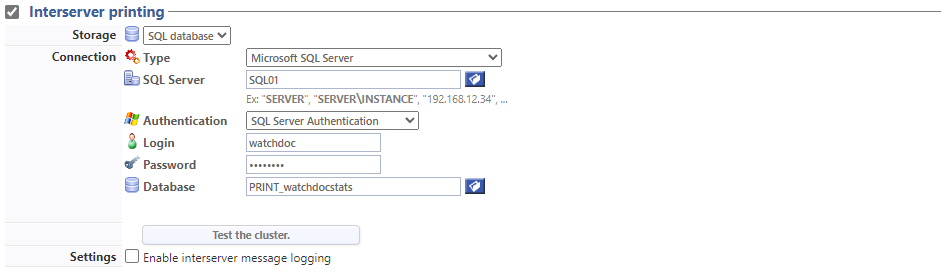
Configure the Interserver printing section
This section is used to enable inter-server printing (if not inherited from the master server) and to define its parameters (see Interserver on-demand printing):
-
Storage: from the drop-down list, select the database used to store queue configuration files (and user data).
-
Connection: if this is an SQL database, complete its configuration:
-
Type: select the type of database from the drop-down list;
-
SQL Server: click on the button to browse the list of servers on which SQL databases are installed;
-
Authentication: from the list, select the authentication mode for accessing the database;
-
User name: for SQL authentication, enter the name of the account authorised to administer the database;
-
Password: enter the password for the account authorised to administer the database;
-
Database: click on the button to browse the list of databases available on the server:
-
-
Test the cluster: at the end of the configuration, click on the button to check that the databases in the cluster are connected. A message informs you of the success of the configuration. If the database is not correctly configured, messages will be displayed to inform you of the nature of the connectivity problem between the databases.
-
Settings: tick the box if you wish to activate logs of messages exchanged between servers.
Configure the NetPOD section
NetPOD is an old-fashioned terminal (CopiCod-IP type) connected to a printing device, allowing a PUK code to be entered or a badge to be read to unlock pending print jobs.
If you are using NetPOD, specify :
-
Port: specify the port used to access the NetPOD server (5743 by default);
-
Logs: specify which activity traces you wish to keep:
-
log server activity
-
record the activity of connected clients
-
record orders received from customers
-
save all activity: if you tick this option, specify the path to the folder in which the logs are saved in the Path field:

-
Configure the TCPConv / Elatec section
TCPConv from Elatec is a device equipped with a USB or RS232 port for integrating devices into the local area network (LAN). Simply insert TCPConv into your device's existing LAN connection. To do this, TCPConv contains 2 LAN ports, which work like a network switch.
-
Port: enter the default port to the TCPConv server (if it is not the default port 5743);

Configure the LDAP section
This section only concerns WESs using OpenPlatform technology: it contains information enabling Watchdoc to be contacted by the WES in the same way as an LDAP directory.
-
Server Port: enter the access LDAP server port (if it is not the default port)

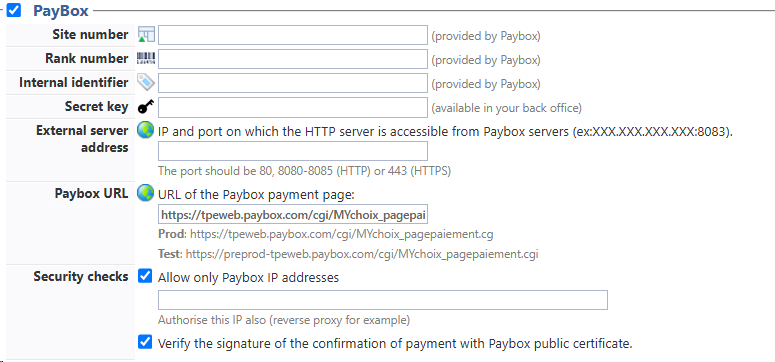
Configure the Paybox section
Paybox® (marketed by Verifone e-commerce) is a third-party online payment application compatible with a large number of French banks that can be associated with Watchdoc to ensure the payment of printing jobs when they are subject to payment. If Watchdoc works with the Paybox solution for payment of print jobs, the parameters need to be specified.
-
in the Paybox section , fill in the fields with the following parameters::
-
Site number: enter the site number provided by Paybox;
-
Rank number: Enter the rank number provided by Paybox;
-
Internal ID: Enter the internal ID provided by Paybox;
-
Secret key: enter the key provided by Paybox and made available to you in the customer area (Back office) or the following test key: 0123456789ABCDEF0123456789ABCDEF0123456789ABCDEF0123456789ABCDEF0123456789ABCDEF;
-
External server address; enter the IP address (or FQDN if you use port 443 and certificate) and port (80, 8080-8085 (HTTP) or 443 (HTTPS)) through which to access the Paybox site;
-
Paybox URL: Enter the URL to call the Paybox payment page;
-
Security Checks:
-
Allow only Paybox IP addresses: check the box to restrict payment confirmation to Paybox addresses only. Uncheck the box if the payment confirmation requests another system and indicate the IP of this system if necessary (IP of a reverse proxy, for example);
-
verify the signature: check the box to verify the signature with the Paybox public certificate.
-
-
Configure the Izly section
Izly is the digital wallet launched by Groupe BPCE for the CNUS and CROUS in 2015. It replaces the Moneo system and allows students and university staff to pay quickly and securely at university restaurants, cafeterias, vending machines, laundromats, and photocopiers, as well as on the online ordering sites of higher education institutions.
- Izly: Check the box to enable the connection between Watchdoc and Izly for payment of print jobs. If applicable, enter the settings for the Izly account (provided by CapMonétique):
-
SAM Number: enter your SAM number;
-
Crous Number: enter your organisation Crous reference number;
-
Izly URL: enter the Izly site URL;
-
Licence Key: Enter the Izly application license key provided by Cap Monétique

-
Configure the Scan to Url section
When a scanned file exceeds a certain weight, it is not sent to the recipient as an email attachment, but as a url link. The recipient can then retrieve the document by clicking on the url.
To set up this function, complete the following parameters:
-
Proxy address: enter the proxy address if there is one; if left blank, large files will be saved in a folder on the Watchdoc server by default
-
Proxy route path : specify the proxy route if it exists;
-
Link validity: indicate in the field the time (1 h. min.) during which the scanned file remains downloadable. After this time, the scanned file is automatically deleted and the download link becomes invalid.

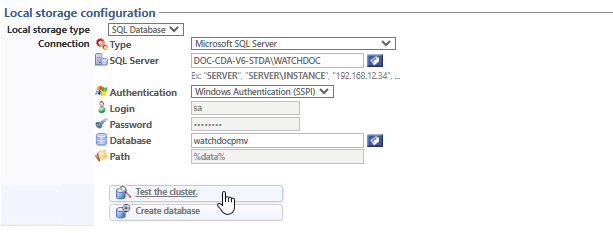
Configure the local storage section
Watchdoc's Json database (JsonDb) is used to store certain cold information such as the stages of a scan, for example.
Some security programs may lock files stored in the JsonDb, causing problems.
This section allows you to configure local storage to change the way JsonDB files are kept: as files on disks by default or in a SQL server to avoid locking.
If you opt for database storage, you need to create a specific database on each server.
-
Configure the storage:
-
Local storage type: from the list, select the storage type (Files on disk by default or SQL database). For an SQL database, specify :
-
Connection :
-
Type: specify the type of database used;
-
SQL server: enter the path to the server or click on the
 button to select the server from those available in your work environment;
 - Authentication: specify the type of authentication. For MS SQL authentication, specify the details of an account authorised to connect:
login
password
-
Database: enter the path to the database or click on the
button to select the database from those available in your work environment;
-
-
Path: for an SQLite base, enter the path.
-
-
Click the button
-
Test to check the access to the configured database;
-
Create if you create a data base for the local storage purpose.
-
Configure the Miscellaneous section
-
Create a backup copy of the configuration at startup: check this box if you want to keep a file in which the application configuration is saved. By default, a backup copy of the Watchdoc configuration file is made each time the service is restarted. For performance reasons, some trivial configuration changes are not saved immediately to disk.
-
Disable configuration file write cache: check this box to disable the cache
-
Disable all Easter eggs: check this box if you do not want the Easter eggs embedded in the Watchdoc application to appear